ASRock Z77 Pro3 Quick Installation Guide
ASRock Z77 Pro3 Manual
 |
View all ASRock Z77 Pro3 manuals
Add to My Manuals
Save this manual to your list of manuals |
ASRock Z77 Pro3 manual content summary:
- ASRock Z77 Pro3 | Quick Installation Guide - Page 1
, please follow the related regulations in advance. "Perchlorate Material-special handling may apply, see www.dtsc.ca.gov/hazardouswaste/perchlorate" ASRock Website: http://www.asrock.com Published February 2012 Copyright©2012 ASRock INC. All rights reserved. 1 ASRock Z77 Pro3 Motherboard English - ASRock Z77 Pro3 | Quick Installation Guide - Page 2
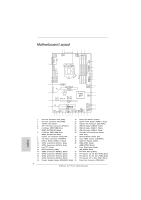
2.0 x16 Slot (PCIE3, Black) 16 SATA2 Connectors (SATA2_4, Black) 33 PCI Express 3.0 x16 Slot (PCIE2, Black) 17 SATA2 Connectors (SATA2_5, Black) 34 PCI Express 2.0 x1 Slot (PCIE1, Black) 18 Chassis Speaker Header (SPEAKER1, Black) 35 Power Fan Connector (PWR_FAN1) 2 ASRock Z77 Pro3 Motherboard - ASRock Z77 Pro3 | Quick Installation Guide - Page 3
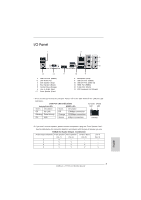
Bass (Orange) 6 Line In (Light Blue) ** 7 Front Speaker (Lime) 10 9 8 Microphone (Pink) 9 USB 2.0 Ports (USB23) 10 USB 3.0 Ports (USB3_23) 11 HDMI Port (HDMI1) 12 D-Sub Port ( (No. 5) (No. 6) 2 V -- -- -- 4 V V -- -- 6 V V V -- 8 V V V V English 3 ASRock Z77 Pro3 Motherboard - ASRock Z77 Pro3 | Quick Installation Guide - Page 4
HDA Primary output" to use Rear Speaker, Central/Bass, and Front Speaker, or select "Realtek HDA Audio 2nd output" to use front panel audio. English 4 ASRock Z77 Pro3 Motherboard - ASRock Z77 Pro3 | Quick Installation Guide - Page 5
Contents ASRock Z77 Pro3 Motherboard (ATX Form Factor: 12.0-in x 7.6-in, 30.5 cm x 19.3 cm) ASRock Z77 Pro3 Quick Installation Guide ASRock Z77 Pro3 Support CD 2 x Serial ATA (SATA) Data Cables (Optional) 1 x I/O Panel Shield ASRock Reminds You... To get better performance in Windows® 7 / 7 64 - ASRock Z77 Pro3 | Quick Installation Guide - Page 6
CPU. Pixel Shader 4.1, DirectX 10.1 with Intel® Sandy Bridge CPU - Max. shared memory 1760MB (see CAUTION 5) - Dual VGA Output: support HDMI and D-Sub ports by independent display controllers - Supports HDMI 1.4a Technology with max. resolution up to 1920x1200 @ 60Hz ASRock Z77 Pro3 Motherboard - ASRock Z77 Pro3 | Quick Installation Guide - Page 7
(supports 2 USB 3.0 ports), supports USB 1.0/2.0/3.0 up to 5Gb/s - 4 x SATA2 3.0 Gb/s connectors, support RAID (RAID 0, RAID 1, RAID 5, RAID 10, Intel Rapid Storage and Intel Smart Response Technology), NCQ, AHCI and Hot Plug functions - 2 x SATA3 6.0Gb/s connectors 7 ASRock Z77 Pro3 Motherboard - ASRock Z77 Pro3 | Quick Installation Guide - Page 8
which are GPU integrated. - ASRock On/Off Play Technology (see CAUTION 18) - Hybrid Booster: - CPU Frequency Stepless Control (see CAUTION 19) - ASRock U-COP (see CAUTION 20) - Boot Failure Guard (B.F.G.) - Combo Cooler Option (C.C.O.) (see CAUTION 21) - Good Night LED ASRock Z77 Pro3 Motherboard - ASRock Z77 Pro3 | Quick Installation Guide - Page 9
an Ivy Bridge CPU. If you install a Sandy Bridge CPU, the PCI Express will run only at PCI Express Gen 2 speed. 5. The maximum shared memory size is defined by the chipset vendor and is subject to change. Please check Intel® website for the latest information. English 9 ASRock Z77 Pro3 Motherboard - ASRock Z77 Pro3 | Quick Installation Guide - Page 10
your PC enters into Standby mode (S1), Suspend to RAM (S3), hibernation mode (S4) or power off (S5). With APP Charger driver installed, you can easily enjoy the marvelous charging experience. ASRock website: http://www.asrock.com/Feature/AppCharger/index.asp 10 ASRock Z77 Pro3 Motherboard English - ASRock Z77 Pro3 | Quick Installation Guide - Page 11
HD videos and download simultaneously. Real-Time Analysis of Your Data: With the status window, you can easily recognize which data streams you are transferring currently. 14. ASRock XFast RAM is a new function that is included into ASRock Extreme Tuning Utility (AXTU). It fully utilizes the memory - ASRock Z77 Pro3 | Quick Installation Guide - Page 12
CPU cooler types, Socket LGA 775, LGA 1155 and LGA 1156. Please be noticed that not all the 775 and 1156 CPU Fan can be used. 22. ASRock XFast RAM is not supported by Microsoft® Windows® XP / XP 64-bit. Intel® Smart Connect Technology and Intel® USB 3.0 ports are not supported by Microsoft® Windows - ASRock Z77 Pro3 | Quick Installation Guide - Page 13
so may damage the motherboard. Before you install or remove any component, ensure that the power is switched off or the power cord is detached from the power supply. Failure to do so may cause severe damage to the motherboard, peripherals, and/or components. 13 ASRock Z77 Pro3 Motherboard English - ASRock Z77 Pro3 | Quick Installation Guide - Page 14
Intel 1155-Pin CPU, please follow the steps below. Load Plate Load Lever Contact Array Socket Body 1155-Pin Socket Overview Before you insert the 1155-Pin CPU into the socket, please check if the CPU must be placed if returning the motherboard for after service. 14 ASRock Z77 Pro3 Motherboard - ASRock Z77 Pro3 | Quick Installation Guide - Page 15
3-4. Verify that the CPU is within the socket and properly mated to the orient keys. Step 4. Close the socket: Step 4-1. Flip the load plate onto the IHS. Step 4-2. Press down the load lever, and secure it with the load plate tab under the retention tab. English 15 ASRock Z77 Pro3 Motherboard - ASRock Z77 Pro3 | Quick Installation Guide - Page 16
components. Please be noticed that this motherboard supports Combo Cooler Option (C.C.O.), which provides flexible options to adopt three different CPU cooler types, Socket LGA 775, LGA 1155 and LGA 1156. The white throughholes are for Socket LGA 1155/1156 CPU fan. 16 ASRock Z77 Pro3 Motherboard - ASRock Z77 Pro3 | Quick Installation Guide - Page 17
this motherboard. It is not recommended to install them on this motherboard. 6. For optimal compatibility and stability while overclocking memory frequency, it is recommended to install one memory module in DDR3_B2 slot or two memory modules in DDR3_A2 and DDR3_B2 slots. English 17 ASRock Z77 Pro3 - ASRock Z77 Pro3 | Quick Installation Guide - Page 18
cause permanent damage to the motherboard and the DIMM if you force the DIMM into the slot at incorrect orientation. Step 3. Firmly insert the DIMM into the slot until the retaining clips at both ends fully snap back in place and the DIMM is properly seated. English 18 ASRock Z77 Pro3 Motherboard - ASRock Z77 Pro3 | Quick Installation Guide - Page 19
slot that you intend to use. Keep the screws for later use. Step 4. Align the card connector with the slot and press firmly until the card is completely seated on the slot. Step 5. Fasten the card to the chassis with screws. Step 6. Replace the system cover. 19 ASRock Z77 Pro3 Motherboard English - ASRock Z77 Pro3 | Quick Installation Guide - Page 20
in the future, please refer to AMD graphics card manuals for detailed installation guide. Step 1. Insert one Radeon graphics card into PCIE2 slot and the other Radeon graphics card to PCIE3 slot. Make sure that the cards are properly seated on the slots. 20 ASRock Z77 Pro3 Motherboard English - ASRock Z77 Pro3 | Quick Installation Guide - Page 21
3. Connect the DVI monitor cable to the DVI connector on the Radeon graphics card on PCIE2 slot. (You may use the DVI to D-Sub adapter to convert the DVI connector to D-Sub interface, and then connect the D-Sub monitor cable to the DVI to D-Sub adapter.) English 21 ASRock Z77 Pro3 Motherboard - ASRock Z77 Pro3 | Quick Installation Guide - Page 22
"ATI Catalyst Control Center" on your Windows® taskbar. ATI Catalyst Control Center Step 6. Double-click "ATI Catalyst Control Center". Click "View", select "CrossFireXTM", and then check the item "Enable CrossFireXTM". Select "2 GPUs" and click "Apply". English 22 ASRock Z77 Pro3 Motherboard - ASRock Z77 Pro3 | Quick Installation Guide - Page 23
restarting your computer, please confirm whether the option "Enable CrossFireTM" in "AMD Catalyst Control Center" is selected or not; if not, please select it again, and then you are CrossFireXTM technology, please check AMD's website for updates and details. 23 ASRock Z77 Pro3 Motherboard English - ASRock Z77 Pro3 | Quick Installation Guide - Page 24
our support CD to your system, you can freely enjoy the benefits of dual monitor function after your system boots. If you haven't installed the onboard VGA driver yet, please install the onboard VGA driver from our support CD to your system and restart your computer. 24 ASRock Z77 Pro3 Motherboard - ASRock Z77 Pro3 | Quick Installation Guide - Page 25
memory. If you do not adjust the UEFI setup, the default value of "Share Memory", [Auto], will disable D-Sub function when an add-on VGA card is inserted to this motherboard. 4. Install the onboard VGA driver and the add-on PCI Express VGA card driver to six. 25 ASRock Z77 Pro3 Motherboard English - ASRock Z77 Pro3 | Quick Installation Guide - Page 26
to the instructions below for more details about HDCP function. What is HDCP? HDCP stands for High-Bandwidth Digital Content Protection, a specification developed by Intel® for protecting recommended that the HDTV or LCD monitor you purchase is compatible. 26 ASRock Z77 Pro3 Motherboard English - ASRock Z77 Pro3 | Quick Installation Guide - Page 27
from MCE Remote Controller, please try support Hot-Plug function. Please install it before you boot the system. * ASRock Smart Remote is only supported by some of ASRock motherboards. Please refer to ASRock website for the motherboard support list: http://www.asrock.com 27 ASRock Z77 Pro3 Motherboard - ASRock Z77 Pro3 | Quick Installation Guide - Page 28
updating the BIOS, you must boot up the system first, and then shut it down before you do the clear-CMOS action. Please be noted that the password, date, time, user default profile, 1394 GUID and MAC address will be cleared only if the CMOS battery is removed. English 28 ASRock Z77 Pro3 Motherboard - ASRock Z77 Pro3 | Quick Installation Guide - Page 29
be connected to the SATA / SATA2 / SATA3 hard disk or the SATA2 / SATA3 connector on this motherboard. Besides four default USB 2.0 ports on the I/O panel, there are three USB 2.0 headers on this motherboard. Each USB 2.0 header can support two USB 2.0 ports. English 29 ASRock Z77 Pro3 Motherboard - ASRock Z77 Pro3 | Quick Installation Guide - Page 30
control of audio devices. 1. High Definition Audio supports Jack Sensing, but the panel wire on the chassis must support HDA to function correctly. Please follow the instruction in our manual and chassis manual don't need to connect them for AC'97 audio panel. 30 ASRock Z77 Pro3 Motherboard English - ASRock Z77 Pro3 | Quick Installation Guide - Page 31
Select "Recorder". Then click "FrontMic". For Windows® 7 / 7 64-bit / VistaTM / VistaTM 64-bit OS: Go to the "FrontMic" Tab in the Realtek Control panel. Adjust "Recording Volume". System Panel Header DUMMY Please connect the chassis speaker to this header. 31 ASRock Z77 Pro3 Motherboard English - ASRock Z77 Pro3 | Quick Installation Guide - Page 32
motherboard, please connect it to Pin 1-3. Pin 1-3 Connected 3-Pin Fan Installation (3-pin CPU_FAN2) (see p.2, No. 2) GND +12V CPU_FAN_SPEED ATX Power Connector (24-pin ATXPWR1) (see p.2, No. 8) 12 24 1 13 Please connect an ATX power supply to this connector. English 32 ASRock Z77 Pro3 - ASRock Z77 Pro3 | Quick Installation Guide - Page 33
No. 28) 4-Pin ATX 12V Power Supply Installation 4 1 This COM1 header supports a serial port module. card, allows the system to connect HDMI Digital TV/ projector/LCD devices. Please connect the HDMI_SPDIF connector of HDMI VGA card to this header. English 33 ASRock Z77 Pro3 Motherboard - ASRock Z77 Pro3 | Quick Installation Guide - Page 34
XP 64-bit. Using SATA / SATA2 / SATA3 HDDs without NCQ function STEP 1: Set Up UEFI. A. Enter UEFI SETUP UTILITY Advanced screen Storage Configuration. B. Set the option "SATA Mode Selection" to [IDE]. STEP 2: Install Windows® XP / XP 64-bit OS on your system. 34 ASRock Z77 Pro3 Motherboard English - ASRock Z77 Pro3 | Quick Installation Guide - Page 35
/ SATA2 / SATA3 HDDs with NCQ function STEP 1: Set Up UEFI. A. Enter UEFI SETUP UTILITY Advanced screen Storage Configuration. B. Set the option "SATA Mode Selection" to [AHCI]. STEP 2: Install Windows® 7 / 7 64-bit / VistaTM / VistaTM 64-bit OS on your system. 35 ASRock Z77 Pro3 Motherboard English - ASRock Z77 Pro3 | Quick Installation Guide - Page 36
about BIOS Setup, please refer to the User Manual (PDF file) contained in the Support CD. 4. Software Support CD information This motherboard supports various Microsoft® Windows® operating EXE" from the BIN folder in the Support CD to display the menus. 36 ASRock Z77 Pro3 Motherboard English - ASRock Z77 Pro3 | Quick Installation Guide - Page 37
Kartoninhalt ASRock Z77 Pro3 Motherboard (ATX-Formfaktor: 30.5 cm x 19.3 cm; 12.0 Zoll x 7.6 Zoll) ASRock Z77 Pro3 Schnellinstallationsanleitung ASRock Z77 Pro3 Support-CD Zwei Serial ATA (SATA) -Datenkabel (optional) Ein I/O Shield ASRock erinnert... Zur besseren Leistung unter Windows® 7 / 7, 64 - ASRock Z77 Pro3 | Quick Installation Guide - Page 38
ösungen: Intel® Quick-Sync-Video 2.0, Intel® InTruTM 3D, Intel® ClearVideo-Technik (HD), Intel® InsiderTM, Intel® HD Graphics 2500/4000 - Pixel Shader 5.0, DirectX 11 mit Intel® Ivy Bridge-Prozessor, Pixel Shader 4.1, DirectX 10.1 mit Intel® Sandy BridgeProzessor ASRock Z77 Pro3 Motherboard Deutsch - ASRock Z77 Pro3 | Quick Installation Guide - Page 39
tzt THX TruStudioTM - PCIE x1 Gigabit LAN 10/100/1000 Mb/s - Realtek RTL8111E 10, Intel Rapid Storage und Intel Smart Response-Technologie), NCQ-, AHCI-und Hot Plug Funktionen - 2 x USB 3.0-Ports an der Rückseite, unterstützt USB 1.0/2.0/3.0 mit bis zu 5 Gb/s Deutsch 39 ASRock Z77 Pro3 Motherboard - ASRock Z77 Pro3 | Quick Installation Guide - Page 40
11) - ASRock XFast USB (siehe VORSICHT 12) - ASRock XFast LAN (siehe VORSICHT 13) - ASRock XFast RAM (siehe VORSICHT 14) - ASRock Crashless BIOS (siehe VORSICHT 15) - ASRock OMG (Online Management Guard) (siehe VORSICHT 16) - Lucid Virtu Universal MVP (siehe VORSICHT 17) ASRock Z77 Pro3 Motherboard - ASRock Z77 Pro3 | Quick Installation Guide - Page 41
Wir übernehmen keine Verantwortung für mögliche Schäden, die aufgrund von Overclocking verursacht wurden. Deutsch VORSICHT! 1. Die Einstellung der "Hyper-Threading Technology", finden Sie auf Seite 51 des auf der Support-CD enthaltenen Benutzerhandbuches beschrieben. 41 ASRock Z77 Pro3 Motherboard - ASRock Z77 Pro3 | Quick Installation Guide - Page 42
. Mithilfe dieses praktischen BIOS-Aktualisierungswerkzeugs können Sie das System-BIOS aktualisieren, ohne dafür zuerst Betriebssysteme wie MS-DOS oder Windows® aufrufen zu müssen. Mit diesem Programm bekommen Sie durch Drücken der -Taste während des 42 ASRock Z77 Pro3 Motherboard Deutsch - ASRock Z77 Pro3 | Quick Installation Guide - Page 43
ASRock XFast RAM ist eine neue Funktion, die beim ASRock Extreme Tuning Utility (AXTU) integriert ist. Sie ermöglicht die vollständige Nutzung des Speicherplatzes, der unter Windows®-Betriebssystemen mit 32-Bit-CPU nicht verwendet werden kann. ASRock XFast RAM verkürzt 43 ASRock Z77 Pro3 Motherboard - ASRock Z77 Pro3 | Quick Installation Guide - Page 44
CPU und Kühlkörper zu sprühen. 21. Die Combo-Kühleroption bietet die flexible Möglichkeit zur Aufnahme von drei verschiedenen CPU-Kühlertypen, Socket LGA 775, LGA 1155 und LGA 1156. Beachten Sie bitte, dass nicht alle 775 und 1156 CPU-Lüfter verwendet werden können. 44 ASRock Z77 Pro3 Motherboard - ASRock Z77 Pro3 | Quick Installation Guide - Page 45
ASRock XFast RAM wird von Microsoft® Windows® XP / XP 64 Bit nicht unterstützt. Intel® Smart Connect-Technologie und Intel® USB 3.0-Ports wird von Microsoft® Windows finiertes Profil, 1394 GUID und MAC-Adresse nur gelöscht werden, wenn die CMOS-Batterie entfernt wird. 45 ASRock Z77 Pro3 Motherboard - ASRock Z77 Pro3 | Quick Installation Guide - Page 46
und Anschlüsse. Wenn Sie Jumperkappen auf Header und Anschlüsse setzen, wird das Motherboard unreparierbar beschädigt! Seriell-ATA2-Anschlüsse (SATA2_2: siehe S.2 - No. 14 am Motherboard. Pro USB 2.0Anschlussleiste werden zwei USB 2.0-Ports unterstützt. Deutsch 46 ASRock Z77 Pro3 Motherboard - ASRock Z77 Pro3 | Quick Installation Guide - Page 47
Consumer Infrared-Modul-Header (4-pin CIR1) (siehe S.2 - No. 25) 1 GND IRTX IRRX ATX+5VSB Dieser Header unterstützt ein optionales, drahtloses Sendeund Empfangs-Infrarotmodul. Dieser Header kann zum Anschließen glichkeit und Kontrolle über Audio-Geräte. 1 Deutsch 47 ASRock Z77 Pro3 Motherboard - ASRock Z77 Pro3 | Quick Installation Guide - Page 48
die AC'97-Audioleiste angeschlossen werden. E. So aktivieren Sie das Mikrofon an der Vorderseite. Bei den Betriebssystemen Windows® XP / XP 64 Bit: Wählen Sie „Mixer". Wählen Sie „Recorder" (Rekorder). Klicken Sie in den Modi S4 befindet oder ausgeschaltet ist (S5). 48 ASRock Z77 Pro3 Motherboard - ASRock Z77 Pro3 | Quick Installation Guide - Page 49
CHA_FAN2unterstützen Lüftersteuerung. CPU-Lüfteranschluss (4-pin CPU_FAN1) (siehe S.2 - No. 1) FAN_SPEED_CONTROL CPU_FAN_SPEED +12V GND 1 2 3 4 Verbinden Sie das CPU Lüfterkabel mit diesem Anschluss und passen Sie den schwarzen Draht dem Erdungsstift an. 49 ASRock Z77 Pro3 Motherboard Deutsch - ASRock Z77 Pro3 | Quick Installation Guide - Page 50
zusammen mit dem Pin 1 und Pin 5 ein. 8 5 COM-Anschluss-Header (9-pin COM1) (siehe S.2 - No. 28) Installation der 4-Pin ATX 12V Energieversorgung 4 1 Dieser COM-Anschluss- Header wird verwendet, um ein COM-Anschlussmodul zu unterstützen. 50 ASRock Z77 Pro3 Motherboard Deutsch - ASRock Z77 Pro3 | Quick Installation Guide - Page 51
im BIN-Verzeichnis der Support-CD, um die Menüs aufzurufen. Das Setup-Programm soll es Ihnen so leicht wie möglich machen. Es ist menügesteuert, d.h. Sie können in den verschiedenen Untermenüs Ihre Auswahl treffen und die Programme werden dann automatisch installiert. 51 ASRock Z77 Pro3 Motherboard - ASRock Z77 Pro3 | Quick Installation Guide - Page 52
performances sous Windows® 7 / 7 64 bits / VistaTM / VistaTM 64 bits, il est recommandé de paramétrer l'option BIOS dans Configuration de stockage en mode AHCI. Pour plus de détails sur l'installation BIOS, référez-vous au "Mode d'emploi" sur votre CD de support. 52 ASRock Z77 Pro3 Motherboard Fran - ASRock Z77 Pro3 | Quick Installation Guide - Page 53
les sorties VGA sont uniquement pris en charge par les processeurs à GPU intégré. - Supporte Intel® HD Graphics Built-in Visuals: Intel® Quick Sync Video 2.0, Intel® InTruTM 3D, Intel® Clear Video HD Technology, Intel® InsiderTM, Intel® HD Graphics 2500/4000 53 ASRock Z77 Pro3 Motherboard Français - ASRock Z77 Pro3 | Quick Installation Guide - Page 54
compatible HDMI requis) (voir ATTENTION 6) - Prise en charge de la fonction HDCP avec ports HDMI - Supporter THX TruStudioTM - PCIE x1 Gigabit LAN 10/100/1000 Mb/s - Realtek RTL8111E - Support du Wake-On- 10, Intel Rapid Storage et Intel Smart Response), NCQ, AHCI et Hot ASRock Z77 Pro3 Motherboard - ASRock Z77 Pro3 | Quick Installation Guide - Page 55
6.5 Trial, Suite multimédia ASRock MAGIX - OEM - Utilitaire ASRock Extreme Tuning (AXTU) (voir ATTENTION 8) - ASRock l'Instant Boot - ASRock Instant Flash (voir ATTENTION 9) - Chargeur ASRock APP (voir ATTENTION 10) - ASRock SmartView (voir ATTENTION 11) 55 ASRock Z77 Pro3 Motherboard Français - ASRock Z77 Pro3 | Quick Installation Guide - Page 56
rature de l'unité centrale) - Commande de ventilateur CPU/Châssis à plusieurs vitesses - Monitoring de la tension: +12V, +5V, +3.3V, Vcore OS - Microsoft® Windows® 7 / 7 64-bit / VistaTM / VistaTM pas responsables des dommages possibles causés par l'overclocking. 56 ASRock Z77 Pro3 Motherboard - ASRock Z77 Pro3 | Quick Installation Guide - Page 57
du CPU ne sont pas utilisées, sans diminuer les performances de l'ordinateur. Veuillez visiter notre site Web pour plus d'informations sur l'utilisation des fonctions de l'utilitaire ASRock Extreme Tuning Utility (AXTU). Site Web de ASRock : http://www.asrock.com 57 ASRock Z77 Pro3 Motherboard Fran - ASRock Z77 Pro3 | Quick Installation Guide - Page 58
-DOS ou o Windows®. Com este utilitário, poderá premir a tecla durante o teste de arranque POST ou premir a tecla para exibir o menu de configuração do BIOS para aceder ao ASRock Instant Flash. Execute de données que vous êtes en train de transférer. 58 ASRock Z77 Pro3 Motherboard Français - ASRock Z77 Pro3 | Quick Installation Guide - Page 59
débranchez le cordon d'alimentation, puis rebranchez-le. Pour améliorer la dissipation de la chaleur, n'oubliez pas de mettre de la pâte thermique entre le CPU le dissipateur lors de l'installation du PC. 59 ASRock Z77 Pro3 Motherboard Français - ASRock Z77 Pro3 | Quick Installation Guide - Page 60
CPU, les sockets LGA 775, LGA 1155 et LGA 1156. Veuillez noter que tous les ventilateurs de CPU 775 et 1156 ne peuvent pas être utilisés. 22. ASRock XFast RAM n'est pas pris en charge par Microsoft® Windows® XP / XP 64-bit. Les technologie Intel de détails. 60 ASRock Z77 Pro3 Motherboard Français - ASRock Z77 Pro3 | Quick Installation Guide - Page 61
ème, puis l'éteindre avant de continuer avec l'opération d'effacement du CMOS. Veuillez noter que le mot de passe, la date, l'heure, le profil par défaut de l'utilisateur, 1394 GUID et l'adresse MAC seront effacés seulement si la batterie du CMOS est enlevée. Français 61 ASRock Z77 Pro3 Motherboard - ASRock Z77 Pro3 | Quick Installation Guide - Page 62
2.0 par défaut sur le panneau E/S, il y a trois embases USB 2.0 sur cette carte mère. Chaque embase USB 2.0 peut prendre en charge 2 ports USB 2.0. Français 62 ASRock Z77 Pro3 Motherboard - ASRock Z77 Pro3 | Quick Installation Guide - Page 63
IRTX +5VSB DUMMY 1 GND IRRX Cet en-tête supporte un module infrarouge optionnel de transfert et de ré No. 25) 1 GND IRTX IRRX ATX+5VSB Cette barrette peut être utilis pour fonctionner correctement. Veuillez suivre les instructions dans notre manuel et le manuel de ASRock Z77 Pro3 Motherboard - ASRock Z77 Pro3 | Quick Installation Guide - Page 64
". Sélectionnez "Recorder" (Enregistreur). Puis cliquez sur "FrontMic" (Micro avant). Pour les systèmes d'exploitation Windows® 7 / 7 64 bits / VistaTM / VistaTM 64 bits : Allez sur l'onglet "FrontMic" (Micro bien à faire correspondre les fils et les broches. 64 ASRock Z77 Pro3 Motherboard Français - ASRock Z77 Pro3 | Quick Installation Guide - Page 65
le ventilateur de CPU à 3 broches au connecteur du ventilateur de CPU sur cette carte mère, veuillez le connecter aux broches 1-3. Installation de ventilateur à 3 broches Broches 1-3 connectées (CPU_FAN2 br. 3) (voir p.2 No. 2) GND +12V CPU_FAN_SPEED Français 65 ASRock Z77 Pro3 Motherboard - ASRock Z77 Pro3 | Quick Installation Guide - Page 66
20-Installation de l'alimentation électrique ATX 1 13 Connecteur ATX 12V (ATX12V1 br.8) (voir p.2 No. 4) 8 5 4 1 Veuillez connecter une unité d'alimentation électrique ATX 12V sur ce connecteur. Bien HDMI_SPDIF de la carte VGA HDMI sur ce connecteur. 66 ASRock Z77 Pro3 Motherboard - ASRock Z77 Pro3 | Quick Installation Guide - Page 67
sur le BIOS, veuillez consulter le Guide de l'utilisateur (fichier PDF) dans le CD technique. 3. Informations sur le CD de support Cette carte mère supporte divers systèmes d'exploitation Microsoft® Windows®: 7 et doublecliquez dessus pour afficher les menus. 67 ASRock Z77 Pro3 Motherboard Français - ASRock Z77 Pro3 | Quick Installation Guide - Page 68
/ VistaTM / VistaTM 64-bit, si consiglia di impostare l'opzione BIOS in Storage Configuration (Configurazione di archiviazione) sulla modalità AHCI. Per l'impostazione BIOS, fare riferimento a "User Manual" (Manuale dell'utente) nel CD di supporto per dettagli. 68 ASRock Z77 Pro3 Motherboard Italiano - ASRock Z77 Pro3 | Quick Installation Guide - Page 69
Pixel Shader 5.0, DirectX 11 con CPU Intel® Ivy Bridge, Pixel Shader 4.1, DirectX 10.1 con CPU Intel® Sandy Bridge - Memoria massima condivisa 1760MB (vedi ATTENZIONE 5) - Uscita VGA Doppia: supporto porte HDMI e D-Sub tramite verificatore display indipendente 69 ASRock Z77 Pro3 Motherboard Italiano - ASRock Z77 Pro3 | Quick Installation Guide - Page 70
- PCIE x1 Gigabit LAN 10/100/1000 Mb/s - controller, supporto di USB 1.0/2.0/3.0 fino a 5Gb/s - 4 x connettori SATA2 3.0Go/s, sopporta RAID (RAID 0, RAID 1, RAID 5, RAID 10, Intel Rapid Storage e tecnologia Intel Smart Response) e delle funzioni NCQ, AHCI e Hot Plug ASRock Z77 Pro3 Motherboard - ASRock Z77 Pro3 | Quick Installation Guide - Page 71
solo con processori dotati di GPU integrata. - Tecnologia ASRock On/Off Play (vedi ATTENZIONE 18) - Booster ibrido: - Stepless control per frequenza del processore (vedi ATTENZIONE 19) - ASRock U-COP (vedi ATTENZIONE 20) - Boot Failure Guard (B.F.G.) 71 ASRock Z77 Pro3 Motherboard Italiano - ASRock Z77 Pro3 | Quick Installation Guide - Page 72
che Windows® non può utilizzare. 4. Solo lo slot PCIE2 supporta velocità fino a Gen 3. Per utilizzare PCI Express a velocità Gen 3, bisogna installare la CPU Ivy Bridge. Se si installa la CPU Sandy Bridge, PCI Express opererà soltanto a velocità Gen 2 PCI Express. 72 ASRock Z77 Pro3 Motherboard - ASRock Z77 Pro3 | Quick Installation Guide - Page 73
PC accede alla modalità di Standby (S1), Sospensione su RAM (S3), Ibernazione (S4) o Spegnimento (S5). Una volta installato il driver APP Charger si otterranno prodigi e comodità mai avuti prima. Sito ASRock: http://www.asrock.com/Feature/AppCharger/index.asp 73 ASRock Z77 Pro3 Motherboard Italiano - ASRock Z77 Pro3 | Quick Installation Guide - Page 74
co: è possibile seguire video HD su Youtube e ASRock XFast RAM è una nuova funzione inclusa in AXTU (ASRock Extreme Tuning Utility). Utilizza completamente lo spazio che non può essere utilizzato da CPU Windows® 32-bit. ASRock XFast RAM CPU, GPU e display. 74 ASRock Z77 Pro3 Motherboard Italiano - ASRock Z77 Pro3 | Quick Installation Guide - Page 75
CPU, Socket LGA 775, LGA 1155 e LGA 1156. Notare che non possono essere usate tutte le ventole CPU 775 e 1156. 22. ASRock XFast RAM non è supportato da Microsoft® Windows® XP / XP 64-bit. Tecnologia Intel® Smart Connect e porte Intel con il produttore. 75 ASRock Z77 Pro3 Motherboard Italiano - ASRock Z77 Pro3 | Quick Installation Guide - Page 76
BIOS, è necessario per prima cosa avviare il sistema e poi spegnerlo prima di eseguire l'azzeramento della CMOS. Notare che password, data, ore, profilo utente predefinito, 1394 GUID e indirizzo MAC saranno cancellati solo se è rimossa la batteria della CMOS. Italiano 76 ASRock Z77 Pro3 Motherboard - ASRock Z77 Pro3 | Quick Installation Guide - Page 77
alle quattro porte USB 2.0 predefinite nel pannello I/O, la scheda madre dispone di tre intestazioni USB 2.0. Ciascuna intestazione USB 2.0 supporta due porte USB 2.0. Italiano 77 ASRock Z77 Pro3 Motherboard - ASRock Z77 Pro3 | Quick Installation Guide - Page 78
pin CIR1) (vedi p.2 Nr. 25) 1 GND IRTX IRRX ATX+5VSB Questo collettore supporta moduli ad infrarossi optional per la trasmissione in modo corretto. Attenersi alle istruzioni del nostro manuale e del manuale del telaio per installare il sistema. 2. Se AC'97. 78 ASRock Z77 Pro3 Motherboard Italiano - ASRock Z77 Pro3 | Quick Installation Guide - Page 79
Mixer". Selezionare "Recorder" (Registratore). Poi, fare clic su "FrontMic" (Microfono frontale). Sistema operativo Windows® 7 / 7 64-bit / VistaTM / VistaTM 64-bit: Andare alla scheda "FrontMic" ( dei fili e dei pin sia fatta corrispondere in modo appropriato. 79 ASRock Z77 Pro3 Motherboard Italiano - ASRock Z77 Pro3 | Quick Installation Guide - Page 80
. Se si intende collegare la ventola CPU a 3 piedini al connettore della ventola CPU su questa scheda madre, collegarla ai piedini 1-3. Piedini 1-3 collegati Installazione della ventola a 3 piedini (3-pin CPU_FAN2) (vedi p.2 Nr. 2) GND +12V CPU_FAN_SPEED Italiano 80 ASRock Z77 Pro3 Motherboard - ASRock Z77 Pro3 | Quick Installation Guide - Page 81
5. 8 5 Collettore porta COM (9-pin COM1) (vedi p.2 Nr. 28) Installazione elettrica 4-Pin ATX 12V 4 1 Questo collettore porta COM è utilizzato per supportare il modulo porta COM. Italiano Header connettore HDMI_SPDIF della scheda VGA HDMI a questo header. 81 ASRock Z77 Pro3 Motherboard - ASRock Z77 Pro3 | Quick Installation Guide - Page 82
BIOS Setup dopo il POST, riavvia il sistema premendo + + , o premi il tasto di reset sullo chassis del sistema. Per informazioni più dettagliate circa il Setup del BIOS, fare riferimento al Manuale due volte per visualizzare i menù. 82 ASRock Z77 Pro3 Motherboard Italiano - ASRock Z77 Pro3 | Quick Installation Guide - Page 83
/ VistaTM / VistaTM 64 bits, es recomendable establecer la opción del BIOS de la configuración de almacenamiento en el modo AHCI. Para obtener detalles sobre la configuración del BIOS, consulte el "Manual del usuario" que se encuentra en nuestro CD de soporte. 83 ASRock Z77 Pro3 Motherboard Español - ASRock Z77 Pro3 | Quick Installation Guide - Page 84
DirectX 11 con CPU Intel® Ivy Bridge, Pixel Shader 4.1, DirectX 10.1 con CPU Intel® Sandy Bridge - 1760MB de Memoria máxima compartida (vea ATENCIÓN 5) - Salida de VGA dual: apoya los puertos de HDMI y de D-Sub por los reguladores independientes de la exhibición ASRock Z77 Pro3 Motherboard Español - ASRock Z77 Pro3 | Quick Installation Guide - Page 85
USB 3.0 - 2 x puertos USB 3.0 traseros, compatible con USB 1.0/2.0/3.0 de hasta 5 GB/s - 1 x cabecera USB 3.0 delantera (compatible con 2 puertos USB 3.0), compatible con USB 1.0/2.0/3.0 de hasta 5 GB/s Conectores - 4 x conexiones SATA2, admiten una velocidad de 85 ASRock Z77 Pro3 Motherboard - ASRock Z77 Pro3 | Quick Installation Guide - Page 86
ÓN 13) - ASRock XFast RAM (vea ATENCIÓN 14) - ASRock Crashless BIOS (vea ATENCIÓN 15) - ASRock OMG (Online Management Guard) (vea ATENCIÓN 16) - Lucid Virtu Universal MVP (vea ATENCIÓN 17) * Lucid Virtu Universal MVP sólo se soporta con procesadores con GPU integrada. ASRock Z77 Pro3 Motherboard - ASRock Z77 Pro3 | Quick Installation Guide - Page 87
Control de ajuste de la velocidad del ventilador de la CPU / chasis - Monitor de Voltaje: +12V, +5V, +3.3V, Vcore OS - En conformidad con Microsoft® Windows del BIOS, aplicando Manual del Usuario en el soporte CD sobre la configuración de Hyper-Threading Technology. 87 ASRock Z77 Pro3 Motherboard - ASRock Z77 Pro3 | Quick Installation Guide - Page 88
Flash es una utilidad de programación del BIOS que se encuentra almacenada en la memoria Flash ROM. Esta sencilla herramienta de actualización de BIOS le permitirá actualizar el BIOS del sistema sin necesidad de acceder a ningún sistema operativo, como MS- 88 ASRock Z77 Pro3 Motherboard Español - ASRock Z77 Pro3 | Quick Installation Guide - Page 89
en secuencias se están transfiriendo actualmente. 14 ASRock XFast RAM es una nueva función incluida en ASRock Extreme Tuning Utility (AXTU). Utiliza completamente el espacio de memoria que no se puede utilizar con procesadores de 32 bits en sistemas operativos 89 ASRock Z77 Pro3 Motherboard Español - ASRock Z77 Pro3 | Quick Installation Guide - Page 90
energía durante el proceso de actualización del BIOS, ASRock Crashless BIOS finalizará de manera automática el proceso base ofrece un control complete, no es recomendable forzar la velocidad. Las frecuencias de bus de la CPU distintas a las CPU diferentes, 90 ASRock Z77 Pro3 Motherboard Español - ASRock Z77 Pro3 | Quick Installation Guide - Page 91
zócalos LGA 775, LGA 1155 y LGA 1156. Recuerde que no es posible el uso de todos los ventiladores para CPU 775 y 1156. 22. ASRock XFast RAM no se admite en Microsoft® Windows® XP / XP 64 bits. Las tecnologías Intel® Smart Connect y puertos Intel® USB 3.0 no se admite en Microsoft® Windows® VistaTM - ASRock Z77 Pro3 | Quick Installation Guide - Page 92
de E/S, hay tre bases de conexiones USB 2.0 en esta placa base. Cada una de estas bases de conexiones admite dos puertos USB 2.0. Español 92 ASRock Z77 Pro3 Motherboard - ASRock Z77 Pro3 | Quick Installation Guide - Page 93
p.2, N. 25) 1 GND IRTX IRRX ATX+5VSB Esta base de conexiones se puede de panel frontal que permite conexión y control conveniente de apparatos de Audio. 1. El Audio favor, siga las instrucciones en nuestro manual y en el manual de chasis para instalar su sistema. 93 ASRock Z77 Pro3 Motherboard - ASRock Z77 Pro3 | Quick Installation Guide - Page 94
En sistemas operativos Windows® 7 / 7 64-bit / VistaTM / VistaTM 64-bit: Acceda a la ficha "FrontMic" (Micrófono frontal) del panel de control Realtek. Ajuste la posición del control deslizante "Recording Volume el disco duro esté leyendo o escribiendo datos. Español 94 ASRock Z77 Pro3 Motherboard - ASRock Z77 Pro3 | Quick Installation Guide - Page 95
control de ventilador. Conector del ventilador de la CPU (4-pin CPU_FAN1) (vea p.2, N. 1) FAN_SPEED_CONTROL CPU_FAN_SPEED +12V GND 1 2 3 4 Conecte el cable del ventilador de la CPU a este conector y haga coincidir el cable negro con el conector de tierra. Español 95 ASRock Z77 Pro3 Motherboard - ASRock Z77 Pro3 | Quick Installation Guide - Page 96
á funcionando correctamente incluso sin la función de control de velocidad de ventilador. Si pretende enchufar el ATX 12V 4 1 Cabezal del puerto COM (9-pin COM1) (vea p.2, N. 28) Este cabezal del puerto COM se utiliza para admitir un módulo de puerto COM. Español 96 ASRock Z77 Pro3 Motherboard - ASRock Z77 Pro3 | Quick Installation Guide - Page 97
configurar la BIOS, por favor refiérase al Manual del Usuario (archivo PDF) contenido en el CD. 3. Información de Software Support CD Esta placa-base soporta diversos tipos de sistema operativo Windows®: 7 / 7 archivo "ASSETUP.EXE" para iniciar la instalación. Español 97 ASRock Z77 Pro3 Motherboard - ASRock Z77 Pro3 | Quick Installation Guide - Page 98
.com www.asrock.com/support/index.asp 1.1 ASRock Z77 Pro3 ATX: 12,0 x 7,6 30,5 x 19,3 см) ASRock Z77 Pro3 ASRock Z77 Pro3 2 x Serial ATA (SATA 1 x I/O ASRock Windows® 7 / 7 64-bit / VistaTM / VistaTM 64-bit BIOS Storage Configuration AHCI BIOS 98 ASRock Z77 Pro3 Motherboard - ASRock Z77 Pro3 | Quick Installation Guide - Page 99
Video HD, Intel® InsiderTM, Intel® HD Graphics 2500/4000 - Pixel Shader 5.0, DirectX 11 Intel® Ivy Bridge, Pixel Shader 4.1, DirectX 10.1 Intel® Sandy Bridge 1760Мб 5) VGA HDMI и D-Sub HDMI 1.4a 1920х1200 @ 60 Гц D-Sub 2048х1536 @ 75 Гц 99 ASRock Z77 Pro3 Motherboard - ASRock Z77 Pro3 | Quick Installation Guide - Page 100
TruStudioTM ЛВС - PCIE x 1 Gigabit LAN 10/100/1000 Mb/s - Realtek 10, Intel Rapid Storage Intel Smart Response), NCQ, AHCI - 2 x SATA3 6,0 Гбит/с - 1 x - 1 x - 1 x COM - 1 x HDMI_SPDIF - 1 x Power LED CPU/Chassis/Power FAN - 24 ATX 100 ASRock Z77 Pro3 Motherboard - ASRock Z77 Pro3 | Quick Installation Guide - Page 101
BIOS 15) - ASRock OMG (Online Management Guard 16) - Lucid Virtu Universal MVP 17) * Lucid Virtu Universal MVP ASRock 18) - Hybrid Booster: 19) - ASRock U-COP 20 Boot Failure Guard (B.F.G) - Combo Cooler Option (C.C.O 21 LED CPU/Chassis/Power FAN 101 ASRock Z77 Pro3 Motherboard - ASRock Z77 Pro3 | Quick Installation Guide - Page 102
17). 3 4 Windows® 7 / VistaTM / XP Windows® OS с 64-bit ASRock XFast RAM Windows®. 4. Tолько PCIE2 Gen 3 PCI Express Gen 3 Ivy Bridge Sandy Bridge PCI Express PCI Express Gen 2. 5 Intel 6 xvYCC и Deep Color Windows® 7 64бит / 7 Deep Color EDID (12 ASRock Z77 Pro3 Motherboard - ASRock Z77 Pro3 | Quick Installation Guide - Page 103
Flash BIOS Flash ROM BIOS MS-DOS или Windows F6 POST BIOS F2 ASRock Instant Flash BIOS на USB BIOS USB FAT32/16/12. 10 Apple iPhone, iPad и iPod Touch ASRock ASRock APP Charger APP Charger iPhone 40%. ASRock APP Charger Apple S1 S3 S4 ASRock Z77 Pro3 Motherboard 103 - ASRock Z77 Pro3 | Quick Installation Guide - Page 104
USB 13. ASRock XFast LAN Youtube 14. ASRock XFast RAM ASRock Extreme Tuning Utility (AXTU 32 Windows®. ASRock XFast RAM Adobe Photoshop 5 ASRock XFast RAM SSD 15. ASRock Crashless BIOS BIOS BIOS ASRock Crashless BIOS BIOS BIOS USB USB2.0. 16 OMG OMG ASRock Z77 Pro3 Motherboard - ASRock Z77 Pro3 | Quick Installation Guide - Page 105
LGA775 или LGA1156 22. ОС Microsoft® Windows® XP / XP 64 ASRock XFast RAM. ОС Microsoft® Windows® VistaTM / VistaTM 64 XP / XP 64 Intel® Smart Connect Technology и Intel USB 3.0. 23. EuP Energy Using Product EuP 1 EuP Intel EuP 50 5V 100 EuP. 105 ASRock Z77 Pro3 Motherboard - ASRock Z77 Pro3 | Quick Installation Guide - Page 106
1.3 short open 3 1 и 2 CMOS (CLRCMOS1, 3 2, п. 27) CMOS CLRCMOS1 CMOS 15 5 2 и 3 CLRCMOS1 CMOS BIOS CMOS BIOS CMOS 1394 GUID и MAC CMOS. 106 ASRock Z77 Pro3 Motherboard - ASRock Z77 Pro3 | Quick Installation Guide - Page 107
2, п. 23) SATA2_2 SATA2_3 SATA2_4 SATA2_5 SATA3_1 SATA3_0 Serial ATA2 SATA2 SATA 3,0 Serial ATA3 SATA3 SATA 6,0 SATA / SATA2 / SATA3 SATA2 / SATA3 USB 2.0 USB 2.0 USB 2.0 USB 2.0. 107 ASRock Z77 Pro3 Motherboard - ASRock Z77 Pro3 | Quick Installation Guide - Page 108
2, п. 26) IRTX +5VSB DUMMY 1 GND IRRX (4 CIR1 2, п. 25) 1 GND IRTX IRRX ATX+5VSB 9 HD_AUDIO1) (см. cтр. 2, п. 30) GND PRESENCE# MIC_RET OUT_RET 1 OUT2_L J_SENSE OUT2_R B Audio_R (RIN OUT2_R Audio_L (LIN OUT2_L. C Ground (GND Ground (GND). ASRock Z77 Pro3 Motherboard - ASRock Z77 Pro3 | Quick Installation Guide - Page 109
D MIC_RET и OUT_RET HD AC'97 E Windows® XP / XP 64 Mixer Recorder FrontMic Windows® 7 / 7 64-бита, VistaTM / VistaTM 64 FrontMic Realtek Recording Volume 9 PANEL1 2, п. 20) PWRBTN RESET PLED S1/S3 S4 S5). HDLED 109 ASRock Z77 Pro3 Motherboard - ASRock Z77 Pro3 | Quick Installation Guide - Page 110
2, п. 7) FAN_SPEED_CONTROL CHA_FAN_SPEED +12V GND (3 CHA_FAN2 2, п. 21) CHA_FAN1 и CHA_FAN2 (3 PWR_FAN1 2, п. 35) GND +12V PWR_FAN_SPEED 4 CPU_FAN1 2, п. 1) FAN_SPEED_CONTROL CPU_FAN_SPEED +12V GND 1 2 3 4 4 3 3 1-3. 1-3 3 110 ASRock Z77 Pro3 Motherboard - ASRock Z77 Pro3 | Quick Installation Guide - Page 111
ATX с 4-Pin 12V ATX с 4-Pin 1 5. 8 5 COM 9 COM1 2, п. 28) ATX С 4-Pin 12V 4 1 COM COM. HDMI_SPDIF (2 HDMI_SPDIF1 2, п. 29) 1 GND SPDIFOUT HDMI_SPDIF VGA-карту HDMI, HDMI HDMI_SPDIF на VGA- карте HDMI. 111 ASRock Z77 Pro3 Motherboard - ASRock Z77 Pro3 | Quick Installation Guide - Page 112
(BIOS Setup BIOS Setup F2> или + + - ASRock Z77 Pro3 | Quick Installation Guide - Page 113
com/support/index.asp 1.1 Paket İçindekiler ASRock Z77 Pro3 Anakart (ATX Form Faktörü: 12,0-inç x 7,6-inç, 30,5 cm x 19,3 cm) ASRock Z77 Pro3 Hızlı Takma Kılavuzu ASRock Z77 Pro3 Destek CD'si 2 x Seri ATA (SATA) Veri Kablosu (İsteğe Bağlı) 1 x G/Ç Panel Kalkanı ASRock Size Şunu Hatırlatır... Windows - ASRock Z77 Pro3 | Quick Installation Guide - Page 114
işlemciye sahip DirectX 10.1 - Maks. paylaюэlan bellek 1760 MB (bkz. DЭKKAT 5) - Çift VGA Çıkış: desteği HDMI ve bağımsız görüntü denetleyiciler tarafından D-Sub bağlantı noktaları - 60Hz'de 1920x1200'e kadar maks. зцzьnьrlьkle HDMI 1.4a Teknolojisini destekler ASRock Z77 Pro3 Motherboard Türkçe - ASRock Z77 Pro3 | Quick Installation Guide - Page 115
desteği - PCIE x1 Gigabit LAN 10/100/1000 Mb/sn - Realtek 10, Intel Rapid Storage ve Intel Smart Response Teknolojisini), NCQ, AHCI ve "Sistem Açıkken Bileşen Takma" işlevlerini - 2 x SATA3 6.0 Gb/sn konektör - 1 x KÖ fişi - 1 x Kullanıcı Kızılötesi Modül Bağlantısı 115 ASRock Z77 Pro3 Motherboard - ASRock Z77 Pro3 | Quick Installation Guide - Page 116
CPU Frekans Adımsız Kontrol (bkz. DİKKAT 19) - ASRock U-COP (bkz. DİKKAT 20) - Önyükleme Hatası Koruması (B.F.G.) - Kombo Soğutucu Seçeneği (C.C.O.) (bkz. DİKKAT 21) - İyi Geceler LED'i - CPU Sıcaklık Duyarlılığı - Kasa Sıcaklık Duyarlılığı - CPU/Kasa/Güç Fan Takometresi ASRock Z77 Pro3 Motherboard - ASRock Z77 Pro3 | Quick Installation Guide - Page 117
verir) - CPU/Kasa Fan Çoklu-Hız Kontrolü - Voltaj İzleme: +12V, +5V, +3,3V, CPU Vcore İS - Microsoft® Windows® 7 / asrock.com UYARI Lütfen, ayarı BIOS'da ayarlama, Untied Overclocking Intel® web sitesini kontrol edin. 6. xvYCC ve Deep Color yalnэzca Windows ASRock Z77 Pro3 Motherboard 117 Türkçe - ASRock Z77 Pro3 | Quick Installation Guide - Page 118
yardımcı programı ile donatılmıştır. SmartView özelliğini kullanmak için işletim sistemi sürümünüzün Windows® 7 / 7 64 bit / VistaTM / VistaTM 64 bit, ve tarayıcı sürümünüzün IE8 olmasına dikkat edin. ASRock web sitesi: http://www.asrock.com/Feature/SmartView/ index.asp ASRock Z77 Pro3 Motherboard - ASRock Z77 Pro3 | Quick Installation Guide - Page 119
CPU veri yolu frekansları dışındaki frekanslar sistemin dengesiz olmasına veya CPU'nun zarar görmesine neden olabilir. 20. CPU aşırı ısınması algılandığında, sistem otomatik olarak kapatılır. Sistemi devam ettirmeden önce, lütfen anakarttaki CPU fanının düzgün çalıştığını ASRock Z77 Pro3 Motherboard - ASRock Z77 Pro3 | Quick Installation Guide - Page 120
utucu tipi olan Soket LGA 775, LGA 1155 ve LGA 1156'yı çalıştıracak esnek seçeneğe sahiptir. Lütfen tüm 775 ve 1156 CPU Fanlarının kullanılamayacağını unutmayın. 22. ASRock XFast RAM, Microsoft® Windows® XP / XP 64-bit ile uyumlu değildir. Intel® Smart Connect Teknolojisini ve Intel® USB 3.0 bağlant - ASRock Z77 Pro3 | Quick Installation Guide - Page 121
USB 2.0 portundan başka, bu anakartta üç USB 2.0 fişi bulunur. Her USB 2.0 fişi iki USB 2.0 portunu destekler. Türkçe (9-pinli USB8_9) (bkz. s.2 No. 24) USB_PWR P-9 P+9 GND DUMMY 1 GND P+8 P-8 USB_PWR ASRock Z77 Pro3 Motherboard 121 - ASRock Z77 Pro3 | Quick Installation Guide - Page 122
ATX Windows® XP / XP 64-bit İS için: "Karıştırıcı"yı seçin. "Kaydedici"yi seçin. Sonra "Ön Mikrofon"u tıklatın. Windows® 7 / 7 64-bit / VistaTM / VistaTM 64-bit İS için: Realtek Kontrol panelinde "Ön Mikrofon" Sekmesine gidin. "Kayıt Ses Seviyesi"ni ayarlayın. Türkçe 122 ASRock Z77 Pro3 Motherboard - ASRock Z77 Pro3 | Quick Installation Guide - Page 123
ğlayın. Sistem çalışırken LED açıktır. LED S1/ S3 durumunda yanıp sönmeye devam eder. LED S3/S4 durumunda veya S5 durumun da (güç kapalı) kapalıdır. 123 ASRock Z77 Pro3 Motherboard Türkçe - ASRock Z77 Pro3 | Quick Installation Guide - Page 124
-pinli ATX güç kaynağını kullanmak için, lütfen güç kaynağınızı Pin 1 ve Pin 13'le birlikte takın. ATX 12V Güç Konektörü (8-pinli ATX12V1) (bkz. s.2 No. 4) 20-Pinli ATX Güç Kaynağını Takma 1 13 8 5 4 1 Lütfen bir ATX 12V güç kaynağını bu konektöre bağlayın. 124 ASRock Z77 Pro3 Motherboard - ASRock Z77 Pro3 | Quick Installation Guide - Page 125
Pin 5'le birlikte takın. 8 5 Seri port Fişi (9-pinli COM1) (bkz. s.2 No. 28) 4-Pinli ATX 12V Güç Kaynağını Takma 4 1 Bu COM1 fişi bir seri port modülünü destekler. HDMI_SPDIF Fişi (2-pinli HDMI_SPDIF1) kartının HDMI_SPDIF konektörünü bu fişe bağlayın. Türkçe 125 ASRock Z77 Pro3 Motherboard - ASRock Z77 Pro3 | Quick Installation Guide - Page 126
POST) sırasında BIOS Ayarları yardımcı programına girmek için veya tuşuna basın; aksi halde, POST test rutinlerine devam eder. BIOS Ayarlarına POST Destek CD'si bilgileri Bu anakart çeşitli Microsoft® Windows® işletim sistemleri destekler: 7 / 7 64-bit ASRock Z77 Pro3 Motherboard Türkçe - ASRock Z77 Pro3 | Quick Installation Guide - Page 127
www.asrock.com/support/index.asp 1.1 ASRock Z77 Pro3 ATX 12.0" x 7.6", 30.5 x 19.3 cm) ASRock Z77 Pro3 ASRock Z77 Pro3 지원 CD 시리얼 ATA (SATA 2 I/O 차폐 1 개 ASRock Windows® 7 / 7 64-비트 / VistaTM / VistaTM 64 Storage Configuration BIOS 옵션을 AHCI BIOS CD 127 ASRock Z77 Pro3 Motherboard 한국어 - ASRock Z77 Pro3 | Quick Installation Guide - Page 128
Intel® HD Graphics 2500/4000 - Intel® Ivy Bridge CPU DirectX 11, Pixel Shader 5.0. Intel® Sandy Bridge CPU DirectX 10.1, Pixel Shader 4.1 1760MB ( 주의 5 VGA 수출 : HDMI 와 D-Sub 1920x1200 @ 60Hz 까지 HDMI 1.4a 2048x1536 @ 75Hz 까지 D-Sub Auto Lip Sync Deep Color)(12bpc), ASRock Z77 Pro3 Motherboard - ASRock Z77 Pro3 | Quick Installation Guide - Page 129
Audio Codec) - Premium Blu-ray THX TruStudioTM 지원 - PCIE x1 Gigabit LAN 10/100/1000 Mb/s - Realtek RTL8111E LAN 802.3az 지원 - PXE 지원 10, Intel Rapid Storage 및 Intel Smart Response NCQ, AHCI 2 개 의 SATA3 6.0Gb/s 1 1 개 - COM 1 개 - HDMI_SPDIF 헤더 1 LED 헤더 1 개 129 ASRock Z77 Pro3 Motherboard - ASRock Z77 Pro3 | Quick Installation Guide - Page 130
15 참조 ) - ASRock OMG (Online Management Guard) ( 주의 16 참조 ) - Lucid Virtu Universal MVP ( 주의 17 참조 ) * Lucid Virtu Universal MVP 는 GPU ASRock On/Off Play 18 - CPU 19 참조 ) - ASRock U-COP ( 주의 20 참조 ) - B.F.G..(Boot Failure Guard C.C.O.) ( 주의 21 LED - CPU CPU ASRock Z77 Pro3 Motherboard - ASRock Z77 Pro3 | Quick Installation Guide - Page 131
Bridge CPU PCI Express 는 PCI Express 2G 5 Intel 6. xvYCC Windows® 7 64-bit / 7 EDID 에서 12bpc HBR 은 Windows® 7 64-bit / 7 / VistaTM 64-bit / VistaTM 7 2 채널 , 4 채널 , 6 채널 및 8 3 8. AXTU (ASRock Extreme Tuning Utility OC DNA, IES CPU OC DNA 에서는 OC ASRock Z77 Pro3 Motherboard 131 - ASRock Z77 Pro3 | Quick Installation Guide - Page 132
/ 7 64 비트 / VistaTM / VistaTM 64 IE8 ASRock http://www.asrock.com/Feature/SmartView/index.asp 12. ASRock XFast USB 는 USB 13. ASRock XFast LAN LAN Youtube HD 14. ASRock XFast RAM 은 AXTU (ASRock Extreme Tuning Utility Windows® OS 32-bit CPU ASRock XFast RAM Adobe ASRock Z77 Pro3 Motherboard - ASRock Z77 Pro3 | Quick Installation Guide - Page 133
와 1156 CPU 22. ASRock XFast RAM 은 Microsoft® Windows® XP / XP 64 Intel® Smart Connect 기술 과 Intel® USB 3.0 포트은 Microsoft® Windows® VistaTM / VistaTM 64- 비트 / XP / XP 64 23. EuP 는 Energy Using Product EuP AC 1.00W EuP EuP EuP Intel EuP 5V 100 mA 50 EuP 133 ASRock Z77 Pro3 Motherboard - ASRock Z77 Pro3 | Quick Installation Guide - Page 134
1.3 3 1-2 점퍼 CMOS 초기화 (CLRCMOS1, 3 2 27 세팅 CMOS 삭제 참고 : CLRCMOS1 CMOS 15 CLRCMOS1 의 핀 2 와 핀 3 을 5 BIOS CMOS BIOS CMOS CMOS CMOS 1394 GUID, MAC 한 국 어 134 ASRock Z77 Pro3 Motherboard - ASRock Z77 Pro3 | Quick Installation Guide - Page 135
SATA3_0 2 ATA3 (SATA3 SATA SATA SATA3 6.0 Gb/s 시리얼 ATA(SATA USB 2.0 헤더 (9 핀 USB4_5) (2 22 (9 핀 USB6_7) (2 23 SATA SATA / SATA2 / SATA3 SATA2 / SATA3 I/O 4 USB 2.0 USB 2.0 헤더가 3 USB 2.0 헤더는 2 개의 USB 2.0 한국어 135 ASRock Z77 Pro3 Motherboard - ASRock Z77 Pro3 | Quick Installation Guide - Page 136
(4 핀 CIR1) (2 25 IRTX +5VSB DUMMY 1 GND IRRX 1 GND IRTX IRRX ATX+5VSB (9 핀 HD_AUDIO1) (2 30 GND PRESENCE# MIC_RET OUT_RET 1 OUT2_L J_SENSE OUT2_R MIC2_R MIC2_L C. Ground (GND) 을 Ground (GND D. MIC_RET 및 OUT_RET 는 HD 이들을 AC'97 한 국 어 136 ASRock Z77 Pro3 Motherboard - ASRock Z77 Pro3 | Quick Installation Guide - Page 137
64 비트 OS Mixer Recorder Front Mic Windows® 7 / 7 64 비트 / VistaTM / VistaTM 64 비트 OS Realtek FrontMic Recording Volume PWRBTN RESET PLED LED LED S1/S3 LED S4 S5 LED HDLED LED LED LED LED LED (4 핀 SPEAKER 1) (2 18 137 ASRock Z77 Pro3 Motherboard 한 국 어 - ASRock Z77 Pro3 | Quick Installation Guide - Page 138
CPU (4 핀 CPU_FAN1) (2 1 FAN_SPEED_CONTROL CPU_FAN_SPEED +12V GND CPU 1 2 3 4 4 핀 CPU 3 핀 CPU CPU 3 핀 CPU 1-3 1-3 3 (3 핀 CPU_FAN2) (2 2 GND +12V CPU_FAN_SPEED ATX (24 핀 ATXPWR1) (2 8 12 24 1 13 ATX 한 국 어 138 ASRock Z77 Pro3 Motherboard - ASRock Z77 Pro3 | Quick Installation Guide - Page 139
ATX 12V 8- 핀 ATX 12V 4- 핀 ATX 12V 하여 4- 핀 ATX 1 과 핀 5 8 5 (9 핀 COM1) (2 28 4- 핀 ATX 12V 4 1 HDMI_SPDIF 헤더 (2 핀 HDMI_SPDIF1) (2 29 1 GND SPDIFOUT HDMI VGA 카드에 SPDIF HDMI_SPDIF HDMI 디지털 TV LCD HDMI VGA 카드의 HDMI_SPDIF 한국어 139 ASRock Z77 Pro3 Motherboard - ASRock Z77 Pro3 | Quick Installation Guide - Page 140
2 POST F2> 또는 ++ - ASRock Z77 Pro3 | Quick Installation Guide - Page 141
www.asrock.com Web www.asrock.com/support/index.asp 1.1 ASRock Z77 Pro3 ATX 12.0-in x 7.6-in, 30.5 cm x 19.3 cm) ASRock Z77 Pro3 ASRock Z77 Pro3 CD 2 x ATA (SATA 1 x I/O ASRock Windows® 7 / 7 64-bit / VistaTM / VistaTM 64-bit BIOS AHCI B I O S C D 141 ASRock Z77 Pro3 Motherboard - ASRock Z77 Pro3 | Quick Installation Guide - Page 142
-in Visuals および VGA GPU Intel® HD Intel® Quick Sync Video 2.0、Intel® InTruTM 3D、Intel® Clear Video HD Technology、Intel® InsiderTM、Intel® HD Graphics 2500/4000 - Intel® Ivy Bridge CPU DirectX 11、Pixel Shader 5.0。Intel® Sandy Bridge CPU DirectX 10.1、Pixel Shader 4.1。 ASRock Z77 Pro3 Motherboard - ASRock Z77 Pro3 | Quick Installation Guide - Page 143
HD Realtek ALC892 Codec) - Premium Blu-ray THX TruStudioTM PCIE x1 Gigabit LAN 10/100/1000 Mb/s - Realtek RTL8111E - Wake-On-LAN LAN Energy Efficient RAID (RAID 0, RAID 1, RAID 5, RAID 10, Intel Rapid Storage および Intel Smart Response NCQ, AHCI および Hot 143 ASRock Z77 Pro3 Motherboard 日本語 - ASRock Z77 Pro3 | Quick Installation Guide - Page 144
XFast USB ( 注意 12 ASRock XFast LAN ( 注意 13 ASRock XFast RAM ( 注意 14 ASRock Crashless BIOS ( 注意 15 ASRock OMG (Online Management Guard) ( 注意 16 Lucid Virtu Universal MVP ( 注意 17 Lucid Virtu Universal MVP GPU が内 ASRock 18 - CPU 19 ASRock U-COP ( 注意 20 を参照 ) ASRock Z77 Pro3 Motherboard - ASRock Z77 Pro3 | Quick Installation Guide - Page 145
2. 3. 4. 5. CD 51 Dual Channel Memory Technology 17 Windows® 7 / VistaTM / XP 4GB 64 ビット CPU の Windows® OS ASRock XFast RAM Windows PCIE2 Gen 3 Gen3 速度で PCI Express Ivy Bridge CPU Sandy Bridge CPU PCI Express は PCI Express Gen 2 Intel® 社の WEB 145 ASRock Z77 Pro3 Motherboard 日本語 - ASRock Z77 Pro3 | Quick Installation Guide - Page 146
BIOS USB FAT32/16/12 10. iPhone/iPad/iPod Touch など Apple ASRock では ASRock APP APP iPhone 40 ASRock APP Apple 製品は PC S1 S3 (S4 S5 APP チャー ASRock の Web サイト : http://www.asrock.com/Feature/AppCharger/index.asp ASRock Z77 Pro3 Motherboard - ASRock Z77 Pro3 | Quick Installation Guide - Page 147
BIOS BIOS 合、ASRock Crashless BIOS BIOS BIOS USB USB 2.0 16. OMG ザーが OMG 17. VIRTU Universal MVP は、Virtu Universal GPU GPU Virtual VsyncTM HyperFormance VIRTU Universal MVP は、CPU GPU 日本語 147 ASRock Z77 Pro3 Motherboard - ASRock Z77 Pro3 | Quick Installation Guide - Page 148
19. CPU CPU 20. CPU CPU PC CPU とヒー 21. C.C.O.) では、Socket LGA 775、LGA 1155 と LGA 1156 の 3 CPU 775 と 1156 CPU 22. ASRock XFast RAM は、Microsoft® Windows® XP / XP 64 Intel® Smart Connect Intel® USB 3.0 Microsoft® Windows® VistaTM - ASRock Z77 Pro3 | Quick Installation Guide - Page 149
1.3 1-2 CMOS CLRCMOS1 2 27 参照) 設定 説明 CMOS の消去 注 : CLRCMOS1 CMOS 15 CLRCMOS1 のピン 2 とピン 3 を 5 BIOS CMOS BIOS CMOS CMOS 1394 GUID と MAC CMOS 日本語 149 ASRock Z77 Pro3 Motherboard - ASRock Z77 Pro3 | Quick Installation Guide - Page 150
SATA2_4 SATA2_5 これら 4 ATA2 (SATA2 SATA SATA2 3.0Gb/s で す。 SATA3_1 SATA3_0 これら 2 ATA3 (SATA3 SATA SATA3 6.0Gb/s で す。 SATA SATA / SATA2 / SATA3 SATA2 / SATA3 I/O 4 つの USB 2.0 3 つの USB 2.0 USB 2.0 2 つの USB 2.0 日本語 150 ASRock Z77 Pro3 Motherboard - ASRock Z77 Pro3 | Quick Installation Guide - Page 151
PRESENCE# MIC_RET OUT_RET 1 OUT2_L J_SENSE OUT2_R MIC2_R MIC2_L 1. HDA 2. AC'97 A. Mic_IN (MIC) を MIC2_L B. Audio_R (RIN) を OUT2_R に、Audio_L (LIN) を OUT2_L C. Ground (GND) を Ground (GND 151 ASRock Z77 Pro3 Motherboard - ASRock Z77 Pro3 | Quick Installation Guide - Page 152
と OUT_RET AC'97 Windows® XP / XP 64-bit OS Mixer Recorder FrontMic Windows® 7 / 7 64-bit / VistaTM / VistaTM 64-bit OS Realtek FrontMic Recording Volume 152 PWRBTN RESET PLED LED LED LED S1/S3 S4 S5 LED HDLED LED LED LED LED LED ASRock Z77 Pro3 Motherboard 日本語 - ASRock Z77 Pro3 | Quick Installation Guide - Page 153
4 ピン CPU_FAN1) ページ 2 1 を参照 FAN_SPEED_CONTROL CPU_FAN_SPEED +12V GND CPU 1 2 3 4 4 ピン CPU 3 ピン CPU 3 ピン CPU CPU 1-3 1-3 3 (3 ピン CPU_FAN2) ページ 2 2 を参照 GND +12V CPU_FAN_SPEED ATX 24 ピン ATXPWR1) ページ 2 8 を参照 12 24 ATX 1 13 日本語 153 ASRock Z77 Pro3 Motherboard - ASRock Z77 Pro3 | Quick Installation Guide - Page 154
8-pin ATX 12V 4-pin ATX 12V 4-pin ATX Pin 1 と Pin 5 8 5 9 ピン COM1) ページ 2 28 を参照 4-Pin ATX 12V 4 1 この COM1 HDMI_SPDIF ヘッダ (2- ピン HDMI_SPDIF1) ページ 2 29 を参照 1 GND SPDIFOUT HDMI_SPDIF SPDIF HDMI VGA HDMI TV LCD HDMI VGA HDMI_SPDIF 日本語 154 ASRock Z77 Pro3 Motherboard - ASRock Z77 Pro3 | Quick Installation Guide - Page 155
2. BIOS 情報 BIOS POST F2 Del BIOS POST BIOS POST Ctrl〉+〈Alt〉+〈Delete BIOS BIOS CD PDF 3 CD 情報 Microsoft® Windows® 7 / 7 64-bit / VistaTM / VistaTM 64bit / XP / XP 64-bit CD CD CDROM CD AUTORUN AUTORUN CD 内の BIN ASSETUP.EXE 155 ASRock Z77 Pro3 Motherboard 日本語 - ASRock Z77 Pro3 | Quick Installation Guide - Page 156
www.asrock.com/support/index.asp 1.1 華擎 Z77 Pro3 主板 (ATX 規格 : 12.0 英吋 X 7.6 英吋 , 30.5 厘米 X 19.3 厘米 ) 華擎 Z77 Pro3 Z77 Pro3 Serial ATA(SATA I/O 擋板 ASRock 為了在 Windows® 7 / 7 64-bit / VistaTM / VistaTM 64-bit BIOS中將Storage Configuration AHCI BIOS User Manual 156 ASRock Z77 Pro3 Motherboard - ASRock Z77 Pro3 | Quick Installation Guide - Page 157
CPU 支持 Pixel Shader 5.0、DirectX 11 技術。Intel® Sandy Bridge CPU 支持 Pixel Shader 4.1、 DirectX 10.1 1760MB 5) - 雙 VGA HDMI 和 D-Sub HDMI 1.4a 1920x1200 @ 60Hz - 支持 D-Sub 2048x1536 @ 75Hz - 支持 HDMI, 可支持 Auto Lip Sync、Deep Color (12bpc)、 xvYCC 與 HBR HDMI 157 ASRock Z77 Pro3 Motherboard 簡體中文 - ASRock Z77 Pro3 | Quick Installation Guide - Page 158
- 7.1 (Realtek ALC892 THX TruStudioTM - PCIE x1 Gigabit LAN 10/100/1000 Mb/s - Realtek RTL8111E Wake-On-LAN Energy 10, Intel Rapid Storage 和 Intel Smart Response 技術 ), NCQ, AHCI 2 x SATA3 6.0Gb/s 1 x 1 x 1 x 1 x HDMI_SPDIF 接頭 - 1 x CPU 24 針 ATX 8 針 12V ASRock Z77 Pro3 Motherboard - ASRock Z77 Pro3 | Quick Installation Guide - Page 159
Guard (B.F.G C.C.O 21) - CPU - CPU - CPU CPU - CPU 12V, +5V, +3.3V 操作系統 - Microsoft® Windows® 7/7 64 位元 /VistaTM/VistaTM 64 位元 / XP/XP 64 22) 認證 - FCC, CE, WHQL - 支持 ErP/EuP ErP/EuP 23) http://www.asrock.com 簡體中文 159 ASRock Z77 Pro3 Motherboard - ASRock Z77 Pro3 | Quick Installation Guide - Page 160
Fan Control Overclocking CPU OC DNA OC O C OC IES CPU ASRock Extreme Tuning Utility (AXTU http://www.asrock.com 9、 華擎 Instant Flash Flash ROM 的 BIOS BIOS MS-DOS 或 Windows B I O S F6> 鍵或在 B I O S F2 Instant Flash B I O S U B I O S U FAT32/64 160 ASRock Z77 Pro3 Motherboard - ASRock Z77 Pro3 | Quick Installation Guide - Page 161
BIOS Crashless BIOS BIOS BIOS USB USB2.0 端口。 16 O M G Everyday Day of the week Weekdays and weekends O M G 17、VIRTU Universal MVP 包括 Virtu GPU 和离散 GPU,使 Breed Virtual VsyncTM HyperFormance VIRTU Universal MVP CPU、GPU 18 M P3 P C P C ACPI S5 3.5mm ASRock Z77 Pro3 Motherboard - ASRock Z77 Pro3 | Quick Installation Guide - Page 162
A1156 775 和 1156 CPU 22、Microsoft® Windows® XP / XP 64-bit XFast RAM。Microsoft® Windows® VistaTM / VistaTM 64-bit / XP / XP 64-bit Intel Intel® USB 3.0 23、EuP, 全稱 Energy Using Product E u P 1.00W EuP EuP EuP Intel EuP 100m A 5V s b 50 E u P 162 ASRock Z77 Pro3 Motherboard 簡體中文 - ASRock Z77 Pro3 | Quick Installation Guide - Page 163
1.3 3 1 和針腳 2 CMOS (CLRCMOS1, 3 2 頁第 27 項 ) 設定 默認設置 清除 CMOS 注意: C L R C M O S1 C M O S 15 C L R C M O S1 2 和插針 3 短接 5 B I O S C M O S B I O S C M O S C M O S C M O S 1394 GUID 和 MAC 簡體中文 163 ASRock Z77 Pro3 Motherboard - ASRock Z77 Pro3 | Quick Installation Guide - Page 164
ATA (SATA USB 2.0 (9 針 USB4_5) ( 見第 2 頁第 22 項 ) (9 針 USB6_7) ( 見第 2 頁第 23 項 ) SATA SATA/SATA2/SATA3 SATA2/SATA3 接口。 I/O USB 2.0 USB 2.0 USB 2.0 USB 2.0 接 口。 簡體中文 (9 針 USB8_9) ( 見第 2 頁第 24 項 ) 164 USB_PWR P-9 P+9 GND DUMMY 1 GND P+8 P-8 USB_PWR ASRock Z77 Pro3 Motherboard - ASRock Z77 Pro3 | Quick Installation Guide - Page 165
+5VSB DUMMY 1 GND IRRX 1 GND IRTX IRRX ATX+5VSB (9 針 HD_AUDIO1) ( 見第 2 頁第 30 Windows® XP / XP 64 Mixer"。選擇"Recorder FrontMic"。 在 Windows® 7 / 7 64 位元 / VistaTM / VistaTM 64 Realtek FrontMic"。調節"Recording Volume"。 (9 針 PANEL1) ( 見第 2 頁第 20 項 ) 165 ASRock Z77 Pro3 Motherboard - ASRock Z77 Pro3 | Quick Installation Guide - Page 166
2 頁第 7 項 ) (3 針 CHA_FAN2) ( 見第 2 頁第 21 項 ) (3 針 PWR_FAN1) ( 見第 2 頁第 35 項 ) CPU (4 針 CPU_FAN1) ( 見第 2 頁第 1 項 ) 166 FAN_SPEED_CONTROL CHA_FAN_SPEED +12V GND CHA_FAN1 和 CHA_FAN2 GND +12V PWR_FAN_SPEED FAN_SPEED_CONTROL CPU_FAN_SPEED +12V GND 請將 CPU 1 2 3 4 ASRock Z77 Pro3 Motherboard 簡體中文 - ASRock Z77 Pro3 | Quick Installation Guide - Page 167
20-pin ATX Pin 1 和 Pin 13 20-Pin ATX 1 13 ATX 12V 接頭 (8 針 ATX12V1) ( 見第 2 頁第 4 項 ) 8 5 4 1 ATX 12V 8-pin ATX 12V 4-pin ATX 12V 4-pin ATX 12V Pin 1 和 Pin 5 插上電 源接頭。 8 5 (9 針 COM1) ( 見第 2 頁第 28 項 ) 4-Pin ATX 12V 4 1 這個 COM1 簡體中文 167 ASRock Z77 Pro3 Motherboard - ASRock Z77 Pro3 | Quick Installation Guide - Page 168
HDMI HDMI HDMI 顯卡的 HDMI_SPDIF 2. BIOS 信息 Flash Memory 存儲了 BIOS POST F2> 或 < D e l B I O S P O S T P O S T B I O S Ctrl>++ - ASRock Z77 Pro3 | Quick Installation Guide - Page 169
SJ/T 11364-2006 10 年。 圖一 部件名稱 鉛 (Pb) 鎘 (Cd) 汞 (Hg Cr(VI PBB PBDE) X O O O O O X O O O O O O SJ/T 11363-2006 X SJ/T 11363-2006 2002/95/EC 簡體中文 169 ASRock Z77 Pro3 Motherboard - ASRock Z77 Pro3 | Quick Installation Guide - Page 170
BIOS CPU http://www.asrock.com www.asrock.com/support/index.asp 1.1 華擎 Z77 Pro3 主機板 (ATX 規格 : 12.0 英吋 x 7.6 英吋 , 30.5 公分 x 19.3 公分 ) 華擎 Z77 Pro3 Z77 Pro3 Serial ATA(SATA I/O 擋板 ASRock提醒您... 若要在Windows® 7 / 7 64位元 / VistaTM / VistaTM 64 BIOS選項設為AHCI BIOS 170 ASRock Z77 Pro3 Motherboard - ASRock Z77 Pro3 | Quick Installation Guide - Page 171
、Intel® InsiderTM、Intel® HD Graphics 2500/4000 - Intel® Ivy Bridge CPU 支援 Pixel Shader 5.0、DirectX 11 技術。Intel® Sandy Bridge CPU 支援 Pixel Shader 4.1、 DirectX 10.1 1760MB 5) - 雙 VGA DVI-D 和 D-Sub HDMI 1.4a 1920x1200 @ 60Hz - 支援 D-Sub 2048x1536 @ 75Hz 繁體中文 171 ASRock Z77 Pro3 Motherboard - ASRock Z77 Pro3 | Quick Installation Guide - Page 172
- 7.1 Realtek ALC892 音 THX TruStudioTM - PCIE x1 Gigabit LAN 10/100/1000 Mb/s - Realtek RTL8111E Wake-On-LAN Energy Efficient 10, Intel Rapid Storage 和 Intel Smart Response 技術 ), NCQ, AHCI 2 x SATA3 6.0Gb/s 接頭 - 1 x 1 x 1 x 1 x HDMI_SPDIF 接頭 - 1 x CPU 24 針 ATX ASRock Z77 Pro3 Motherboard - ASRock Z77 Pro3 | Quick Installation Guide - Page 173
Universal MVP。 - 華擎 On/Off Play 18) - Hybrid Booster - 支援 CPU 19) - ASRock U-COP 20) - Boot Failure Guard (B.F.G C.C.O 21 LED CPU CPU CPU CPU CPU 12V, +5V, +3.3V Microsoft® Windows® 7/7 64 位元 /VistaTM/VistaTM 64 位元 / XP/XP 64 22) - FCC, CE, WHQL 173 ASRock Z77 Pro3 Motherboard 繁體中文 - ASRock Z77 Pro3 | Quick Installation Guide - Page 174
Fan Control Overclocking CPU OC DNA O C O C OC IES (Intelligent Energy Saver),當 CPU ASRock Extreme Tuning Utility (AXTU ASRock http://www.asrock.com 9、 華擎 Instant Flash Flash ROM 的 BIOS BIOS MS-DOS 或 Windows B I O S F6> 鍵或在 B I O S F2 Instant Flash 174 ASRock Z77 Pro3 Motherboard - ASRock Z77 Pro3 | Quick Installation Guide - Page 175
RAM SSD 或 HDD 15、華擎 Crashless BIOS BIOS BIOS Crashless BIOS BIOS BIOS USB USB2.0 插槽。 16 OMG OMG 17、VIRTU Universal MVP 包括 Virtu GPU GPU,使 Breed Virtual VsyncTM HyperFormance VIRTU Universal MVP CPU、GPU 18、華擎 On/Off Play PC 的 MP3 PC ACPI S5 3.5m m ASRock Z77 Pro3 Motherboard - ASRock Z77 Pro3 | Quick Installation Guide - Page 176
LGA1155 與 LGA1156 775 和 1156 CPU 22、Microsoft® Windows® XP / XP 64-bit XFast RAM。Microsoft® Windows® VistaTM / VistaTM 64-bit / XP / XP 64-bit Intel Intel® USB 3.0 接頭。 23、EuP, 全稱 Energy Using Product EuP 1.00W EuP EuP EuP Intel EuP 100mA 5Vsb 50 EuP 176 ASRock Z77 Pro3 Motherboard - ASRock Z77 Pro3 | Quick Installation Guide - Page 177
1.3 3 1 和針腳 2 CMOS (CLRCMOS1, 3 2 頁第 27 項 ) 設定 默認設置 清除 CMOS 註: C L R C M O S1 C M O S 15 CLRCMOS1 的 pin2 及 pin3 短路 5 BIOS CMOS BIOS CMOS CMOS C M O S 1394 GUID 及 MAC 繁體中文 177 ASRock Z77 Pro3 Motherboard - ASRock Z77 Pro3 | Quick Installation Guide - Page 178
SATA3_0 Serial ATA3 (SATA3 SATA SATA3 6.0Gb/s SATA SATA/SATA2/SATA3 SATA2/SATA3 接口。 I/O USB 2.0 USB 2.0 USB 2.0 USB 2.0 接 口。 繁體中文 (9 針 USB8_9) ( 見第 2 頁第 24 項 ) 178 USB_PWR P-9 P+9 GND DUMMY 1 GND P+8 P-8 USB_PWR ASRock Z77 Pro3 Motherboard - ASRock Z77 Pro3 | Quick Installation Guide - Page 179
IRTX +5VSB DUMMY 1 GND IRRX 1 GND IRTX IRRX ATX+5VSB (9 針 HD_AUDIO1) ( 見第 2 頁第 30 項 Windows® XP / XP 64 Mixer Recorder FrontMic"。 在 Windows® 7 / 7 64 位元 / VistaTM / VistaTM 64 Realtek FrontMic Recording Volume"。 (9 針 PANEL1) ( 見第 2 頁第 20 項 ) 179 ASRock Z77 Pro3 Motherboard - ASRock Z77 Pro3 | Quick Installation Guide - Page 180
2 頁第 19 項 ) 1 PLEDPLED+ PLED+ LED S1/S3 LED S4 或 S5 LED (4 針 CHA_FAN1) ( 見第 2 頁第 7 項 ) (3 針 CHA_FAN2) ( 見第 2 頁第 21 項 ) (3 針 PWR_FAN1) ( 見第 2 頁第 35 項 ) FAN_SPEED_CONTROL CHA_FAN_SPEED +12V GND CHA_FAN1 和 CHA_FAN2 GND +12V PWR_FAN_SPEED 繁體中文 180 ASRock Z77 Pro3 Motherboard - ASRock Z77 Pro3 | Quick Installation Guide - Page 181
20-pin ATX 著 Pin 1 和 Pin 13 20-Pin ATX 1 13 ATX 12V (8 針 ATX12V1) ( 見第 2 頁第 4 項 ) 8 5 4 1 請將 ATX 12V 8-pin ATX 12V 4-pin ATX 12V 4-pin ATX 12V 8 5 順著 Pin 1 和 Pin 5 4-Pin ATX 12V 4 1 序列埠 (9 針 COM1) ( 見第 2 頁第 28 項 ) COM1 繁體中文 181 ASRock Z77 Pro3 Motherboard - ASRock Z77 Pro3 | Quick Installation Guide - Page 182
HDMI_SPDIF SPDIF HDMI HDMI HDMI HDMI_SPDIF 2. BIOS 訊息 Flash Memory BIOS POST F2> 或 + + - ASRock Z77 Pro3 | Quick Installation Guide - Page 183
lebih baik di Windows® 7/ 7 64-bit/ VistaTM/ VistaTM 64-bit, sebaiknya atur pilihan BIOS dalam Storage Configuration (Konfigurasi Penyimpanan) ke mode AHCI. Untuk konfigurasi BIOS, lihat "Panduan Pengguna" dalam CD dukungan kami untuk informasi rinci. 183 ASRock Z77 Pro3 Motherboard Bahasa Indonesia - ASRock Z77 Pro3 | Quick Installation Guide - Page 184
2500/4000 - Pixel Shader 5.0, DirectX 11 dengan Intel® Ivy Bridge CPU, Pixel Shader 4.1, DirectX 10.1 dengan Intel® Sandy Bridge CPU - Ingatan sama Max. 1760MB - Output VGA Ganda: mendukung port HDMI dan D-Sub melalui pengontrol tampilan independen Bahasa Indonesia 184 ASRock Z77 Pro3 Motherboard - ASRock Z77 Pro3 | Quick Installation Guide - Page 185
Premium Blu-ray audio - Menggunakan THX TruStudioTM - PCIE x1 Gigabit LAN 10/100/1000 Mb/s - Realtek RTL8111E - Menggunakan Wake-On-LAN - 10, Intel Rapid Storage dan Intel Smart Response Technology), NCQ, AHCI dan fungsi Hot Plug - 2 x penghubung SATA3 6.0Gb/s 185 ASRock Z77 Pro3 Motherboard - ASRock Z77 Pro3 | Quick Installation Guide - Page 186
Virtu Universal MVP hanya dapat didukung dengan prosesor yang mengintegrasikan GPU. - ASRock On/Off Play Technology - Hybrid Booster: - Kontrol tanpa langkah Frekwensi CPU - ASRock U-COP - Penjaga kegagalan input (B.F.G.) - Combo Cooler Option (C.C.O.) - Good Night LED ASRock Z77 Pro3 Motherboard - ASRock Z77 Pro3 | Quick Installation Guide - Page 187
digunakan Microsoft® Windows® 7 / 7 64-bit / VistaTM / VistaTM 64-bit / XP / XP 64-bit Sertifikasi - FCC, CE, WHQL - ErP/EuP Ready (memerlukan catu daya ErP/EuP ready) * Untuk informasi rinci, silakan kunjungi website kami: http://www.asrock.com Bahasa Indonesia 187 ASRock Z77 Pro3 Motherboard - ASRock Z77 Pro3 | Quick Installation Guide - Page 188
> Boot > Boot Option #1. ("xxx" is the device which contains your Windows® installation files. Normally it is an optical drive.) You can also press to launch boot menu at system POST and choose the item "UEFI:xxx" to boot. 4. Start Windows® installation. 188 ASRock Z77 Pro3 Motherboard English - ASRock Z77 Pro3 | Quick Installation Guide - Page 189
64-bit (with SP2 or above) or Windows® 7 64-bit (with SP1 or above). 2. Copy Intel® RAID drivers into a USB flash disk. You can download the driver from ASRock's website and unzip the file into a USB flash disk OR copy the file from ASRock motherboard support CD. (please copy the files under following - ASRock Z77 Pro3 | Quick Installation Guide - Page 190
it may take more time to boot into Windows® or install driver/ utilities. If you encounter this problem, you will need to following instructions to fix this problem. Windows® VistaTM 64-bit: Microsoft® does not provide hotfix for this problem. The steps listed below are Microsoft®'s suggested solution - ASRock Z77 Pro3 | Quick Installation Guide - Page 191
B. Disable "Volume Shadow Copy" service. a. Type "computer management" in the Start Menu, then press "Enter". b. Go to "Services and Applications>Services"; Then double click "Volume Shadow Copy". 191 ASRock Z77 Pro3 Motherboard English - ASRock Z77 Pro3 | Quick Installation Guide - Page 192
the hotfix kb2505454. (This may take a long time; >30 mins.) C. Reboot your system. (It may take about 5 minutes to reboot.) D. Windows® will install this hotfix then reboot by itself. E. Please start to install motherboard drivers and utilities. 6. Finish. 192 ASRock Z77 Pro3 Motherboard English
-
 1
1 -
 2
2 -
 3
3 -
 4
4 -
 5
5 -
 6
6 -
 7
7 -
8
-
9
-
10
-
11
-
12
-
13
-
14
-
15
-
16
-
17
-
18
-
19
-
20
-
21
-
22
-
23
-
24
-
25
-
26
-
27
-
28
-
29
-
30
-
31
-
32
-
33
-
34
-
35
-
36
-
37
-
38
-
39
-
40
-
41
-
42
-
43
-
44
-
45
-
46
-
47
-
48
-
49
-
50
-
51
-
52
-
53
-
54
-
55
-
56
-
57
-
58
-
59
-
60
-
61
-
62
-
63
-
64
-
65
-
66
-
67
-
68
-
69
-
70
-
71
-
72
-
73
-
74
-
75
-
76
-
77
-
78
-
79
-
80
-
81
-
82
-
83
-
84
-
85
-
86
-
87
-
88
-
89
-
90
-
91
-
92
-
93
-
94
-
95
-
96
-
97
-
98
-
99
-
100
-
101
-
102
-
103
-
104
-
105
-
106
-
107
-
108
-
109
-
110
-
111
-
112
-
113
-
114
-
115
-
116
-
117
-
118
-
119
-
120
-
121
-
122
-
123
-
124
-
125
-
126
-
127
-
128
-
129
-
130
-
131
-
132
-
133
-
134
-
135
-
136
-
137
-
138
-
139
-
140
-
141
-
142
-
143
-
144
-
145
-
146
-
147
-
148
-
149
-
150
-
151
-
152
-
153
-
154
-
155
-
156
-
157
-
158
-
159
-
160
-
161
-
162
-
163
-
164
-
165
-
166
-
167
-
168
-
169
-
170
-
171
-
172
-
173
-
174
-
175
-
176
-
177
-
178
-
179
-
180
-
181
-
182
-
183
-
184
-
185
-
186
-
187
-
188
-
189
-
190
-
191
-
192
 |
 |
1
ASRock
Z77 Pro3
Motherboard
English
Copyright Notice:
No part of this installation guide may be reproduced, transcribed, transmitted, or trans-
lated in any language, in any form or by any means, except duplication of documentation
by the purchaser for backup purpose, without written consent of ASRock Inc.
Products and corporate names appearing in this guide may or may not be registered
trademarks or copyrights of their respective companies, and are used only for identi
fi
ca-
tion or explanation and to the owners’ bene
fi
t, without intent to infringe.
Disclaimer:
Speci
fi
cations and information contained in this guide are furnished for informational use
only and subject to change without notice, and should not be constructed as a commit-
ment by ASRock. ASRock assumes no responsibility for any errors or omissions that may
appear in this guide.
With respect to the contents of this guide, ASRock does not provide warranty of any kind,
either expressed or implied, including but not limited to the implied warranties or condi-
tions of merchantability or
fi
tness for a particular purpose. In no event shall ASRock, its
directors, of
fi
cers, employees, or agents be liable for any indirect, special, incidental, or
consequential damages (including damages for loss of pro
fi
ts, loss of business, loss of
data, interruption of business and the like), even if ASRock has been advised of the pos-
sibility of such damages arising from any defect or error in the guide or product.
This device complies with Part 15 of the FCC Rules. Operation is subject to the following
two conditions:
(1) this device may not cause harmful interference, and
(2) this device must accept any interference received, including interference that
may cause undesired operation.
CALIFORNIA, USA ONLY
The Lithium battery adopted on this motherboard contains Perchlorate, a toxic substance
controlled in Perchlorate Best Management Practices (BMP) regulations passed by the
California Legislature. When you discard the Lithium battery in California, USA, please
follow the related regulations in advance.
“Perchlorate Material-special handling may apply, see
www.dtsc.ca.gov/hazardouswaste/perchlorate”
ASRock Website: http://www.asrock.com
Published February 2012
Copyright
©
2012 ASRock INC. All rights reserved.