Acer AC511 User Guide
Acer AC511 Manual
 |
View all Acer AC511 manuals
Add to My Manuals
Save this manual to your list of manuals |
Acer AC511 manual content summary:
- Acer AC511 | User Guide - Page 1
Before operating the monitor please read this manual thoroughly. This manual should be retained for future reference. Contents Packing list 1 Precautions 2 Installation Instructions 3 Swivel Base 3 Power cord 3 Video cable 4 Operating Instructions 5 General Instructions 5 Front panel control - Acer AC511 | User Guide - Page 2
hazards. Please refer all servicing to qualified service personnel. z To ensure satisfactory operation, use the monitor only with UL listed computers which have appropriate configured receptacles marked between 100 - 240 VAC, Min. 1.5A. z The wall socket shall be installed near the equipment and - Acer AC511 | User Guide - Page 3
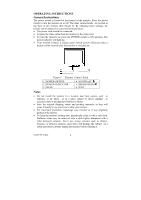
Remove Figure 1 Installing and Removing the Swivel Base Power Cord Power Source: 1. Make sure the power cord is the correct type that required in your area. 2. This monitor has a universal power supply that allows operation in either 100/120V AC or 220/240V AC voltage area ( No user adjustment is - Acer AC511 | User Guide - Page 4
Cord: Plug the power cord into the monitor's AC power socket. Then plug the power cord into a grounded AC outlet or ULapproved power strip or the power output socket on your PC. Caution: If the AC outlet is not grounded (with three holes), install the proper grounding adapter (not supplied). Figure - Acer AC511 | User Guide - Page 5
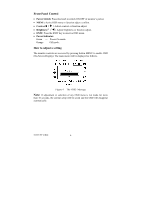
INSTRUCTIONS General Instructions The power switch is located at front panel of the monitor. Press the power switch to turn the monitor on or off. The other control knobs are located at the base of the monitor video cable from the monitor to the video card. • To turn the monitor install the monitor - Acer AC511 | User Guide - Page 6
Indicator: Green - Power On mode. Orange - Off mode. How to adjust a setting The monitor controls are accessed by pressing button MENU to enable OSD (On-Screen-Display). The main menu will 10 seconds, the current setup will be saved and the OSD will disappear automatically. 41A604-786-2A 英文 6 - Acer AC511 | User Guide - Page 7
Adjusting the picture The description for functional control icons 1. CONTRAST : Adjust the picture contrast. 2. BRIGHTNESS : Adjust the picture brightness. 3. H-CENTER : Adjust the horizontal position of the picture. 4. H-SIZE : Adjust the picture's horizontal size. 5. V-CENTER : - Acer AC511 | User Guide - Page 8
15. DEGAUSS : If color impurity occurs when moving or swiveling the monitor, press MENU Key and degauss to fix the picture condition. 16. MOIRE REDUCE : Moire is the result of interference between the phosphor layout and the video signal. In some cases, you may find the moire very noticeable - Acer AC511 | User Guide - Page 9
Employees ( NUTEK ). This feature is designed to conserve electrical energy by reducing power consumption when there is no video input signal present. When there is no video input signal this monitor, following a time-out period, will automatically switch to an OFF mode. This reduces the - Acer AC511 | User Guide - Page 10
*Check if the PC system is Plug & Play compatible *Check if the Video Card is Plug & Play compatible *Check if the D-15 plug pin of Video Cable is bent *Make sure the Monitor Drivers are installed *Adjust the Contrast and Brightness Controls. *Move electrical devices that may cause electrical - Acer AC511 | User Guide - Page 11
CRT Viewable Image Size Display Color • Analog input Input Signal • Video • Sync. Synchronization • Horizontal • Vertical Max. Resolution Video bandwidth Factory Preset Timings : User mode Timings : Misconvergence • Center • Corner Power Source Operating Humidity Weight Dimensions • Monitor AC 100 - Acer AC511 | User Guide - Page 12
OSD ) • CONTRAST • BRIGHTNESS • H-CENTER • H-SIZE • V-CENTER • V-SIZE • ZOOM • PINCUSHION • TRAPEZOID • PIN-BALANCE • PARALLELOGRAM • ROTATION • 6500°K • USER COLOR • 9300°K • DEGAUSS • MOIRE REDUCE • RECALL • EXIT • SELECT LANGUAGE Plug & Play DDC1/2B EPA ENERGY On mode ≤ 75W - Acer AC511 | User Guide - Page 13
APPENDIX B - FACTORY PRESET TIMING TABLE STANDARD IBM VGA VESA/85 VESA/85 VESA/60 RESOLUTION 720×400 640×480 640×480 800×600 1024×768 HORIZONTAL FREQUENCY 31.5kHz 31.5kHz 43.3kHz 53.6kHz 48.4kHz VERTICAL FREQUENCY 70Hz 60Hz 85Hz 85Hz 60Hz 41A604-786-2A 英文 13
-
 1
1 -
 2
2 -
 3
3 -
 4
4 -
 5
5 -
 6
6 -
 7
7 -
8
-
9
-
10
-
11
-
12
-
13
 |
 |

41A604-786-2A 英文
1
Before operating the monitor please read this manual thoroughly. This
manual should be retained for future reference.
Contents
Packing list
----------------------------------------------------
1
Precautions
----------------------------------------------------
2
Installation Instructions
-------------------------------------
3
Swivel
Base
--------------------------------------------------
3
Power cord
--------------------------------------------------
3
Video cable
--------------------------------------------------
4
Operating Instructions
--------------------------------------
5
General Instructions
--------------------------------------
5
Front panel control
----------------------------------------
6
How to adjust a setting
-----------------------------------
6
Adjusting the picture
-------------------------------------
7-8
Plug and play
--------------------------------------------------
9
Technical Support (FAQ)
-----------------------------------
10
Appendix A – Specifications
-------------------------------
11-12
Appendix B – Factory Preset Timing Table
------------
13
PACKING LIST
The product package should include the following items:
1.
Monitor
2.
Owner's Manual
3.
Power Cord
4.
Swivel Base