Acer AL1702 AL1702W User's Guide
Acer AL1702 Manual
 |
View all Acer AL1702 manuals
Add to My Manuals
Save this manual to your list of manuals |
Acer AL1702 manual content summary:
- Acer AL1702 | AL1702W User's Guide - Page 1
5 ADJUSTING THE VIEWING ANGLE 6 OPERATING INSTRUCTIONS 7 GENERAL INSTRUCTIONS 7 HOW TO ADJUST A SETTING 9 ADJUSTING THE PICTURE 10-11 PLUG AND PLAY 12 TECHNICAL SUPPORT(FAQ 13-14 ERROR MESSAGE & POSSIBLE SOLUTION --------- 15 APPENDIX 16 SPECIFICATIONS 16-17 FACTORY PRESET TIMING TABLE 18 - Acer AL1702 | AL1702W User's Guide - Page 2
that this product meets the ENERGY STAR® guidelines for energy efficiency. WARNING: To prevent fire or shock hazard, do not expose the monitor to rain or moisture. Dangerously high voltages are present inside the monitor. Do not open the cabinet. Refer servicing to qualified personnel only. 1 - Acer AL1702 | AL1702W User's Guide - Page 3
not overload power strips and extension cords. Overloading can result in fire or electric shock. z Never push any object into the slot on the monitor cabinet. It could short circuit parts causing a fire or electric shock. Never spill liquids on the monitor. z Do not attempt to service the monitor by - Acer AL1702 | AL1702W User's Guide - Page 4
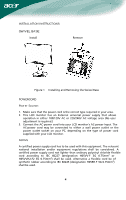
LCD Monitor • Crisp, Clear Display for Windows • Recommened Resolutions: 1440 X 900 @60Hz • EPA ENERGY STAR® • Ergonomic Design • Space Saving, Compact Case Design CHECKING THE CONTENTS OF THE PACKAGE The product package should include the following items: 1. LCD Monitor 2. Owner's Manual 3. Power - Acer AL1702 | AL1702W User's Guide - Page 5
INSTALLATION INSTRUCTIONS SWIVEL BASE IVEL BASE Install Remove Figure 1 Installing and Removing the Swivel Base POWERCORD Power Source: 1. Make sure that the power cord is the correct type required in your area. 2. This LCD monitor has an External universal power supply that allows operation in - Acer AL1702 | AL1702W User's Guide - Page 6
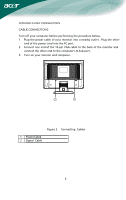
outlet. Plug the other end of the power cord into the PC port. 2. Connect one end of the 15-pin VGA cable to the back of the monitor and connect the other end to the computer's D-Sub port. 3. Turn on your monitor and computer. 1 2 Figure 2 Connecting Cables 1. Power Cable 2. Signal Cable 5 - Acer AL1702 | AL1702W User's Guide - Page 7
stand so you do not topple the monitor when you change the monitor's angle. • You are able to adjust the monitor's angle from -5° to 15°. 15 -5 Figure 3 NOTES • Do not touch the LCD screen when you change the angle. It may cause damage or break the LCD screen. • Careful attention is required not to - Acer AL1702 | AL1702W User's Guide - Page 8
OPERATING INSTRUCTIONS GENERAL INSTRUCTIONS Press the power button to turn the monitor on or off. The other control buttons are located at front panel of the monitor (See Figure 4). By changing these settings, the picture can be adjusted to your personal preferences. • The power cord should be - Acer AL1702 | AL1702W User's Guide - Page 9
Button: Press this button to turn the monitor ON or OFF, And display the monitor's state. • Power Indicator: Green - Power On mode. Orange - Stand by mode. set the HPos, VPos, Clock and Focus. NOTES • Do not install the monitor in a location near heat sources such as radiators or air ducts, or in - Acer AL1702 | AL1702W User's Guide - Page 10
HOW TO ADJUST A SETTING 1. Press the MENU-button to activate the OSD window. 2. Press < or > to select the desired function. 3. Press the MENU-button to select the function that you want to adjust. 4. Press < or > to change the settings of the current function. 5. To exit and save, select the exit - Acer AL1702 | AL1702W User's Guide - Page 11
ADJUSTING THE PICTURE The descriptions for function control LEDS Main Menu Icon Sub Menu Icon Sub Menu Item Description Contrast Brightness Adjusts the contrast between the foreground and background of the screen image. Adjusts the background brightness of the screen image. Focus Adjusts - Acer AL1702 | AL1702W User's Guide - Page 12
. V. Position Adjust the vertical position of the OSD. OSD Timeout Adjust the OSD timeout. N/A DDC/CI Turn ON/OFF DDC/CI support. N/A Information Show the resolution, H/V frequency and input port of current iput timing. N/A Reset Clear each old status of Auto-configuration and set the color - Acer AL1702 | AL1702W User's Guide - Page 13
a time-out period, will automatically switch to an OFF mode. This reduces the monitor's internal power supply consumption. After the video input signal is restored, full power is restored and the display is automatically redrawn. The appearance is similar to a "Screen Saver" feature except the - Acer AL1702 | AL1702W User's Guide - Page 14
TECHNICAL SUPPORT (FAQ) Problem & Question Possible Solution Power LED is not on *Check if the Power Switch is in the ON position *Power Cord should be connected No Plug . Missing one of the primary *Inspect the monitor's video cable and colors (RED, GREEN, or make sure that none of the pins - Acer AL1702 | AL1702W User's Guide - Page 15
frequency is not correct, the screen shows vertical stripes and the picture has not correct width. FOCUS adjusts the phase of the pixel clock signal. With a wrong phase adjustment the picture has horizontal disturbances in light picture. For FOCUS and CLOCK adjustment use "dot-pattern" or win 95 - Acer AL1702 | AL1702W User's Guide - Page 16
-cable is properly connected, If the connector is loose, tighten the connector's screws. 2. Check the signal -cable connection pins for damage. INPUT NOT SUPPORT : Your computer has been set to unsuitable display mode, set the computer to display mode given in the following table (See page 18). 15 - Acer AL1702 | AL1702W User's Guide - Page 17
170MHz Max. Resolution Plug & Play EPA ENERGY STAR® ON Mode 1440 × 900 @75Hz VESA DDC2BTM ≤ 37W OFF Mode ≤ 1W Input Connector D-Sub 15pin Input Video Signal Analog:0.7Vp-p(standard), 75 OHM, Positive Maximum Screen Size Horizontal : 367.2mm Vertical : 229.5mm Power Source 100-240V - Acer AL1702 | AL1702W User's Guide - Page 18
• Clock • H.Position • V.Position • Language • DDC/CI ON/OFF • (Warm) Color • (Cool) Color • RGB Color temperature • Reset • OSD position . timeout • Display information • Exit Power Consumption ( Maximum ) Regulatory Compliance 45 Watts CUL, FCC, VCCI, CCC, MPR II, CE, TÜV/GS , ISO13406-2 17 - Acer AL1702 | AL1702W User's Guide - Page 19
Preset Display Modes STANDARD DOS VESA VGA SVGA XGA SXGA WXGA RESOLUTION 720x400 640x480 640x480 640x480 640x480 800x600 800x600 800x600 800x600 832x624 1024x768 1024x768 1024x768 1152x864 1280x1024 1280x1024 1440x900 1440x900 HORIZONTAL FREQUENCY(KHz) 31.469 31.469 - Acer AL1702 | AL1702W User's Guide - Page 20
5 6 10 11 15 PIN NO. 1. 2. 3. 4. 5. 6. 7. 8. 15 - Pin Color Display Signal Cable DESCRIPTION Red Green Blue Monitor Ground DDC-return R-Ground G-Ground B-Ground PIN NO. 9. 10. 11. 12. 13. 14. 15. DESCRIPTION +5V Logic Ground Monitor Ground DDC-Serial Data H-Sync V-Sync DDC-Serial Clock 19
-
 1
1 -
 2
2 -
 3
3 -
 4
4 -
 5
5 -
 6
6 -
 7
7 -
8
-
9
-
10
-
11
-
12
-
13
-
14
-
15
-
16
-
17
-
18
-
19
-
20
 |
 |
.
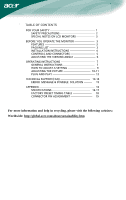
TABLE OF CONTENTS
FOR YOUR SAFETY -------------------------------------------------- 1
SAFETY PRECAUTIONS --------------------------------------- 2
SPECIAL NOTES ON LCD MONITORS --------------------
3
BEFORE YOU OPERATE THE MONITOR ---------------------- 3
FEATURES -------------------------------------------------------- 3
PACKING LIST --------------------------------------------------- 3
INSTALLATION INSTRUCTIONS ---------------------------- 4
CONTROLS AND CONNECTORS --------------------------- 5
ADJUSTING THE VIEWING ANGLE ------------------------ 6
OPERATING INSTRUCTIONS -------------------------------------- 7
GENERAL INSTRUCTIONS ----------------------------------- 7
HOW TO ADJUST A SETTING ------------------------------- 9
ADJUSTING THE PICTURE ------------------------------
10-11
PLUG AND PLAY ----------------------------------------------- 12
TECHNICAL SUPPORT(FAQ) ---------------------------------
13-14
ERROR
MESSAGE & POSSIBLE
SOLUTION ---------
15
APPENDIX ------------------------------------------------------------- 16
SPECIFICATIONS ------------------------------------------
16-17
FACTORY PRESET TIMING TABLE ---------------------
18
CONNECTOR PIN ASSIGNMENT ------------------------
19
For more information and help in recycling, please visit the following websites: