Acer AL1922 AL1922R User's Guide
Acer AL1922 Manual
 |
View all Acer AL1922 manuals
Add to My Manuals
Save this manual to your list of manuals |
Acer AL1922 manual content summary:
- Acer AL1922 | AL1922R User's Guide - Page 1
5 ADJUSTING THE VIEWING ANGLE 6 OPERATING INSTRUCTIONS 7 GENERAL INSTRUCTIONS 7 HOW TO ADJUST A SETTING 9 ADJUSTING THE PICTURE 10-11 PLUG AND PLAY 12 TECHNICAL SUPPORT(FAQ 13-14 ERROR MESSAGE & POSSIBLE SOLUTION ------- 15 APPENDIX 16 SPECIFICATIONS 16-17 FACTORY PRESET TIMING TABLE 18 - Acer AL1922 | AL1922R User's Guide - Page 2
monitor, please read this manual thoroughly. This manual in accordance with the instructions, may cause harmful equipment off and on, the user is encouraged to try to correct monitor to rain or moisture. Dangerously high voltages are present inside the monitor. Do not open the cabinet. Refer servicing - Acer AL1922 | AL1922R User's Guide - Page 3
or sold with the monitor. If you mount the monitor on a wall or shelf, use a mounting kit approved by the manufacturer and follow the kit instructions. z Slots and . Please refer all servicing to qualified service personnel. z To ensure satisfactory operation, use the monitor only with UL listed - Acer AL1922 | AL1922R User's Guide - Page 4
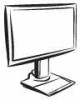
OPERATE THE MONITOR FEATURES • 48cm(19") TFT Color LCD Monitor • Crisp, Clear Display for Windows • Recommened Resolutions: 1280 X Monitor 2. Owner's Manual 3. Power Cord 4. 15-pin D-Sub Cable 5. DVI Cable (Only dual-input model) 6. Audio Cable 7. Pivot Software (Only AL1922 r) 8. Quick Start Guide - Acer AL1922 | AL1922R User's Guide - Page 5
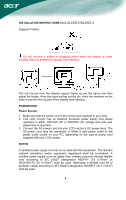
INSTRUCTIONS (only AL1922 h/AL1922 r) Support Frame Do not perform a pulling or plugging action when the display is under slanting status to prevent the display from ejecting. Pull out the pin from the display support user adjustment is required.) 3. Connect the AC-power cord into your LCD monitor's - Acer AL1922 | AL1922R User's Guide - Page 6
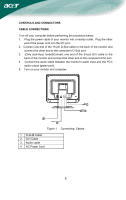
the other end of the power cord into the PC port. 2. Connect one end of the 15-pin D-Sub cable to the back of the monitor and connect the other end to the computer's D-Sub port. 3. (Only dual-input model)Connect one end of the 24-pin DVI cable to the - Acer AL1922 | AL1922R User's Guide - Page 7
, grasp the monitor with both hands on the right and left edge of the casing and move it to the desired position. Before adjusting the height, be sure to pull out the pin indicated in the figure (for details, please refer to Support Frame on Page 4). Rotate Adjustment (Only AL1922 r): 1. Before - Acer AL1922 | AL1922R User's Guide - Page 8
INSTRUCTIONS GENERAL INSTRUCTIONS Press the power button to turn the monitor on or off. The other control buttons are located at front panel of the monitor Connect the video cable from the monitor to the video card. • Press the power button to turn on the monitor position. The power indicator will - Acer AL1922 | AL1922R User's Guide - Page 9
button / Exit: 1. When OSD menu is in active status, this button will act as EXIT-KEY (EXIT OSD menu). 2. When OSD menu is in off status, press this to ship your monitor. • For maximum protection, repackage your monitor as it was originally packed at the factory. • To keep the monitor looking new, - Acer AL1922 | AL1922R User's Guide - Page 10
HOW TO ADJUST A SETTING 1. Press the MENU-button to activate the OSD window. 2. Press < or > to select the desired function. 3. Press the MENU-button to select the function that you want to adjust. 4. Press < or > to change the settings of the current function. 5. To exit and save, select - Acer AL1922 | AL1922R User's Guide - Page 11
Dual-Input Model, Digital Signal Input ADJUSTING THE PICTURE The descriptions for function control LEDS Sub Main Menu Menu Icon Icon Sub Menu Item Description Contrast Brightness Focus warm white. Set the color temperature to cool white. User /Red User/Green Adjusts Red/Green/Blue intensity - Acer AL1922 | AL1922R User's Guide - Page 12
model) N/A Digital N/A Information N/A Reset Select input signal from digital (DVI) Show the resolution, H/V frequency and input port of current iput timing. Clear each old status of Auto-configuration and set the color temperature to Cool. N/A Exit Save user adjustment and OSD disappear. 11 - Acer AL1922 | AL1922R User's Guide - Page 13
WILL APPEAR TO BE NON-FUNCTIONAL IF THERE IS NO VIDEO INPUT SIGNAL. IN ORDER FOR THIS MONITOR TO OPERATE PROPERLY, THERE MUST BE A VIDEO INPUT SIGNAL. This monitor meets the Green monitor standards as set by the Video Electronics Standards Association (VESA) and/or the United States Environmental - Acer AL1922 | AL1922R User's Guide - Page 14
TECHNICAL SUPPORT (FAQ) Problem & Question Power LED is not on No Plug & Play Picture is . *Computer Video Card should be snugly seated in its slot *Make sure monitor's video cable is properly connected to the computer. *Inspect monitor's video cable and make sure none of the pins are bent. *Make - Acer AL1922 | AL1922R User's Guide - Page 15
frequency is not correct, the screen shows vertical stripes and the picture has not correct width. FOCUS adjusts the phase of the pixel clock signal. With a wrong phase adjustment the picture has horizontal disturbances in light picture. For FOCUS and CLOCK adjustment use "dot-pattern" or win 95 - Acer AL1922 | AL1922R User's Guide - Page 16
-cable is properly connected , If the connector is loose, tighten the connector's screws. 2. Check the signal -cable connection pins for damage. INPUT NOT SUPPORT : Your computer has been set to unsuitable display mode ,set the computer to display mode given in the following table(See page 18). 15 - Acer AL1922 | AL1922R User's Guide - Page 17
Resolution signal (Only dual-input model) Maximum Screen Size Horizontal : 376.32mm Vertical : 301.056mm Power Source 100~264VAC,47~63Hz Environmental Operating Temp: 5° to 40°C Considerations Storage Temp.: -20° to 65°C Dimensions Weight (N. W.) Operating Humidity: 10% to 85% (AL1922 - Acer AL1922 | AL1922R User's Guide - Page 18
( Maximum ) Audio Output Regulatory Compliance • Auto Adjust Key • / Volume • Power Button • MENU/ENTER • Contrast • Brightness • Focus • Clock • H.Position • V.Position • Input signal Selection (Only dual-input model) • Language • Auto configuration (only Analog-input Model) • (Warm - Acer AL1922 | AL1922R User's Guide - Page 19
Preset Display Modes VIDEO MODE RESOLUTION VGA 640 × 480 640 × 480 HORIZONTAL FREQUENCY(kHz) 31.469 37.500 VERTICAL FREQUENCY(Hz) 59.940 75.000 SVGA 800 × 600 800 × 600 37. - Acer AL1922 | AL1922R User's Guide - Page 20
CONNECTOR PIN ASSIGNMENT 1 5 6 10 11 15 PIN NO. 1. 2. 3. 4. 5. 6. 7. 8. 15 - Pin Color Display Signal Cable DESCRIPTION PIN NO. Red 9. Green 10. Blue 11. Monitor Ground 12. DDC-return 13. R-Ground 14. G-Ground 15. B-Ground (Dual-Input Model) DESCRIPTION +5V Logic Ground
-
 1
1 -
 2
2 -
 3
3 -
 4
4 -
 5
5 -
 6
6 -
 7
7 -
8
-
9
-
10
-
11
-
12
-
13
-
14
-
15
-
16
-
17
-
18
-
19
-
20
 |
 |

.
TABLE OF CONTENTS
FOR YOUR SAFETY -------------------------------------------------- 1
SAFETY PRECAUTIONS -------------------------------------- 2
SPECIAL NOTES ON LCD MONITORS ------------------- 3
BEFORE YOU OPERATE THE MONITOR --------------------- 3
FEATURES -------------------------------------------------------- 3
PACKING LIST --------------------------------------------------- 3
INSTALLATION INSTRUCTIONS --------------------------- 4
CONTROLS AND CONNECTORS -------------------------- 5
ADJUSTING THE VIEWING ANGLE ----------------------- 6
OPERATING INSTRUCTIONS ------------------------------------- 7
GENERAL INSTRUCTIONS ---------------------------------- 7
HOW TO ADJUST A SETTING ------------------------------ 9
ADJUSTING THE PICTURE -----------------------------
10-11
PLUG AND PLAY -----------------------------------------------
12
TECHNICAL SUPPORT(FAQ) --------------------------------
13-14
ERROR
MESSAGE & POSSIBLE
SOLUTION -------
15
APPENDIX -------------------------------------------------------------
16
SPECIFICATIONS ------------------------------------------ 16-17
FACTORY PRESET TIMING TABLE ---------------------
18
CONNECTOR PIN ASSIGNMENT ------------------------
19