Acer AL2423W AL2423 LCD Monitor User's Guide EN
Acer AL2423W Manual
 |
View all Acer AL2423W manuals
Add to My Manuals
Save this manual to your list of manuals |
Acer AL2423W manual content summary:
- Acer AL2423W | AL2423 LCD Monitor User's Guide EN - Page 1
LCD monitors 2 Package contents 3 Installation instructions 3 Assembling the monitor 3 Adjusting the viewing angle 4 Connecting the devices 6 Switching the power 6 Adjusting display settings 7 External controls 7 OSD options...8 OSD menu ...8 Troubleshooting 11 General specifications 12 - Acer AL2423W | AL2423 LCD Monitor User's Guide EN - Page 2
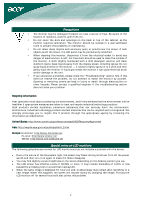
://swico.one.webbuild.ch/ Special notes on LCD monitors The following symptoms are normal for LCD monitors and do not indicate a problem with the device: • Due to the nature of the fluorescent light, the screen may flicker during initial use. Turn off the power switch and then turn it on again to - Acer AL2423W | AL2423 LCD Monitor User's Guide EN - Page 3
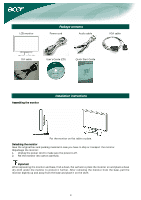
DVI cable User's Guide (CD) Quick Start Guide Assembling the monitor Installation instructions Put the monitor on flat table or plate. Detaching the monitor Save the original box and packing material in case you have to ship or transport the monitor. Repackage the monitor: 1. Unplug the power - Acer AL2423W | AL2423 LCD Monitor User's Guide EN - Page 4
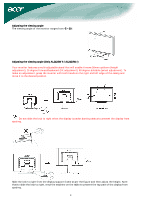
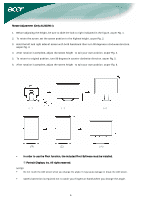
viewing angle of the monitor ranges from -5 - 20°. Adjusting the viewing angle (Only AL2423W h / AL2423W r) Your monitor features a multi-adjustable support frame as per the figure and then adjust the height. Note that to slide the lock to right, erect the machine on the table to prevent the top part - Acer AL2423W | AL2423 LCD Monitor User's Guide EN - Page 5
Rotate Adjustment (Only AL2423W r): 1. Before adjusting the height, be sure to slide the lock to right indicated in the figure. as per Fig. 1. 2. To rotate the screen, set the screen position to the highest height, as per Fig. 2. 3. Hold the left and right sides of screen with both hands and then - Acer AL2423W | AL2423 LCD Monitor User's Guide EN - Page 6
Caution: Make sure that the computer and the monitor are both disconnected from the power supply. 1 Power cord Attach the monitor to the power cord, and then insert the power cord into a properly grounded electrical socket. 2 VGA cable Connect the signal cable to the VGA input socket of the - Acer AL2423W | AL2423 LCD Monitor User's Guide EN - Page 7
on the power button or a video signal, check the connections. Adjusting display settings External controls 1 Auto If the OSD is active, press Auto to exit a selection in the OSD. If the OSD is inactive, press Auto and the monitor will automatically optimize the position, focus, and clock of your - Acer AL2423W | AL2423 LCD Monitor User's Guide EN - Page 8
Contrast: This adjusts dark and light shades of color relative to each other. Brightness: This adjusts the brightness of the picture on the screen. Focus: This removes any horizontal distortion and makes the picture clear and sharp. Clock: If there are any vertical stripes seen on the background - Acer AL2423W | AL2423 LCD Monitor User's Guide EN - Page 9
: Select the OSD menu language. Select from English, German, Spanish, Russia, Nederlands, French, Italian, and Finnish. OSD Settings: This changes the position of the OSD window on the screen and the staying time. 9 - Acer AL2423W | AL2423 LCD Monitor User's Guide EN - Page 10
Input signal: Select either Analog Input or Digital Input video. Information: This shows information about the screen. Reset: Resets all settings to default levels. Exit: Exit from OSD. 10 - Acer AL2423W | AL2423 LCD Monitor User's Guide EN - Page 11
optimize the position of your display. See horizontal and vertical position adjustment (p. 7). Caution: Do not attempt to service or open the monitor or computer yourself. Please refer all servicing to qualified service personnel if the "Troubleshooting" section cannot solve your problems. 11 - Acer AL2423W | AL2423 LCD Monitor User's Guide EN - Page 12
specifications Item LCD panel Display Max resolution Pixel pitch Color Brightness Contrast ratio Response time View angle of horizontal View angle of vertical External controls Power Button Control Buttons OSD Function Contrast/Brightness Focus/Clock Position Color Language OSD setting Input signal
-
 1
1 -
 2
2 -
 3
3 -
 4
4 -
 5
5 -
 6
6 -
 7
7 -
8
-
9
-
10
-
11
-
12
 |
 |

1
Table of Contents
Precautions
.......................................................................................................
2
Special notes on LCD monitors
........................................................................
2
Package contents
.............................................................................................
3
Installation instructions
...................................................................................
3
Assembling the monitor
..........................................................................................
3
Adjusting the viewing angle
.....................................................................................
4
Connecting the devices
...........................................................................................
6
Switching the power
..............................................................................................
6
Adjusting display settings
................................................................................
7
External controls
...................................................................................................
7
OSD options
......................................................................................................
8
OSD menu
..........................................................................................................
8
Troubleshooting
.............................................................................................
11
General specifications
....................................................................................
12