Acer AL2423W AL2423 LCD Monitor User's Guide EN - Page 6
Power switch - no signal
 |
View all Acer AL2423W manuals
Add to My Manuals
Save this manual to your list of manuals |
Page 6 highlights
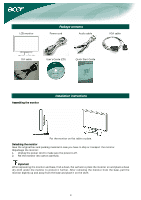
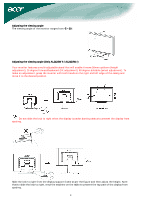
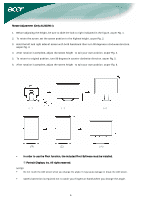
Connecting the devices Caution: Make sure that the computer and the monitor are both disconnected from the power supply. 1 Power cord Attach the monitor to the power cord, and then insert the power cord into a properly grounded electrical socket. 2 VGA cable Connect the signal cable to the VGA input socket of the monitor, and connect the signal cable to the VGA output socket of the graphics card on the computer. Then tighten the thumbscrews on the connector. 3 DVI-D cable Connect the signal cable to the DVI-D input socket of the monitor, and connect the signal cable to the DVI-D output socket of the graphics card on the computer. Then tighten the thumbscrews on the connector. 4 Audio cable Connect the audio input socket (AUDIO IN) of the LCD monitor and the computer by means of the audio cable. 5 Power switch On / off WARNING! Check the VGA card of your computer. Make sure the shape of the plug matches the shape of the socket it is inserted into. Also check that none of the pins are bent or otherwise damaged. VGA DVI-D Switching the power First, switch on the hard-switch on the backside of monitor, then turn on PC and power button on monitor's control panel. When you see the LED on the power button go green, this indicates the computer is ready for use. Allow about 10 seconds for the video signal to appear. If you do not see the green light 6
-
 1
1 -
 2
2 -
 3
3 -
 4
4 -
 5
5 -
 6
6 -
 7
7 -
 8
8 -
 9
9 -
 10
10 -
 11
11 -
 12
12
 |
 |
