Acer AL711 User Guide - Page 3
Introduction, Installation - screen
 |
View all Acer AL711 manuals
Add to My Manuals
Save this manual to your list of manuals |
Page 3 highlights
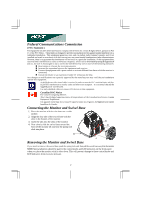
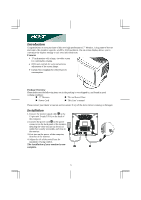
Introduction Congratulations on your purchase of this new high performance 17" Monitor. Using state-of-the-art electronics, this monitor support s a 1280 x 1024 resolution. The on-screen display allows you to customize the display settings to suit your individual taste. Features Ø 17-inch monitor with a large, viewable screen for comfortable viewing. Ø OSD user controls for easy and accurate adjustment of the screen image. Ø Energy Star compliant for reduced power consumption. Package Overview Please make sure the following items are in the packing it was shipped in, and found in good working condition: n 17" Monitor n Tilt and Swivel Base n Power Cord n This User's manual Please contact your dealer or nearest service centers if any of the above items is missing or damaged. Installation 1. Connect the monitor signal cable 1 to the 15-pin mini D-sub (VGA) on the back of the computer. 2. Connect the power cord to the power connector on the back panel of the monitor, then plug the other end into an electrical outlet that is easily accessible, and close to the monitor. 3. First turn on the power of the computer, then that of the monitor. 4. Adjust the tilt of the swivel base for maximum viewing comfort. The installation of your monitor is now complete. 3
-
 1
1 -
 2
2 -
 3
3 -
 4
4 -
 5
5 -
 6
6 -
 7
7
 |
 |
