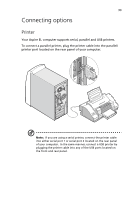
Acer Aspire EL User Guide - Page 38
Power cable, Then plug the other end of the power cable
 |
View all Acer Aspire EL manuals
Add to My Manuals
Save this manual to your list of manuals |
Page 38 highlights
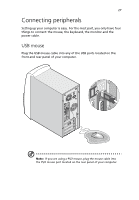
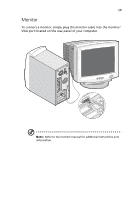
30 Power cable 3 Setting up your Aspire EL Caution! Before you proceed, check the voltage range in your area. Make sure that it matches your computer's voltage setting (see the voltage setting switch located on the rear panel of your computer). If they don't match, change your computer's voltage setting according to your area's voltage range. Plug the power cable into the power cable socket located on the rear panel of your computer. Then plug the other end of the power cable into a power outlet. The figure below shows a complete connection of the whole system.
-
 1
1 -
2
-
3
-
4
-
5
-
6
-
7
-
8
-
9
-
10
-
11
-
12
-
13
-
14
-
15
-
16
-
17
-
18
-
19
-
20
-
21
-
22
-
23
-
24
-
25
-
26
-
27
-
28
-
29
-
30
-
31
-
32
-
 33
33 -
 34
34 -
 35
35 -
 36
36 -
 37
37 -
 38
38 -
 39
39 -
 40
40 -
 41
41 -
 42
42 -
 43
43 -
44
-
45
-
46
-
47
-
48
-
49
-
50
-
51
-
52
-
53
-
54
-
55
-
56
-
57
-
58
-
59
-
60
-
61
-
62
-
63
-
64
-
65
-
66
 |
 |

3 Setting up your Aspire EL
30
Power cable
Caution!
Before you proceed, check the voltage range in your
area.
Make sure that it matches your computer’s voltage setting
(see the voltage setting switch located on the rear panel of your
computer).
If they don’t match, change your computer’s voltage
setting according to your area’s voltage range.
Plug the power cable into the power cable socket located on the rear
panel of your computer.
Then plug the other end of the power cable
into a power outlet.
The figure below shows a complete connection of
the whole system.