Acer C112 Quick Start Guide - Page 2
English - battery
 |
View all Acer C112 manuals
Add to My Manuals
Save this manual to your list of manuals |
Page 2 highlights
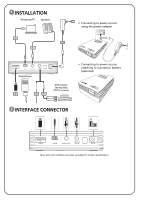
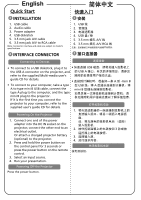
English 简体中文 Quick Start 快速入门 1 INSTALLATION 1 安装 1. USB cable 2. Audio cable 3. Power adapter 4. USB disk/stick 5. 3.5 mm jack A/V cable 6. 3.5 mm jack A/V to RCA cable Note: Connector interface and cable are subject to model's specifications. 2 INTERFACE CONNECTOR 1. USB 线 2. 音频线 3 4. USB 盘 / 棒 5. 3.5 mm 插孔 A/V 线 6. 3.5 mm 插孔 A/V-RCA 线 2 Connecting to Devices 连接设备 • To connect to a USB disk/stick, plug it to USB the USB A connector on the projector, and 的 USB A refer to the supplied Multi-media user's guide CD for details. A 型 -mini B • To connect to your computer, take a type 型 USB 线,将 A A to type mini B USB cable, connect the type A plug to the computer, and the type mini B plug to the projector. If it is the first time you connect the mini B projector to your computer, refer to the supplied user's guide CD for details. 1 Powering On the Projector 1. Connect one end of the power adapter into the DC IN socket on the projector; connect the other end to an electrical outlet. Or attach a charged projector battery (optional) to the projector. 2. Press and hold the power button on the control panel for 3 seconds or 2 3 3 4 press the power button on the remote control. 3. Select an input source. 4. Run your presentation. Powering Off the Projector Press the power button.
-
 1
1 -
 2
2
 |
 |
