Acer DC221HQ User Manual - Page 8
Getting started, Plug in and set up your Acer Chromebase, Turn on your Acer Chromebase
 |
View all Acer DC221HQ manuals
Add to My Manuals
Save this manual to your list of manuals |
Page 8 highlights
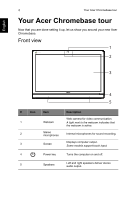
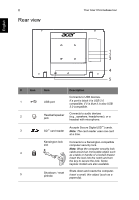
English 8 Getting started Getting started Plug in and set up your Acer Chromebase Open the stand until it snaps in place. Then, tilt the display panel to an angle of between 15 and 75 degrees from an upright position. Connect the DC-in jack to your Acer Chromebase and plug the AC adapter into an AC outlet. Turn on your Acer Chromebase On the Acer Chromebase, the power button is located in the lower-right corner beneath the screen. A "connect" screen will appear when the Acer Chromebase first boots up. Using the touchscreen Your Acer Chromebase uses a touchscreen for selecting items and entering information. Use your finger to tap the screen. You may use the following gestures:
-
 1
1 -
2
-
 3
3 -
 4
4 -
 5
5 -
 6
6 -
 7
7 -
 8
8 -
 9
9 -
 10
10 -
 11
11 -
 12
12 -
 13
13 -
14
-
15
-
16
-
17
-
18
-
19
-
20
-
21
-
22
-
23
-
24
-
25
-
26
-
27
-
28
-
29
-
30
-
31
-
32
-
33
-
34
-
35
-
36
-
37
-
38
 |
 |

Getting started
8
English
Getting started
Plug in and set up your Acer Chromebase
Open the stand until it snaps in place. Then, tilt the display panel to an
angle of between 15 and 75 degrees from an upright position.
Connect the DC-in jack to your Acer Chromebase and plug the AC adapter
into an AC outlet.
Turn on your Acer Chromebase
On the Acer Chromebase, the power button is located in the lower-right
corner beneath the screen. A "connect" screen will appear when the Acer
Chromebase first boots up.
Using the touchscreen
Your Acer Chromebase uses a touchscreen for selecting items and
entering information. Use your finger to tap the screen. You may use the
following gestures: