Acer FHD2400 User Guide - Page 8
Connecting USB cables - stand
 |
UPC - 827103136494
View all Acer FHD2400 manuals
Add to My Manuals
Save this manual to your list of manuals |
Page 8 highlights
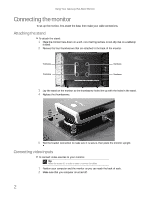
Using Your Gateway Flat-Panel Monitor 5 Connect other video sources (such as a DVD player, video camera, or receiver) to the appropriate video jacks on the back of the monitor. HDMI port DVI port VGA port Blue component video jack S-Video jack Green Red component component video jack video jack Composite video in jack • For basic video quality, connect your video device's composite video in jack to the corresponding jack on the back of your monitor (cable not included). • For better video quality, connect your video device's S-Video jack to the corresponding jack on the back of your monitor (cable not included). • For best video quality, connect your video device's component video (green Y, blue Pb, and red Pr) or HDMI jacks to the corresponding jacks on the back of your monitor (cables not included). 6 Route the cables through the cable clip on the back of the stand. If you plan on using the screen in portrait mode, make sure you leave enough slack in the cables for screen rotation. Connecting USB cables Your monitor has a built-in, four-port USB 2.0 hub that lets you conveniently connect USB devices. Because your computer case may be under your desk or inside a cabinet, these monitor-mounted USB ports can be much easier to access. To use the monitor's USB ports, you must first connect the monitor to a USB port on your computer. Because the USB hub uses power from the monitor, it does not require its own power connection. To connect USB cables: Important The built-in USB 2.0 hub provides only low-speed connections if its USB in port is connected to a USB 1.1 port on your computer or on a USB hub. Tip Use the USB 2.0 ports on the back of the monitor for connecting USB devices you want to keep connected most of the time, such as a keyboard, a mouse, or a printer. Use the USB 2.0 ports on the side of the monitor for connecting USB devices that are frequently disconnected, such as cameras, flash drives, and USB hard drives. 1 Connect the included USB cable to the USB in ("B" type) port on the back of your monitor, then connect the other end of the cable to a USB 2.0 port on your computer. USB in ("B" type) port USB ports 4
-
 1
1 -
2
-
 3
3 -
 4
4 -
 5
5 -
 6
6 -
 7
7 -
 8
8 -
 9
9 -
 10
10 -
 11
11 -
 12
12 -
 13
13 -
14
-
15
-
16
-
17
-
18
-
19
-
20
-
21
-
22
-
23
-
24
-
25
-
26
-
27
-
28
-
29
-
30
-
31
-
32
-
33
-
34
-
35
-
36
-
37
-
38
 |
 |
