Acer GD711 User Manual media - Page 10
Network & Internet, Connected devices, Display, Storage, Security & location, Accounts,
 |
View all Acer GD711 manuals
Add to My Manuals
Save this manual to your list of manuals |
Page 10 highlights
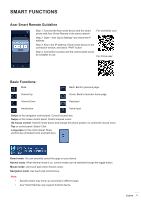
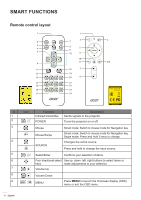
SMART FUNCTIONS Network & Internet Note: Before configuring the network settings, make sure the Wi-Fi dongle is connected to the USB port on the rear of the projector. To connect the projector to an available Wi-Fi network, do the following: 1. Slide the Wi-Fi switch from Off to On. 2. Select your preferred access point from the Wi-Fi list and click on it to make the connection. Note: If the selected Wi-Fi network is secured, you are prompted to enter a password. Note: In the Network & Internet menu, you can also view Wi-Fi data usage, add Virtual Private Network (VPN), and configure Private DNS mode settings. Connected devices Connect to a Bluetooth keyboard, Bluetooth mouse, Bluetooth remote controller, and manage connection preferences. Apps & notifications View recently opened apps, configure apps notifications, permissions, uninstall apps, and access settings. Display Adjust the display brightness, select a wallpaper, set a sleep timer, font size, and access advanced display settings. Storage View and manage storage usage. Security & location Set the screen lock, configure privacy settings, device admin apps, encryption and credentials, and enable or disable screen spinning. Accounts Add an Owner account and enable or disable apps to auto-refresh data if you make any modifications to the Owner account. Accessibility Configure text-to-speech output, display font size and display size, magnification settings, enable or disable large mouse pointer, removing animations, cursor dwell timing, screen auto-rotation, and more. 10 English
-
 1
1 -
2
-
3
-
4
-
 5
5 -
 6
6 -
 7
7 -
 8
8 -
 9
9 -
 10
10 -
 11
11 -
 12
12 -
 13
13 -
 14
14 -
 15
15 -
16
-
17
 |
 |
