Acer K520 User Manual (3D)
Acer K520 Manual
 |
View all Acer K520 manuals
Add to My Manuals
Save this manual to your list of manuals |
Acer K520 manual content summary:
- Acer K520 | User Manual (3D) - Page 1
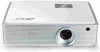
Acer Projectors with 3D Technology Quick Guide - Acer K520 | User Manual (3D) - Page 2
© 2011 All Rights Reserved. Acer Projector Series Quick Guide Original Issue: 02/2011 Model number Serial number Date of purchase Place of purchase - Acer K520 | User Manual (3D) - Page 3
English 3 The Acer projector you have bought has integrated DLP and NVIDIA 3D technology. If you have connected your projector to a computer, please read sections "Using NVIDIA 3D technology" on page 4 or "Using DLP 3D technology" on page 7. If you have connected your projector to a DVD or Blu-ray - Acer K520 | User Manual (3D) - Page 4
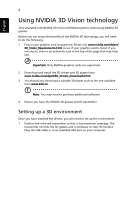
top of the page that may help you. Important: Only NVIDIA graphics cards are supported. 2 Download and install the 3D drivers and 3D player from www.nvidia.com/object/3D_Drivers_Downloads.html. 3 You should also download a suitable 3D player such as the one available from www.3dtv.at. Note: You may - Acer K520 | User Manual (3D) - Page 5
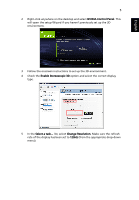
Control Panel. This will open the setup Wizard if you haven't previously set up the 3D environment. 3 Follow the onscreen instructions to set up the 3D environment. 4 Check the Enable Stereoscopic 3D option and select the correct display type. 5 In the Select a task... list, select Change Resolution - Acer K520 | User Manual (3D) - Page 6
6 If you are viewing Blu-ray 3D content over an HDMI 1.4a or later connection, this will be set automatically. 6 Press the menu button on the projector remote control to open the OSD. Select the Image section (second menu option) on the left-hand side of the window. 7 Set 3D Glasses to Nvidia - Acer K520 | User Manual (3D) - Page 7
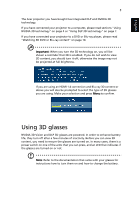
Key on your projector's remote control to open Acer eView Management. From the 3D options, select Nvidia 3D Vision. Using the stereoscopic player You need to have a stereoscopic player in order to view 3D content. The instructions below explain how to view 3D content using the Stereoscopic - Acer K520 | User Manual (3D) - Page 8
Play ready projectors when using DLP 3D glasses. Before you can enjoy the benefits of the DLP 3D technology, you will need to do the following. 1 Ensure your graphics card supports 3D playback. Note: Please refer to your graphics card's documentation. 2 Download and install the latest drivers for - Acer K520 | User Manual (3D) - Page 9
3 Set 3D Glasses to DLP 3D. 4 Alternatively, press the Empowering Key on your projector's remote control to open Acer eView Management. From the 3D options, select DLP 3D. 5 If you find that the 3D content is not displaying properly, try selecting 3D Sync Invert from the projector OSD or Acer eView - Acer K520 | User Manual (3D) - Page 10
and the NVIDIA 3D Vision drivers installed, you may need to disable the Stereoscopic feature to use the DLP 3D technology. Using the stereoscopic player You need to have a stereoscopic player in order to view 3D content. The instructions below explain how to view 3D content using the Stereoscopic - Acer K520 | User Manual (3D) - Page 11
on the projector remote control to open the OSD. Select the Image section (second menu option) on the left-hand side of the window. 2 Set 3D to DLP 3D. 3 Alternatively, press the Empowering Key on your projector's remote control to open Acer eView Management. From the 3D options, select DLP 3D. - Acer K520 | User Manual (3D) - Page 12
English 12 4 If you find that the 3D content is not displaying properly, try selecting 3D Sync Invert from the projector OSD or Acer eView Management. 5 If this does not improve the image, and you are using an HDMI 1.4 connection, change the 3D Format to match the signal sent by your player. Note:
-
 1
1 -
 2
2 -
 3
3 -
 4
4 -
 5
5 -
 6
6 -
 7
7 -
8
-
9
-
10
-
11
-
12
 |
 |

Acer Projectors
with 3D Technology
Quick Guide