Acer PT.SBP0X.001 Aspire G7710 Series User's Guide - EN - Page 66
Removing and installing a hard drive
 |
UPC - 884483473359
View all Acer PT.SBP0X.001 manuals
Add to My Manuals
Save this manual to your list of manuals |
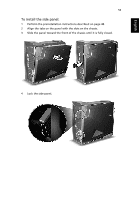
Page 66 highlights
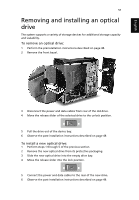
English 54 6 Upgrading your computer Removing and installing a hard drive The computer supports up to four easy-swap hard disk drives. Each hard disk is mounted in a carrier that holds a standard 3.5-inch Serial ATA hard drive and connects to a SATA interface on the disk cage backplane. Aspire G7710's EasySwap technology allows you to replace hard drives without powering down the system. Easy-swap technology shortens system downtime for changing the hard disk or performing an upgrade. To remove a hard drive: 1 Observe the ESD precautions described on page 48. 2 Open the drive bay door. 3 Press the HDD carrier latch, then pull the lever and slide the carrier from the chassis. 4 Place the HDD carrier on a clean, static-free network surface.
-
 1
1 -
2
-
3
-
4
-
5
-
6
-
7
-
8
-
9
-
10
-
11
-
12
-
13
-
14
-
15
-
16
-
17
-
18
-
19
-
20
-
21
-
22
-
23
-
24
-
25
-
26
-
27
-
28
-
29
-
30
-
31
-
32
-
33
-
34
-
35
-
36
-
37
-
38
-
39
-
40
-
41
-
42
-
43
-
44
-
45
-
46
-
47
-
48
-
49
-
50
-
51
-
52
-
53
-
54
-
55
-
56
-
57
-
58
-
59
-
60
-
 61
61 -
 62
62 -
 63
63 -
 64
64 -
 65
65 -
 66
66 -
 67
67 -
 68
68 -
 69
69 -
 70
70 -
 71
71 -
72
-
73
-
74
-
75
-
76
-
77
-
78
-
79
-
80
-
81
-
82
-
83
-
84
-
85
-
86
-
87
-
88
-
89
-
90
-
91
-
92
-
93
-
94
-
95
-
96
-
97
-
98
-
99
-
100
-
101
-
102
 |
 |

6 Upgrading your computer
54
English
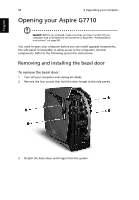
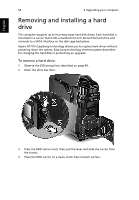
Removing and installing a hard
drive
The computer supports up to four easy-swap hard disk drives. Each hard disk is
mounted in a carrier that holds a standard 3.5-inch Serial ATA hard drive and
connects to a SATA interface on the disk cage backplane.
Aspire G7710’s EasySwap technology allows you to replace hard drives without
powering down the system. Easy-swap technology shortens system downtime
for changing the hard disk or performing an upgrade.
To remove a hard drive:
1
Observe the ESD precautions described on page 48.
2
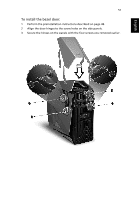
Open the drive bay door.
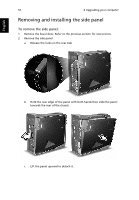
3
Press the HDD carrier latch, then pull the lever and slide the carrier from
the chassis.
4
Place the HDD carrier on a clean, static-free network surface.