Acer RC111 User Manual - Page 31
Power on the system
 |
View all Acer RC111 manuals
Add to My Manuals
Save this manual to your list of manuals |
Page 31 highlights
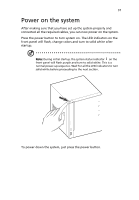
31 Power on the system After making sure that you have set up the system properly and connected all the required cables, you can now power on the system. Press the power button to turn system on. The LED indicators on the front panel will flash, change colors and turn to solid white after startup. Note: During initial startup, the system status indicator on the front panel will flash purple and turn to solid white. This is a normal power-up sequence. Wait for all the LED indicators to turn solid white before proceeding to the next section. To power down the system, just press the power button.
-
 1
1 -
2
-
3
-
4
-
5
-
6
-
7
-
8
-
9
-
10
-
11
-
12
-
13
-
14
-
15
-
16
-
17
-
18
-
19
-
20
-
21
-
22
-
23
-
24
-
25
-
 26
26 -
 27
27 -
 28
28 -
 29
29 -
 30
30 -
 31
31 -
 32
32 -
 33
33 -
 34
34 -
 35
35 -
 36
36 -
37
-
38
-
39
-
40
-
41
-
42
-
43
-
44
-
45
-
46
-
47
-
48
-
49
-
50
-
51
-
52
-
53
-
54
-
55
-
56
-
57
-
58
-
59
-
60
-
61
-
62
-
63
-
64
-
65
-
66
-
67
-
68
-
69
-
70
-
71
-
72
-
73
-
74
-
75
-
76
-
77
-
78
-
79
-
80
-
81
-
82
-
83
-
84
-
85
-
86
-
87
-
88
-
89
-
90
-
91
-
92
-
93
-
94
-
95
-
96
-
97
-
98
-
99
-
100
-
101
-
102
-
103
 |
 |

31
Power on the system
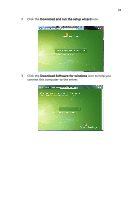
After making sure that you have set up the system properly and
connected all the required cables, you can now power on the system.
Press the power button to turn system on. The LED indicators on the
front panel will flash, change colors and turn to solid white after
startup.
Note:
During initial startup, the system status indicator
on the
front panel will flash purple and turn to solid white. This is a
normal power-up sequence. Wait for all the LED indicators to turn
solid white before proceeding to the next section.
To power down the system, just press the power button.