Acer X1260 X1160 User's Guide EN
Acer X1260 Manual
 |
View all Acer X1260 manuals
Add to My Manuals
Save this manual to your list of manuals |
Acer X1260 manual content summary:
- Acer X1260 | X1160 User's Guide EN - Page 1
Acer Projector X1160/X1260 Series User's Guide - Acer X1260 | X1160 User's Guide EN - Page 2
All Rights Reserved. Acer Projector X1160/X1260 Series User's Guide Original Issue: 8/2007 Changes may be made periodically to the information in this publication without obligation to notify any person of such revisions or changes. Such changes will be incorporated in new editions of this manual or - Acer X1260 | X1160 User's Guide EN - Page 3
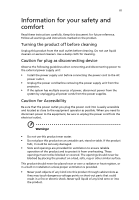
to the AC power outlet. • Unplug the power cord before removing the power supply unit from the projector. • If the system has multiple sources of power, disconnect power from the system by unplugging all power cords from the power supplies. Caution for Accessibility Be sure that the power outlet - Acer X1260 | X1160 User's Guide EN - Page 4
unexpected short current or damage rotor devices, lamp. Using electrical power • This product receptacle by plugging in too many devices. The overall system load must not exceed 80% of the branch circuit rating power supply cord set. If you need to replace the power cord set, make sure that the new - Acer X1260 | X1160 User's Guide EN - Page 5
instructions Note: Adjust only those controls that are covered by the operating instructions, since improper adjustment of other controls • Do not look into the projector's lens when the lamp is on. The bright may hurt your eyes. • Turn on the projector first and then signal sources • Do - Acer X1260 | X1160 User's Guide EN - Page 6
and follow all changing instructions. • Reset the "Lamp Hour Reset" function from the Onscreen display "Management" menu after replacing the lamp module. • Do not attempt to disassemble this projector. There are dangerous high voltages inside which may hurt you. The only user serviceable part is the - Acer X1260 | X1160 User's Guide EN - Page 7
external RF energy or if you have any questions. Switch off your device in health care facilities when any regulations posted in these areas instruct you to do so. Hospitals or health care facilities may be using equipment that could be sensitive to external RF transmissions. Pacemakers. Pacemaker - Acer X1260 | X1160 User's Guide EN - Page 8
aids. Some digital wireless devices may interfere with some hearing aids. If interference occurs, consult your service provider. Vehicles RF signals may affect improperly installed or inadequately shielded electronic systems in motor vehicles such as electronic fuel injection systems, electronic - Acer X1260 | X1160 User's Guide EN - Page 9
Waste from Electrical and Electronics Equipment (WEEE) regulations, visit http://global.acer.com/about/ sustainability.htm Mercury advisory For projectors or electronic products containing an LCD/CRT monitor or display: Lamp(s) inside this product contain mercury and must be recycled or disposed of - Acer X1260 | X1160 User's Guide EN - Page 10
• Do not use lens cap when projector is in operation. • When the lamp reaches the end of its life, it will burn out and may make a loud popping sound. If this happens, the projector will not turn back on until the lamp module has been replaced. To replace the lamp, follow the procedures listed under - Acer X1260 | X1160 User's Guide EN - Page 11
and zoom 12 User Controls 14 Acer Empowering Technology 14 Onscreen Display (OSD) Menus 15 Color setting 16 Image setting 17 Management setting 19 Audio setting 21 Language setting 22 Appendices 23 Troubleshooting 23 LED & Alarm Definition Listing 27 Replacing the Lamp 28 - Acer X1260 | X1160 User's Guide EN - Page 12
Ceiling Mount Installation 29 Specifications 32 Compatibility modes 34 Regulations and safety notices 36 - Acer X1260 | X1160 User's Guide EN - Page 13
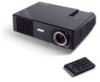
Product Features This product is a single-chip DLP® projector. Outstanding features include: • DLP® technology • X1160 series: Native 800 x 600 SVGA resolution X1260 series : Native 1024 x 768 XGA resolution 4:3 / 16:9 aspect ratio supported • ColorBoost technology comes with excellent color - Acer X1260 | X1160 User's Guide EN - Page 14
the items shown below. Check to make sure your unit is complete. Contact your dealer immediately if any thing is missing. Projector with lens cap Power cord CR2025 3V Composite video cable Battery User's guide Remote control VGA cable Security card Acer Projector Quick Start Guide Quick start - Acer X1260 | X1160 User's Guide EN - Page 15
English 3 Projector Overview Projector Outlook Front / upper side 1 2 3 4 # Description 1 Zoom ring (X1260 series) 2 Focus ring 3 Zoom lens 4 Lens cap Rear side 5 6 7 # Description 5 Power button and Power Indicator LED 6 Remote control 7 Remote control receiver 1 237 4 8 9 5 # - Acer X1260 | X1160 User's Guide EN - Page 16
English 4 Remote Control and Control Panel Layout 1 2 9 3 10 4 5 9 6 11 7 12 8 13 14 # Icon Function 1 Infrared transmitter 2 Power/Power LED 3 POWER Description Sends signals to the projector. Power button and Power Indicator LED. Refer to the "Turning the Projector On/Off" - Acer X1260 | X1160 User's Guide EN - Page 17
Description Momentarily turns off the video. Press "HIDE" to hide the image, press again to display the image. Unique Acer functions: eView, eTimer Management. To pause the screen image. Note: Remote Control Placement Please refer to the illustration to attach the remote control to the projector. - Acer X1260 | X1160 User's Guide EN - Page 18
Video Output # Description 1 Power cord 2 VGA cable 3 Composite video cable 4 USB cable # Description 5 S-Video cable 6 Audio cable jack/jack 7 RS232 cable Note: To ensure the projector works well with your computer, please make sure the timing of the display mode is compatible with the - Acer X1260 | X1160 User's Guide EN - Page 19
projector is locked onto a specific source type and there is no such type of input signal detected. • If the screen displays "No Signal", please make sure the signal cables are securely connected. • If you connect to multiple sources at the same time, use the "Source" button on the remote control - Acer X1260 | X1160 User's Guide EN - Page 20
is about to happen: "Projector Overheated. Lamp will automatically turn off soon." • If the Power indicator quick flashing RED and steady BLUE by returns and the message below is displayed onscreen, please contact your local dealer or service center: "Fan fail. Lamp will automatically turn off soon - Acer X1260 | X1160 User's Guide EN - Page 21
English 9 Adjusting the Projected Image Adjusting the Height of Projected Image The projector is equipped with elevator feet for adjusting the height of image. To raise/lower the image: 1 Use Tilt adjusting wheel (Illustration #1) to fine-tune the display angle. 1 Tilt adjusting wheel - Acer X1260 | X1160 User's Guide EN - Page 22
size and distance Consult the table below to find the optimal image sizes achievable when the projector is positioned at a desired distance from the screen. • X1160 series Example: If the projector is 3 m from the screen, good image quality is possible for 76" image sizes . • X1260 series Example - Acer X1260 | X1160 User's Guide EN - Page 23
252 513 x 385 442 11 252 512 x 384 441 278 564 x 423 487 12 275 558 x 419 481 303 615 x 462 531 Zoom Ratio: 1.1x X1160 series Desired Distance (m) 1.5 2 2.5 3 3.5 4 4.5 5 6 7 8 9 10 11 12 Screen size Diagonal (inch) 38 50 63 76 88 101 114 126 151 177 202 227 252 278 303 - Acer X1260 | X1160 User's Guide EN - Page 24
m B Desired Distance The table below shows how to achieve a desired image size by adjusting either the position or the zoom ring. • X1160 series Example: to obtain an image size of 50" set the projector at 2 m distance from the screen. • X1260 series Example: to obtain an image size of 50" set the - Acer X1260 | X1160 User's Guide EN - Page 25
zoom 1.3 1.7 2.2 2.6 3.1 3.5 3.9 4.4 5.2 6.6 7.9 8.7 10.9 Top (cm) From base to top of image 53 70 88 105 123 140 158 175 210 263 315 351 438 526 X1160 series Desired Distance (m) 30 40 50 60 70 80 90 100 120 150 180 200 250 300 Screen size Diagonal (inch) W (cm) x H (cm) 61 - Acer X1260 | X1160 User's Guide EN - Page 26
English 14 User Controls Acer Empowering Technology Empowering Key Acer Empowering Key provides three Acer unique functions, they are "Acer eView Management"and "Acer eTimer Management" respectively. Press " " key for more than one second to launch the Onscreen display main menu to modify its - Acer X1260 | X1160 User's Guide EN - Page 27
in the submenu and adjust as described above. • Press "MENU" on the remote control, the screen will return to the main menu. • To exit OSD, press "MENU" on the remote control again. The OSD menu will close and the projector will automatically save the new settings. Main manu Sub manu Setting - Acer X1260 | X1160 User's Guide EN - Page 28
Utilizador 2: Memorize user's settings. Adjust the brightness of the image. • Press to darken image. • Press to lighten the image. "Contrast" controls the difference between the lightest and darkest parts of the picture. Adjusting the contrast changes the amount of black and white in the image - Acer X1260 | X1160 User's Guide EN - Page 29
amount of red in the image. Note: "Saturation" and "Tint" functions are not supported under computer mode or DVI mode. Image setting Keystone Adjust image distortion caused by tilting . Front-Ceiling • When you select this function, the projector inverts the image for ceiling-mounted projection. - Acer X1260 | X1160 User's Guide EN - Page 30
function to make the necessary adjustments. Synchronizes the signal timing of the projector with the graphics card. If you experience an unstable or flickering image, "V. Position", "Frequency" and "Tracking" functions are not supported under DVI or Video mode. Note: "Sharpness" functions is not - Acer X1260 | X1160 User's Guide EN - Page 31
Source" button on the remote control for the next channel. Choose the menu location on the display screen. Displays the lamp's elapsed operating time 10 minute to 990 minutes. • When the time is up, the projector will prompt the user to enter the password again. • The factory default setting of " - Acer X1260 | X1160 User's Guide EN - Page 32
: • An unique 6-digit "Universal Password" which is Acer service center. Disable Power button • When "ON" is selected, only the Power Key on the remote control can be used. If "OFF" is selected, then the Power Key on either the remote control or the control panel can be used to control the projector - Acer X1260 | X1160 User's Guide EN - Page 33
21 Audio setting English Volume Mute • Press to decrease the volume. • Press to increase the volume. • Choose "On" to mute the volume. • Choose "Off" to restore the volume. Note: Audio menu is for X1260 series. - Acer X1260 | X1160 User's Guide EN - Page 34
22 Timer setting English Timer Start Timer Period Timer Display Timer Location • Press to start or stop the timer. • Press or to adjust the timer period. • Press or to which timer mode to display on the screen. • Choose the location of the timer on the screen. Language setting Language - Acer X1260 | X1160 User's Guide EN - Page 35
23 Appendices English Troubleshooting If you experience a problem with your Acer projector, refer to the following troubleshooting guide. If the problem persists, please contact your local reseller or service center. Image Problems and Solutions # Problem Solution 1 No image appears • - Acer X1260 | X1160 User's Guide EN - Page 36
• Press "RESYNC" on the remote control. or incorrectly displayed image (For the projector. 4 The screen of the • If you are using a Microsoft® Windows® based your computer's manual for detailed information. • If you are using an Apple® Mac® OS based notebook: In System Preferences, open - Acer X1260 | X1160 User's Guide EN - Page 37
out or makes a popping sound When the lamp reaches the end of its useful life, it will burn out and may make a loud popping sound. If this happens, the projector will not turn on until the lamp module has been replaced. To replace the lamp, follow the procedures in the "Replacing the Lamp" section. - Acer X1260 | X1160 User's Guide EN - Page 38
# Condition 1 Message Message Reminder Fan Fail - the system fan is not working. Projector Overheated - the projector has exceeded its recommended operating temperature and must be allowed to cool down before it may be used. Replace the lamp - the lamp is about to reach its maximum lifetime - Acer X1260 | X1160 User's Guide EN - Page 39
ON to OFF 100ms -- Standby V -- Power button ON -- V Lamp retry -- Quick Flashing Power off (Cooling state) Quick Flashing -- Power Error (Fan lock) Quick Flashing RED and Steady BLUE by returns Error (Lamp breakdown) Quick Flashing BLUE and Steady RED by returns Error (Color Wheel - Acer X1260 | X1160 User's Guide EN - Page 40
(s) from the cover, and then pull out the lamp. The projector will detect the lamp life. You will be shown a warning message "Lamp is approaching the end of its useful life in full power operation. Replacement Suggested!" When you see this message, change the lamp as soon as possible. Make sure the - Acer X1260 | X1160 User's Guide EN - Page 41
English 29 Ceiling Mount Installation If you wish to install the projector using a ceiling mount, please refer to the steps below: 1 Drill four holes into a solid, structurally sound part of the ceiling, and secure the mount base. Note: Screws are not included. Please obtain the appropriate screws - Acer X1260 | X1160 User's Guide EN - Page 42
Spacer - For heat dissipation Note: It is recommended that you keep a reasonable space between the bracket and the projector to allow for proper heat distribution. Use two washers for extra support, if deemed necessary. 4 Attach the ceiling bracket to the ceiling rod. Screw Type A 50 mm length 08 - Acer X1260 | X1160 User's Guide EN - Page 43
appropriate type of screw and washer for each model is listed in the table below. 3 mm diameter screws are enclosed in the screw pack. Models X1160/X1260 Screw Type B Diameter (mm) Length (mm) 3 20 Washer Type Large Small V V - Acer X1260 | X1160 User's Guide EN - Page 44
, f = 21.79 mm - 23.99 mm, 1.1X manual zoom lens X1160: 25" (0.64 m) - 303" (7.70 m) X1260: 23" (0.58 m) - 303" (7.70 m) 3.3' (1.0 m) - 39.4' (12.0 m) 50"@2m (1.95 - 2.15:1) X1160: 31k - 69 kHz X1260: 31k - 80 kHz 50 - 85 Hz 160 W user-replaceable lamp 4000 hours +/- 40 degrees Internal speaker with - Acer X1260 | X1160 User's Guide EN - Page 45
VGA output x 1 • 3.5 mm audio jack input x 1 • AC power cord x1 • VGA cable x1 • Composite video cable x1 • Remote control x1 • Battery x 1 (for remote control) • User's guide (CD-ROM) x 1 • Quick start guide x 1 • Security card x 1 * Design and specifications are subject to change without notice. - Acer X1260 | X1160 User's Guide EN - Page 46
English 34 Compatibility modes A. VGA Analog 1 VGA Analog - PC Signal Modes VGA SVGA XGA SXGA QuadVGA SXGA+ Power Mac G4 PowerBook G4 Resolution 640x480 640x480 640x480 640x480 720x400 720x400 800x600 800x600 800x600 800x600 800x600 832x624 1024x768 1024x768 1024x768 1024x768 1152x864 1152x864 - Acer X1260 | X1160 User's Guide EN - Page 47
English 35 1024x768 60 1152x870 75 *1280x960 75 i Mac DV (G3) 1024x768 75 48.40 68.68 75.00 60.00 2 VGA Analog - Extended Wide Timing Modes WXGA Resolution 1280x768 1280x768 *1280x768 1280x720 1280x800 1440x900 V.Frequency [Hz] 60 75 85 60 60 60 H.Frequency [KHz] 48.36 57.60 68.630 - Acer X1260 | X1160 User's Guide EN - Page 48
comply with the limits for a Class B digital device pursuant to Part 15 of the FCC installed and used in accordance with the instructions, may cause harmful interference to radio communications user's authority, which is granted by the Federal Communications Commission, to operate this projector. - Acer X1260 | X1160 User's Guide EN - Page 49
. Declaration of Conformity for EU countries Hereby, Acer, declares that this projector series is in compliance with the essential requirements and other relevant provisions of Directive 1999/5/EC. (Please visit http://global.acer.com/support/certificate.htm for complete documents.) Compliant with - Acer X1260 | X1160 User's Guide EN - Page 50
English 38 European Union (EU) R&TTE Directive 1999/5/EC as attested by conformity with the following harmonized standard: • Article 3.1(a) Health and Safety • EN60950-1:2001 • EN50371:2002 • Article 3.1(b) EMC • EN301 489-1 V1.4.1:2002 • EN301 489-17 V1.2.1:2002 • Article 3.2 Spectrum Usages • - Acer X1260 | X1160 User's Guide EN - Page 51
/ Importer is responsible for this declaration: Product: Model Number: Machine Type: Name of Responsible Party: Address of Responsible Party: Contact Person: Phone No.: Fax No.: DLP Projector DSV0705/DNX0708 X1160/X1260 series Acer America Corporation 333 West San Carlos St. San Jose, CA 95110 - Acer X1260 | X1160 User's Guide EN - Page 52
: Mr. Easy Lai Tel: 886-2-8691-3089 Fax: 886-2-8691-3000 E-mail: [email protected] Hereby declare that: Product: Trade Name: Model Number: Machine Type: DLP Projector Acer DSV0705/DNX0708 X1160/X1260 series Is compliant with the essential requirements and other relevant provisions of the
-
 1
1 -
 2
2 -
 3
3 -
 4
4 -
 5
5 -
 6
6 -
 7
7 -
8
-
9
-
10
-
11
-
12
-
13
-
14
-
15
-
16
-
17
-
18
-
19
-
20
-
21
-
22
-
23
-
24
-
25
-
26
-
27
-
28
-
29
-
30
-
31
-
32
-
33
-
34
-
35
-
36
-
37
-
38
-
39
-
40
-
41
-
42
-
43
-
44
-
45
-
46
-
47
-
48
-
49
-
50
-
51
-
52
 |
 |

Acer Projector
X1160/X1260 Series
User's Guide