Adobe 65036570 Tutorial
Adobe 65036570 - Director - PC Manual
 |
UPC - 883919173603
View all Adobe 65036570 manuals
Add to My Manuals
Save this manual to your list of manuals |
Adobe 65036570 manual content summary:
- Adobe 65036570 | Tutorial - Page 1
CREATE A BASIC MOVIE IN DIRECTOR - Adobe 65036570 | Tutorial - Page 2
ADOBE DIRECTOR 11.0 2 Create a basic movie Building Your First Basic Movie This tutorial takes you through the steps of creating your first movie in Director®. If - Adobe 65036570 | Tutorial - Page 3
ADOBE DIRECTOR 11.0 3 Create a basic movie The movie consists of three scenes. The , click the Movie tab. If the Property inspector is not in graphical view, as shown in the following illustration, click the List View Mode button to switch to the graphical view. To see the names of buttons (like - Adobe 65036570 | Tutorial - Page 4
ADOBE DIRECTOR 11.0 4 Create a basic movie 7 In the Property inspector, type 50 in the Channels text box and press Enter (Windows) or Return (Macintosh), and then - Adobe 65036570 | Tutorial - Page 5
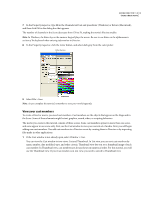
ADOBE DIRECTOR 11.0 5 Create a basic movie 2 To toggle from List view to Thumbnail view, click the Cast View Style button in the upper left corner of - Adobe 65036570 | Tutorial - Page 6
The Text window opens. ADOBE DIRECTOR 11.0 6 Create a basic movie Cast Member Name Size Italic Bold You use the Text window to edit text cast members. You will find that - Adobe 65036570 | Tutorial - Page 7
ADOBE DIRECTOR 11.0 7 Create a basic movie Add sprites to the Stage To begin building the scene, you drag the TitleText cast member, button cast member, and - Adobe 65036570 | Tutorial - Page 8
ADOBE DIRECTOR 11.0 8 Create a basic movie c In the X text box, type 15. In the Y text box, type 15, and press Enter (Windows) or Return (Macintosh). The - Adobe 65036570 | Tutorial - Page 9
ADOBE DIRECTOR 11.0 9 Create a basic movie 3 Drag the Animation button cast member from the Cast window to the Stage. Place it on the lower right side - Adobe 65036570 | Tutorial - Page 10
ADOBE DIRECTOR 11.0 10 Create a basic movie 2 Make sure that the Tool palette is Button tool. 4 Drag a horizontal rectangle toward the right side of the Stage, as shown in the following illustration: 5 When you release the mouse button, the rectangle you created becomes an editable text box in which - Adobe 65036570 | Tutorial - Page 11
ADOBE DIRECTOR 11.0 11 Create a basic movie The editable text box changes to a completed button sprite. In the Cast window, the new button cast member takes - Adobe 65036570 | Tutorial - Page 12
ADOBE DIRECTOR 11.0 12 Create a basic movie 1 In the Score window, click the end of the TitleText sprite, and drag it to the left to frame 10. open the Sprite Preferences dialog box. 2 In the Span Duration text box, type 10 and click OK. This new default sprite duration applies to all of your movies - Adobe 65036570 | Tutorial - Page 13
ADOBE DIRECTOR 11.0 13 Create a basic movie Building the second scene with animation The second scene of your movie will contain a simple animation of a tire bouncing. - Adobe 65036570 | Tutorial - Page 14
ADOBE DIRECTOR 11.0 14 Create a basic movie Import media into Director The tire graphic for the animation is a Fireworks® PNG file, but you can import lots - Adobe 65036570 | Tutorial - Page 15
ADOBE DIRECTOR 11.0 15 Create a basic movie • In the Score, drag the playhead back and forth from frame 15 to frame 24. This is called "scrubbing - Adobe 65036570 | Tutorial - Page 16
ADOBE DIRECTOR 11.0 16 Create a basic movie 2 Scrub the playhead again. This time, the background sprite exists through the whole tire animation. Change the tempo of - Adobe 65036570 | Tutorial - Page 17
10 Scrub the playhead. The tire accelerates as it reaches the bottom. ADOBE DIRECTOR 11.0 17 Create a basic movie Change the span of an animation It may seem that the tire is bouncing too rapidly. To make the - Adobe 65036570 | Tutorial - Page 18
ADOBE DIRECTOR 11.0 18 Create a basic movie Add an existing navigation button to the Score To complete the animation scene, you will add navigation buttons. First, - Adobe 65036570 | Tutorial - Page 19
ADOBE DIRECTOR 11.0 19 Create a basic movie 4 At the bottom of the Stage, click the Rewind button, and then click the Play button. 5 The movie plays from beginning to end, flashing scene 1 briefly on the Stage and playing the tire animation once before returning to frame 1 and playing again. 6 If - Adobe 65036570 | Tutorial - Page 20
ADOBE DIRECTOR 11.0 20 Create a basic movie The new digital video cast member appears in the Cast window in the first available cast slot. It is - Adobe 65036570 | Tutorial - Page 21
ADOBE DIRECTOR 11.0 21 Create a basic movie Create a QuickTime sprite You are now playback of the QuickTime sprite. These buttons are already included in the Cast window in cast slots 9, 10, and 11. Unlike the standard Director button cast members, these cast members are bitmap graphics that do - Adobe 65036570 | Tutorial - Page 22
ADOBE DIRECTOR 11.0 22 Create a basic movie The Play button's sprite appears on the Stage and in channel 2, frames 55 through 64, of the Score. 3 In - Adobe 65036570 | Tutorial - Page 23
ADOBE DIRECTOR 11.0 23 Create a basic movie 7 On the Align tab, click the Align Vertical Center button. This option aligns the buttons along the X axis. Align - Adobe 65036570 | Tutorial - Page 24
ADOBE DIRECTOR 11.0 24 Create a basic movie 1 In the Score, click the Hide/Show the track1 sound to play through before the playhead reaches frame 64. Later, you will add Lingo to solve this problem. 5 When you finish viewing the movie, click the Stop button at the bottom of the Stage. Add navigation - Adobe 65036570 | Tutorial - Page 25
ADOBE DIRECTOR 11.0 25 Create a basic movie You used the GoStart button in the animation scene and placed it at the very bottom left corner of - Adobe 65036570 | Tutorial - Page 26
ADOBE DIRECTOR 11.0 26 Create a basic movie Director supports scripting in two languages: Lingo and JavaScript contains tools for editing scripts easily. 1 In the Script channel of the Score, double-click frame 10, the last frame of the start scene. The Script window opens, and it already includes a - Adobe 65036570 | Tutorial - Page 27
ADOBE DIRECTOR 11 when the playhead leaves the frame where the script is located. This is frame 10. • The second line, beginning with _movie.go, tells Director to send you could simply write a script that says: _movie.go(15) The problem with this script is that it is not flexible. If you decide to - Adobe 65036570 | Tutorial - Page 28
ADOBE DIRECTOR 11.0 28 Create a basic movie Markers are a way of giving a name to a specific frame in the Score. If you name the first frame of - Adobe 65036570 | Tutorial - Page 29
ADOBE DIRECTOR 11.0 29 Create a basic movie You start by adding scripts to the button sprites in the start scene. 1 In the Score, display frames 1 through 10. 2 Right-click (Windows) or Control-click (Macintosh) the Animation button sprite in channel 3, frames 1 through 10. 3 In the context menu, - Adobe 65036570 | Tutorial - Page 30
ADOBE DIRECTOR 11.0 30 Create a basic movie 1 Display frame 1 of the Score. Go to Sound and Video button in the start scene. 1 In the Score, display frames 1 through 10. 2 In frames 1 through 10, right-click (Windows) or Control-click (Macintosh) the SoundVideo sprite. 3 In the context menu, select - Adobe 65036570 | Tutorial - Page 31
ADOBE DIRECTOR 11.0 31 Create a basic movie 4 To write a new script for the Go to Start button, right-click (Windows) or Control-click (Macintosh) the GoStart - Adobe 65036570 | Tutorial - Page 32
ADOBE DIRECTOR 11.0 32 Create a basic movie When the user navigates to the sound Script window, type RewindScript. 8 Close the Script window, and save your movie. 9 Rewind and play your movie. 10 In the start scene, click the Go to Sound and Video button. The movie jumps to the sound and video scene - Adobe 65036570 | Tutorial - Page 33
ADOBE DIRECTOR 11.0 33 Create a basic movie 2 Select Script from the context menu. 3 In the Script window, on the second line of the handler, type the - Adobe 65036570 | Tutorial - Page 34
ADOBE DIRECTOR 11.0 34 Create a basic movie 3 Place the insertion point at the end of the second line of the handler that reads as follows: sprite(1). - Adobe 65036570 | Tutorial - Page 35
ADOBE Script window, create a new line after the first line of the handler. 10 On the new line, type the following Lingo: sound(2).play(member("button")) The correctly. These steps involve specifying that a QuickTime Xtra extension downloads to your user's system, if necessary, and placing your files - Adobe 65036570 | Tutorial - Page 36
ADOBE 3 Select the Download if Needed check box. 4 Click the OK button. 5 Save your movie. The Xtra extension will now download transparently to the correct version of Shockwave Player. If necessary, a message appears that advises your user to update the Shockwave Player installation. 1 Select - Adobe 65036570 | Tutorial - Page 37
ADOBE DIRECTOR 11.0 37 Create a basic movie Summarizing what you learned By completing this tutorial, you have become familiar with the basic tasks and procedures used
-
 1
1 -
 2
2 -
 3
3 -
 4
4 -
 5
5 -
 6
6 -
 7
7 -
8
-
9
-
10
-
11
-
12
-
13
-
14
-
15
-
16
-
17
-
18
-
19
-
20
-
21
-
22
-
23
-
24
-
25
-
26
-
27
-
28
-
29
-
30
-
31
-
32
-
33
-
34
-
35
-
36
-
37
 |
 |

CREATE A BASIC MOVIE IN DIRECTOR