Airlink AMPS230 User Manual
Airlink AMPS230 Manual
 |
UPC - 658729087262
View all Airlink AMPS230 manuals
Add to My Manuals
Save this manual to your list of manuals |
Airlink AMPS230 manual content summary:
- Airlink AMPS230 | User Manual - Page 1
1-Port USB 2.0 Multi-Functional Printer Server Model # AMPS230 User's Manual Ver. 1A - Airlink AMPS230 | User Manual - Page 2
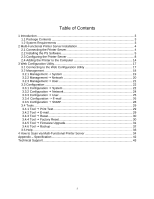
J E-mail 26 3.3.5 Configuration J SNMP 28 3.4 Tools...29 3.4.1 Tool J Print Test 29 3.4.2 Tool J E-mail 29 3.4.3 Tool J Reset 30 3.4.4 Tool J Factory Reset 30 3.4.5 Tool J Firmware Upgrade 31 3.4.6 Tool J Backup 32 3.5 Help ...33 4 How to Scan via Multi-Functional Printer Server 34 Appendix - Airlink AMPS230 | User Manual - Page 3
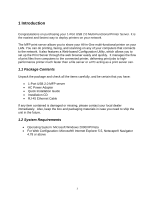
Port USB 2.0 Multi-Functional Printer Server. It is the easiest and fastest way to deploy printers on your network. The MFP print server allows you to share your All-in-One multi-functional printer on your LAN. You can do printing Microsoft Windows 2000/XP/Vista • For Web Configuration: Microsoft® Internet - Airlink AMPS230 | User Manual - Page 4
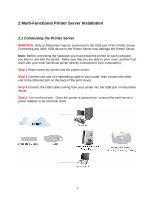
with your multi-functional printer directly connected to your computer(s). Step 1 Power down the printer and the printer server. Step 2 Connect one end of a networking cable to your router, then connect the other end to the Ethernet port on the back of the print server. Step 3 Connect the USB cable - Airlink AMPS230 | User Manual - Page 5
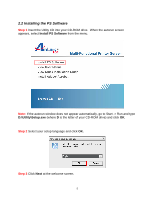
Step 1 Insert the Utility CD into your CD-ROM drive. When the autorun screen appears, select Install PS Software from the menu. Note: If the autorun window does not appear automatically, go to Start -> Run and type D:\Utility\Setup.exe (where D is the letter of your CD-ROM drive) and click OK - Airlink AMPS230 | User Manual - Page 6
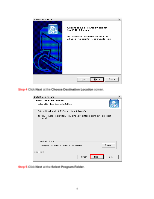
Step 4 Click Next at the Choose Destination Location screen. Step 5 Click Next at the Select Program Folder. 6 - Airlink AMPS230 | User Manual - Page 7
Step 6 Once the installation is complete, make sure that the Launch PS-Link box is checked and click Finish. 7 - Airlink AMPS230 | User Manual - Page 8
need to disable any software firewalls you have on your computer. Step 2 Once the printer server appears in the Server Name box, click on it. You should see your printer next to Device name. Click on the Setup Wizard button. Step 3 A password box will appear. The default password is admin. Enter it - Airlink AMPS230 | User Manual - Page 9
Next at the welcome screen. Step 5 At the System screen you can change the Server Name, Port Name, and Password. Click Next after making the desired changes. If you do not have a specific Server Name, Port Name, or Password that you would like to use, click Next to accept the default settings. 9 - Airlink AMPS230 | User Manual - Page 10
Step 6 If you have a specific IP address you would like to assign to the print server, select Manually Assign and enter your custom settings. Otherwise, select DHCP Assign Automatically and click Next. 10 - Airlink AMPS230 | User Manual - Page 11
Step 7 If your network uses a workgroup name other than WORKGROUP, you can enter it here and click Next. Most users will want to leave this setting as it is and click Next. 11 - Airlink AMPS230 | User Manual - Page 12
Step 8 If you have specific AppleTalk settings, you can enter them here. Most users will want to leave this setting as it is and click Next. 12 - Airlink AMPS230 | User Manual - Page 13
Step 9 Click Save to save the changes to your print server. 13 - Airlink AMPS230 | User Manual - Page 14
2.4 Adding the Printer to the Computer Note: The following steps must be completed on all computers you plan to use with the print server. Step 1 Select your print server from the Server Name box and click the Link button. 14 - Airlink AMPS230 | User Manual - Page 15
configures the printer. Step 3 Once you see a notice that says Your new hardware is installed and ready to use, go to Start -> Control Panel and double click on Printers and Faxes (Windows Vista Users click on Printers instead of Printers and Faxes). Step 4 In Printers and Faxes (or Printers) you - Airlink AMPS230 | User Manual - Page 16
Congratulations, the configuration is now complete. Remember to repeat all steps in Section 2.4 on each of the computers you plan to use with the print server. 16 - Airlink AMPS230 | User Manual - Page 17
but also the Web Configuration Utility. The latter method will be introduced in this chapter. To begin managing the MFP Server, simply launch the PS-Link software and click on the Web Setup button. A new web browser window will open, prompting you for a username and password. Both the Username and - Airlink AMPS230 | User Manual - Page 18
the bar, to display its submenu and select a desired option listed in the left column, and then the corresponding content will show up in the right column. 3.2 Management The Management screen displays the basic information of the MFP Server, including these options: System, Network, and User. 18 - Airlink AMPS230 | User Manual - Page 19
option displays the status of your MFP Server, printer, and network for your reference: Device Status Display information about the MFP Server, including its model type, firmware version, MAC and IP addresses, and up time. Printer Status All information about your printer, such as the given name for - Airlink AMPS230 | User Manual - Page 20
(on/ off line), and further status of your printing tasks, will be listed in this field. Ethernet Status You can also monitor the network connection, transmission speed, duplex status, and the packets status in this field. 3.2.2 Management J Network - Airlink AMPS230 | User Manual - Page 21
that is located on Network of Configuration category, for your verification. The current configuration contains DHCP/BOOTP, UPnP, and MAC Bonjour/Rendezvous. TCP/IP Printing For you to monitor the status of your printing tasks through TCP/IP. Microsoft Network Printing For you to monitor the status - Airlink AMPS230 | User Manual - Page 22
User, Email, and SNMP. 3.3.1 Configuration J System Click System item of Configuration to display the following page, which contains two fields: System Device and Port Settings. System Device You are allowed to do the basic set up for your MFP Server, including: - Server Name: Specify a name for the - Airlink AMPS230 | User Manual - Page 23
the pull-down menu. NOTE: PJL (Print Job Language) has certain job requirements that must be met to work correctly. For more information, please refer to your printer's manual. After done the System configuration, click Save button to restore the new configuration, or Cancel button to abandon. 23 - Airlink AMPS230 | User Manual - Page 24
3.3.2 Configuration J Network Click Network item of Configuration to display the following page, which contains two fields: TCP/IP, Microsoft Network, and Apple Talk. TCP/IP This field allows you to configure the TCP/IP setting, including: 24 - Airlink AMPS230 | User Manual - Page 25
you to enable or disable MAC Bonjour/Rendezvous mode. - Second HTTP Port: For you to enable or disable remote Web Configuration and IPP Printing. Microsoft Network Enter the name of the Workgroup that you want the MFP Server associated with in this field. AppleTalk (Does not support in this hardware - Airlink AMPS230 | User Manual - Page 26
Printing Control Allow you to enable or disable authorized users and unauthorized users that are listed in the User List to access the MFP Server. After done the configuration, click Save button to restore the new configuration, or Cancel button to abandon. Define Users For you to edit User List: - Airlink AMPS230 | User Manual - Page 27
, so that your mail of the account can be printed out directly through the printer (ASCII text only). To enable this function, enter the Email account in the MFP Server E-mail Address frame. - Incoming E-mail (POP3) Server Address: Enter the server address that is used to receive your E-mail here - Airlink AMPS230 | User Manual - Page 28
following page: SNMP Management Allow you to use SNMP (Simple Network Management Protocol) to manage complex networks. - Community 1/2/3: Enter a name in the Name frame, and configure the Access Right by selecting Read Only or Read/Write from the pull-down menu. After done the - Airlink AMPS230 | User Manual - Page 29
3.4 Tools The Tools category provides several tools for you to do various testing, reset the device, and upgrade firmware. 3.4.1 Tool J Print Test Print Test You may click the Test button to print a test page. NOTE: This tool is only available for DOS Printing Printer. 3.4.2 Tool J E-mail 29 - Airlink AMPS230 | User Manual - Page 30
button to send a test E-mail to the given administrator's E-mail address. Receive E-mail Click Yes button to immediately check and receive E-mail, and then print out the mail when available. 3.4.3 Tool J Reset Reset Click Yes button to immediately reset the MFP Server. 3.4.4 Tool J Factory Reset 30 - Airlink AMPS230 | User Manual - Page 31
Click Yes button to reload the factory settings of the MFP Server. 3.4.5 Tool J Firmware Upgrade Firmware Upgrade When a new version of firmware is available (e.g. downloading from the manufacturer's website), you can upgrade the firmware of your MFP Server by clicking Browse button to point to the - Airlink AMPS230 | User Manual - Page 32
to File Click Backup button to backup your current configuration of the MFP Server to file and restore it in the computer. Restore Device Configuration from File You can reload a configuration file that you pre-saved by clicking Browse button to point to the backup file, and then Restore - Airlink AMPS230 | User Manual - Page 33
3.5 Help The Help category provides brief information about the MFP Server for your reference. 33 - Airlink AMPS230 | User Manual - Page 34
4 How to Scan via Multi-Functional Printer Server For Windows 2000 users: you need to use the proprietary utility of your multifunctional printer, e.g. HP Director. For Windows XP users: you can use either the proprietary utility of your multifunctional printer or the Windows scan utility (WIA, - Airlink AMPS230 | User Manual - Page 35
Step 5 Double click the MFP device icon to launch Windows Scanner and Camera Wizard. Step 6 Click Next. 35 - Airlink AMPS230 | User Manual - Page 36
Step 7 Click Next to start the scanning process. 36 - Airlink AMPS230 | User Manual - Page 37
Step 8 Click Next. Step 9 Click Next. 37 - Airlink AMPS230 | User Manual - Page 38
Step 10 Click Finish. For Windows Vista users: Step 1 To scan using Windows Vista, click on Start -> All Programs -> Windows Photo Gallery 38 - Airlink AMPS230 | User Manual - Page 39
The Windows Photo Gallery will appear. From here you can scan and view your pictures. Step 2 Click on File, then click Import from Camera or Scanner 39 - Airlink AMPS230 | User Manual - Page 40
Step 3 Select your Multi-Function Printer/Scanner from the list and click Import. Step 4 At the New Scan screen you can select various settings for the scan. For a standard color scan, you can use the default settings. Click on the Preview button to view a preview of what you are scanning. 40 - Airlink AMPS230 | User Manual - Page 41
like to scan. In this example, only the Windows logo is going to be scanned. Once you've configured all of your settings and selected the portion of Enter a tag or leave it blank and click Import. Once the Windows Photo Gallery is done scanning, it will return you to the main Gallery screen where - Airlink AMPS230 | User Manual - Page 42
10/100 Mbps RJ-45 port Supported Protocols • TCP/IP, SMB, NetBEUI, AppleTalk, BOOTP, SNMP, Telnet, TFTP, FTP, LPD, RARP, DHCP, IPP System Hardware • SDRAM: 8M Byte • Flash ROM: 2M Byte Power • DC 5V, switching type LED • Power, USB, LAN Supported OS • Windows 2000/XP/Vista Warranty • 1-Year Limited - Airlink AMPS230 | User Manual - Page 43
Toll Free: 1-888-746-3238 Web site: www.airlink101.com *Printer server may not support all printers. Go to the Airlink101 website to view the printer compatibility list *Actual data throughput will vary. Network conditions and environmental factors lower actual data throughput rate. Specifications
-
 1
1 -
 2
2 -
 3
3 -
 4
4 -
 5
5 -
 6
6 -
 7
7 -
8
-
9
-
10
-
11
-
12
-
13
-
14
-
15
-
16
-
17
-
18
-
19
-
20
-
21
-
22
-
23
-
24
-
25
-
26
-
27
-
28
-
29
-
30
-
31
-
32
-
33
-
34
-
35
-
36
-
37
-
38
-
39
-
40
-
41
-
42
-
43
 |
 |
1-Port USB 2.0 Multi-Functional Printer Server
Model # AMPS230
User’s Manual
Ver. 1A