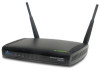
Airlink AR675W Quick Installation Guide
Airlink AR675W Manual
 |
UPC - 658729081604
View all Airlink AR675W manuals
Add to My Manuals
Save this manual to your list of manuals |
Airlink AR675W manual content summary:
- Airlink AR675W | Quick Installation Guide - Page 1
Quick Installation Guide Wireless N Green Router Model # AR675W Ver. 1A - Airlink AR675W | Quick Installation Guide - Page 2
, please check the items of your package: Package Contents: • Wireless N Green Router • Power Adapter • Ethernet Cable (Cat.5) • Manual CD • Quick Installation Guide Section 1 This Quick Installation Guide only provides basic instructions. For detailed information on using this product, please refer - Airlink AR675W | Quick Installation Guide - Page 3
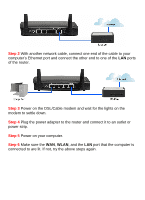
Ethernet port and connect the other end to one of the LAN ports of the router. Step 3 Power on the DSL/Cable modem and wait for the lights on the modem to settle down. Step 4 Plug the power adapter to the router and connect it to an outlet or power strip. Step 5 Power on your computer. - Airlink AR675W | Quick Installation Guide - Page 4
LAN 1-4 LNK/ACT Light Status Solid Green Solid Green Off Flashing Green Solid Green Off Flashing Green Solid Green Off Flashing Green Description Router is powered on. WPS setup is in progress. Wireless network is switched off. Wireless network is ready and WPS setup is not in progress. WAN port - Airlink AR675W | Quick Installation Guide - Page 5
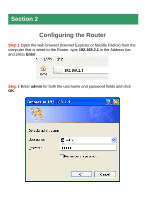
Section 2 Configuring the Router Step 1 Open the web browser (Internet Explorer or Mozilla Firefox) from the computer that is wired to the Router, type 192.168.2.1 in the Address bar and press Enter. Step 2 Enter admin for both the username and password fields and click OK. - Airlink AR675W | Quick Installation Guide - Page 6
Step 3 Click Setup Wizard on the left menu. Step 4 Click Next to start the Setup Wizard. - Airlink AR675W | Quick Installation Guide - Page 7
Step 5 Configure the Time Zone Settings of the Router. Click Next. Step 6 Click Next to accept the default Router IP Address or change it to match with your existing local area network settings. - Airlink AR675W | Quick Installation Guide - Page 8
Step 7 Select the Internet Type for your Router. Cable Modem For cable modem, select DHCP Client and click Next. Continue to Step 8. - Airlink AR675W | Quick Installation Guide - Page 9
you are not sure which one you have, it is suggested to select DHCP Client, and if you cannot connect to the Internet after the Setup Wizard finished, go through the Setup Wizard again and select PPPoE. Otherwise, you can call your ISP to confirm which Internet type you have. DHCP - Airlink AR675W | Quick Installation Guide - Page 10
PPPoE Setup Select PPPoE for from the Internet Type drop-down menu. Enter your user name and password provided by your ISP. Click Next. Note: Depending on the ISP, you may need to include the domain name with your username. Example: [email protected] - Airlink AR675W | Quick Installation Guide - Page 11
Step 8 Keep the default SSID (wireless network name) or change it to a desired name, so you can always recognize your wireless network with it. Click Next. Step 9 Select a desired Security Mode from the drop-down menu. WPA2(AES) is the most secured encryption mode for general - Airlink AR675W | Quick Installation Guide - Page 12
(AES) for your wireless security if all wireless devices on your network can support this mode. WPA2(AES) Select WPA2 (AES) for Security Mode, and enter a Pre-Shared Key (Passphrase) between 8 to 63 characters (alphanumeric, case sensitive). This is the security key for your wireless network. Click - Airlink AR675W | Quick Installation Guide - Page 13
you selected 128-bit key length and HEX key format, enter 26 hexadecimal characters. Click Finish to save the settings. Please refer to the User's Manual in the provided CD for other security mode settings. Note: It is suggested to write down the security settings (Security Mode and Key) you - Airlink AR675W | Quick Installation Guide - Page 14
Setup Wizard. After your router restarts, you will go back to the Status page with valid IP address assigned by you ISP (or configured by yourself if you use Static IP. If each field has a valid number assigned, the router is connected to the Internet. Section 3 Connecting to the Router Wirelessly - Airlink AR675W | Quick Installation Guide - Page 15
Step 1 Click on this icon on the task bar of your desktop, then click on Wireless networks are available. Step 2 Click on the wireless network you want to connect to and click Connect. - Airlink AR675W | Quick Installation Guide - Page 16
Step 3 Enter the Security key you configured for the Router (see Step 8 in Section 2). Click Connect. Step 4 Click on Close. Now the wireless connection has been established successfully with the Router. - Airlink AR675W | Quick Installation Guide - Page 17
built-in which allows you to connect your wireless computer with the router easily and safely. Your wireless adapter must support this feature as well. If not, you will need to set up the wireless security manually and you can skip this section. In the instructions below, we are going to use the - Airlink AR675W | Quick Installation Guide - Page 18
You will see this window pops up on the monitor: Step 3 Push the Security button the Router for 3 seconds. The WLAN LED will stay solid green instead of blinking. - Airlink AR675W | Quick Installation Guide - Page 19
Step 4 The Router will now start the handshake with the wireless adapter which will take about 2 minutes. When you see the window below, the connection has been established. - Airlink AR675W | Quick Installation Guide - Page 20
Internet IP Address, Subnet Mask, and Default Gateway have valid numbers assigned to them (instead of all 0's). Section 6 Technical Support E-mail: [email protected] Toll Free: 1-888-746-3238 Website: www.airlink101.com *Theoretical maximum wireless signal rate derived from IEEE standard 802
-
 1
1 -
 2
2 -
 3
3 -
 4
4 -
 5
5 -
 6
6 -
 7
7 -
8
-
9
-
10
-
11
-
12
-
13
-
14
-
15
-
16
-
17
-
18
-
19
-
20
 |
 |

Quick Installation Guide
Wireless N Green Router
Model # AR675W
Ver. 1A