Airlink AR725W Quick Installation Guide
Airlink AR725W Manual
 |
View all Airlink AR725W manuals
Add to My Manuals
Save this manual to your list of manuals |
Airlink AR725W manual content summary:
- Airlink AR725W | Quick Installation Guide - Page 1
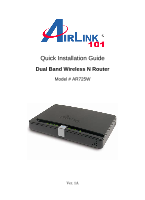
Quick Installation Guide Dual Band Wireless N Router Model # AR725W Ver. 1A - Airlink AR725W | Quick Installation Guide - Page 2
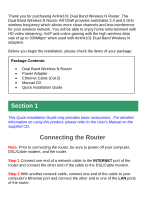
check the items of your package: Package Contents: • Dual Band Wireless N Router • Power Adapter • Ethernet Cable (Cat.5) • Manual CD • Quick Installation Guide Section 1 This Quick Installation Guide only provides basic instructions. For detailed information on using this product, please refer - Airlink AR725W | Quick Installation Guide - Page 3
lights on the modem to settle down. Step 4 Plug the power adapter to the router and connect to an outlet or power strip. Step 5 Power on your computer. Step 6 Make sure the INTERNET, WIRELESS, and the LAN port that the computer is connected to are lit. If not, try the above steps again - Airlink AR725W | Quick Installation Guide - Page 4
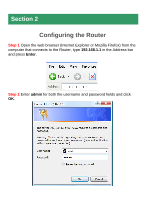
Section 2 Configuring the Router Step 1 Open the web browser (Internet Explorer or Mozilla Firefox) from the computer that connects to the Router, type 192.168.1.1 in the Address bar and press Enter. Step 2 Enter admin for both the username and password fields and click OK. - Airlink AR725W | Quick Installation Guide - Page 5
Cable Modem For most cable modem users, you should be able to connect to the Internet without changing any configuration. If your ISP has provided you with a host name, enter it in the optional Host Name field. Click Apply to save the setting. If your ISP requires a registered MAC Address, click on - Airlink AR725W | Quick Installation Guide - Page 6
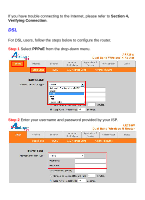
If you have trouble connecting to the Internet, please refer to Section 4, Verifying Connection. DSL For DSL users, follow the steps below to configure the router. Step 1 Select PPPoE from the drop-down menu. Step 2 Enter your username and password provided by your ISP. - Airlink AR725W | Quick Installation Guide - Page 7
to an available LAN port on the Router with an Ethernet cable, and then restart the computer. These computers should be able to connect to the Internet immediately. Section 3 Configuring Wireless Settings Step 1 Click on Wireless Tab and select Manual for Basic Wireless settings. Step 2 Select - Airlink AR725W | Quick Installation Guide - Page 8
Note: If your wireless computer cannot detect the router after you selected AN-Mixed, please make sure your wireless adapter supports 5GHz frequency band. Step 3 Name your wireless network by changing the SSID. Step 4 Click Apply to save the setting. Step 5 Click on Wireless Security on the sub-menu - Airlink AR725W | Quick Installation Guide - Page 9
common encryption but the least secured. It is recommended to use WPA2 Personal AES for your wireless security if all the wireless devices on your network support this mode. Please refer to the User's Manual in the provided CD for other security mode settings. WPA2-Personal Select WPA2 Personal for - Airlink AR725W | Quick Installation Guide - Page 10
each key; if you selected 128 bits encryption, enter 26 HEX characters (0~9, A~F) for each key. Click Apply to save the setting. Please use the same wireless settings (SSID and Wireless Security) for each computer or other network device you want to connect to the - Airlink AR725W | Quick Installation Guide - Page 11
the modem to settle down. Step 3 Turn on the router and wait for the lights on the router to settle down. Step 4 Turn on the computer. Step 5 Log in to the router and select the Status tab. Step 6 Verify that the Internet IP Address, Default Gateway, and at least one of the DNS fields - Airlink AR725W | Quick Installation Guide - Page 12
router safely and easily. Your wireless adapter must support this feature as well. If not, you will need to set up the wireless security manually and you can skip this section. In the instructions below, we are going to use the Wireless Monitor utility that comes with Airlink101 Dual Band Wireless - Airlink AR725W | Quick Installation Guide - Page 13
WPS window: Step 3 Push the WPS button on the Dual Band Wireless N Router, and the WPS LED will start blinking. Step 4 The Router will now start the handshake with the wireless adapter. When you see the window below, the connection has been established. - Airlink AR725W | Quick Installation Guide - Page 14
Section 6 Technical Support E-mail: [email protected] Toll Free: 1-888-746-3238 Website: www.airlink101.com *Theoretical maximum wireless signal rate derived from IEEE standard 802.11g and draft 802.11n specifications. Actual data throughput will vary. Network conditions and environmental
-
 1
1 -
 2
2 -
 3
3 -
 4
4 -
 5
5 -
 6
6 -
 7
7 -
8
-
9
-
10
-
11
-
12
-
13
-
14
 |
 |

Quick Installation Guide
Dual Band Wireless N Router
Model # AR725W
Ver. 1A