Alpine PXE-H650 User Guide
Alpine PXE-H650 - System Integration Audio Processor Manual
 |
UPC - 793276310262
View all Alpine PXE-H650 manuals
Add to My Manuals
Save this manual to your list of manuals |
Alpine PXE-H650 manual content summary:
- Alpine PXE-H650 | User Guide - Page 1
vehicleʼs voltage regulator checked. Maintenance If you have problems, do not attempt to repair the unit yourself. Return it to your Alpine dealer or the nearest Alpine Service Station for servicing. E Installation Location Make sure the PXE-H650 will not be exposed to: N • Direct sun and - Alpine PXE-H650 | User Guide - Page 2
4 - Alpine PXE-H650 | User Guide - Page 3
FEATURES/DESCRIPTION The Alpine PXE-H650 is a versatile processor that takes an OK sounding factory system turns it into a high-end, audiophile system. The PXE-H650 utilizes advanced sound tuning of the factory equipment to correct the acoustical problems inherent in the vehicle. Using AntEQ™ to - Alpine PXE-H650 | User Guide - Page 4
by the input to the processor. Therefore, it is very important that the output from the factory radio be properly set so the PXE-H650 receives the correct audio level (not so high that it's distorted and not so low that it's noisy). This ensures that the DSP chip in the unit can see every detail - Alpine PXE-H650 | User Guide - Page 5
E N 7 - Alpine PXE-H650 | User Guide - Page 6
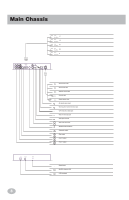
Main Chassis 8 - Alpine PXE-H650 | User Guide - Page 7
. It draws minimal current to maintain processor memory. N • Remote OUT (BLU/WHT) This output can turn on external amplifiers. The signal goes high after the PXE-H650 audio mute is OFF. • Remote ON (BLU/WHT) If the OEM head unit is not turning on the EQ using the AUTO RANGING INPUT, use this - Alpine PXE-H650 | User Guide - Page 8
and accurate setup procedure. Have the MultEQ CD, microphone in the calibration, the better the results will sound. MultEQ requires a minimum of 4 MIC positions and has EQ, the REMOTE ON wire must be used. Otherwise, there is no way for the EQ to turn on. Use the Remote On wire from the head unit - Alpine PXE-H650 | User Guide - Page 9
sleep mode (before head unit powers up). 1. TURN ON Vehicle Ignition Switch 2. TURN ON Factory Radio Power and insert the H650 Setup CD. If properly connected, the Factory Radio Power should automatically turn ON the PXE-H650. The PXE-H650 display = "ALPINE PXE-H650" if already setup. E If this is - Alpine PXE-H650 | User Guide - Page 10
levels are at reasonable levels. Amplifier Levels 10. "ADJUST XOVER + AMP LEVELS" - Make adjustments to match amp levels Play Track 3 of the PXE-H650 Setup Disc in the Factory Head unit. This is a Pink Noise signal to facilitate the trimming of the amplifier level controls. WARNING: Output of the - Alpine PXE-H650 | User Guide - Page 11
all windows. Press MEASURE on the remote control to begin (see Page 7). 4. "CHK OUTPUTS & MIC" - Speaker detection Error If there was a problem during the Speaker Detection process, the PXE-H650 displays the above error display on the LCD and the LED will blink quickly. Troubleshoot the system - Alpine PXE-H650 | User Guide - Page 12
6 positions is recommended for optimal results. Normally, the more locations used, the more accurate the final EQ curve. NOTE: Mic Position 1 is stored in PRESET 1. Mic Position 2 is stored in PRESET FILTERS" then "SAVING FILTERS" is displayed on the LCD and finally "ALPINE PXE-H650" is displayed. 14 - Alpine PXE-H650 | User Guide - Page 13
returns the processor to the last MultEQ baseline response. • FACTORY RESET: Press ENTER at this display to return the PXE-H650 to its original factory condition. The entire calibration procedure must be redone. • CANCEL: Press ENTER at this display to return to PXE-H650 STANDBY mode. Demo Mode - Alpine PXE-H650 | User Guide - Page 14
to customize the tone of the music. Each Source Input to the PXE-H650 has its own EQ. Each of the Bands (Bass, Mid and Treble) is adjusted to enter Custom Tuning mode. 2. With "PRESET 1" in the display, use the ▼ or ▲ buttons to choose the MIC position to modify or to choose the EQ Adjustment mode. - Alpine PXE-H650 | User Guide - Page 15
, press ENTER to save values and exit back to the "CUSTOM EQ" HU or AUX sub-menu headings of BASS, MID or TREB EQ. e) Use the MODE button at any point, to return to the previous sub-menu. Crossover Overview The PXE-H650 crossover allows custom cut-off points for the high-pass and low - Alpine PXE-H650 | User Guide - Page 16
3. Crossover Adjustment a) Use the ▼ or ▲ button to make the selection. In this example, "CROSSOVER" b) The user can also use these buttons to select "TIME DELAY." The following "FRONT 2" adjustment procedures will be similar in nature to adjustments for the other channels. Just substitute "FRONT - Alpine PXE-H650 | User Guide - Page 17
specs and no longer conforms to its ideal sound stage. All channels have delays adjustable from 0 to 10ms in 0.1ms steps. Time Delay 1. Press MODE twice to enter Custom Tuning or may not result in an improvement of the overall sound quality. • If setup includes a 2-Way output, the FRONT 1 High-pass - Alpine PXE-H650 | User Guide - Page 18
20 237.6mm 114.9 mm - Alpine PXE-H650 | User Guide - Page 19
ADJUSTMENTS & RANGES 3 Band Parametric Q 0.5 to 2 (0.5 steps) Level 6 to +6 dB (1 dB steps) Bass Frequency Fc = 30, 40, 50, 60, 80, 100, 125, 150 Hz Mid Fc = 0.5, 0.75, 1.0, 1.5, 2.0, 3.0, 4.0, 5.0 kHz Treble Fc = 6, 7.5, 10, 12.5, 15, 17.5 kHz Digital Crossovers 2-Way High Pass (@ -12 dB/ - Alpine PXE-H650 | User Guide - Page 20
Control x 1 Power Supply Connector x 1 Speaker Input Connector x 1 Microphone...x 1 IR Remote Sensor x 1 MultEQ LED...x 1 Batteries (AAA x 2 Owner's Manual x 1 Imprint Setup CD x 1 NOTES: Due to continuous product improvements, specifications and design are subject to change without notice - Alpine PXE-H650 | User Guide - Page 21
E N 23 - Alpine PXE-H650 | User Guide - Page 22
24 - Alpine PXE-H650 | User Guide - Page 23
25 - Alpine PXE-H650 | User Guide - Page 24
26 - Alpine PXE-H650 | User Guide - Page 25
. N'UTILISEZ PAS LES BOULONS OU ÉCROUS DU SYSTÈME DE FREINAGE POUR L'INSTALLATION OU LA MISE À LA MASSE Les boulons et écrous des systèmes de èces liées à la sécurité et les réservoirs ne doivent pas servir à l'installation ou à la mise à la masse. L'utilisation de ces pièces pourrait notamment nuire - Alpine PXE-H650 | User Guide - Page 26
PRÉCAUTIONS Ce symbole précède des instructions importantes. Le fait de ne pas les me. Retournez-le à votre détaillant autorisé par Alpine ou au plus proche centre d'entretien Alpine pour le faire réparer. EMPLACEMENT D'INSTALLATION Veillez à ce que le PXE-H650 ne soit pas exposé : • aux rayons - Alpine PXE-H650 | User Guide - Page 27
TABLE DES MATIÈRES Avertissements Caractéristiques et description CD de configuration - Contenu ATTENTION - Réglage du niveau d'entrée Télécommande Châssis principal Câblage et connexions Fonctionnement de base Configuration initiale et AntEQ MultEQ Mode de dé - Alpine PXE-H650 | User Guide - Page 28
PXE-H650 utilise une technique sophistiquée pour accorder le son du matériel original afin de corriger les problèmes acoustiques propres à tout véhicule. Il emploie la technologie Imprint d'Alpine AntEQ et MultEQ (technologie Imprint) • Entrée AUX (audio) • Entrée d'unité principale originale à 5 - Alpine PXE-H650 | User Guide - Page 29
gler le signal de sortie de l'appareil original de façon que le PXE-H650 reçoive un signal audio de niveau approprié (pas assez élevé pour présenter une distorsion droite-gauche et avant-arrière. CD DE CONFIGURATION - Contenu F R CD de configuration Imprint 1. Looped Sine Sweep (signal sinusoï - Alpine PXE-H650 | User Guide - Page 30
TÉLÉCOMMANDE Fonctions Télécommandées 1 Sélection de source auxiliaire 2 Sélection de l'unité principale originale 3 Monter le volume 4 Réglage d'utilisateur no 1 5 Baisser les extrêmes graves 6 Monter les extrêmes graves 7 Baisser le volume 8 Réglage d'utilisateur no 2 9 Monter/ - Alpine PXE-H650 | User Guide - Page 31
CHASSIS PRINCIPAL F R 33 - Alpine PXE-H650 | User Guide - Page 32
ble USB requis pour le contrôle et la configuration par PC (logiciel PC sur CD inclus). 2 MULTEQ LED - Sortie de la DEL incluse; indique l'état de l'égaliseur de suppression du son du PXE-H650 est désactivée. • Mise en circuit télécommandée (bleu/blanc) Si l'unité principale originale n'allume pas - Alpine PXE-H650 | User Guide - Page 33
instructions suivantes pour assurer l'efficacité et la précision de la configuration. Munissez-vous de la DEL, du micro et du CD MultEQ inclus et prenez note des données obtenues, car vous en aurez besoin à la prochaine section. Vous aurez besoin d'un support d'aiguës sont installés dans le tableau - Alpine PXE-H650 | User Guide - Page 34
devrait allumer automatiquement le PXE-H650. Si celui-ci est déjà configuré, l'affichage indique ALPINE PXE-H650 ». Si le PXE-H650 n'a jamais été utilisé, il se met automatiquement en mode de configuration. Dans ce cas, suivez les étapes suivantes. 3. Réglez l'unité principale originale. Désactivez - Alpine PXE-H650 | User Guide - Page 35
glage des niveaux d'amplification Faites jouer la plage 3 du CD de configuration dans l'unité principale originale. Le signal de bruit rose facilite l'ajustement des commandes de niveau d'amplification. AVERTISSEMENT : Le son des sorties du PXE-H650 n'est pas supprimé à cette étape. Assurez-vous que - Alpine PXE-H650 | User Guide - Page 36
des données raisonnablement neutres pour éliminer les crêtes et les creux de l'unité source, ce qui facilite le travail de MultEQ. 1. « ENTER TO START ) pendant le fonctionnement normal. 2. « CONNECT LED & MIC » Si le PXE-H650 ne détecte pas le micro, l'affichage indique « PLUG IN MICROPHONE » et - Alpine PXE-H650 | User Guide - Page 37
micro, appuyez sur RIGHT (entrer) lorsque l'affichage indique « MEASURE POS X » (où X est 5, 6 ou 7). Une fois l'étalonnage terminé à la dernière étape, l'affichage indique « SAVING MULTEQ », puis « ALPINE PXE-H650 . 39 - Alpine PXE-H650 | User Guide - Page 38
sur un seul bouton de la télécommande. Mode de démonstration • Appuyez sur MODE au PXE-H650 pour afficher l'écran du mode de démonstration. Appuyez sur ENTER pour activer le mode. L'affichage indique « DEMO MODE ON ». Appuyez sur REAR (annuler) pour désactiver MultEQ et AntEQ. Appuyez sur FRONT - Alpine PXE-H650 | User Guide - Page 39
son de chacun des sept canaux. Chaque entrée de source du PXE-H650 a son égaliseur. Nous expliquons les étapes suivantes en prenant a) Appuyez sur ou pour choisir « CUSTOM AUX EQ » (entrée AUX) ou « CUSTOM HU EQ » (entrée de l'unité principale originale). b) Vous pouvez aussi utiliser ces - Alpine PXE-H650 | User Guide - Page 40
ées et retourner au sous-menu « BASS », « MID » ou « TREB » du menu « CUSTOM AUX EQ » ou « CUSTOM HU EQ ». e) Appuyez sur MODE en tout temps pour retourner au sous-menu précédent. Aperçu du filtre Le filtre du PXE-H650 permet de fixer des fréquences de coupure passe-haut et passe-bas pour - Alpine PXE-H650 | User Guide - Page 41
3. Réglage du filtre a) Appuyez sur ou pour choisir (par exemple, « CROSSOVER »). b) Vous pouvez aussi utiliser ces boutons pour choisir « TIME DELAY » (temporisation). Comme vous le constaterez à la fin de la présente section, la procédure de réglage suivante des canaux FRONT 2 est semblable à - Alpine PXE-H650 | User Guide - Page 42
Aperçu de la temporisation MultEQ fixe le retard par défaut à la configuration initiale, mais vous devrez peut-être le modifier, temporairement ou non. Sachez que tout changement apporté cause une déviation par rapport aux spécifications par défaut de MultEQ, qui ne fournit plus alors le milieu - Alpine PXE-H650 | User Guide - Page 43
MONTAGE F R 45 237.6mm 114.9 mm - Alpine PXE-H650 | User Guide - Page 44
à l'utilisateur 2 réglages Interface de contrôle pour PC USB Commande de préampli Volume, équilibre G-D et avant-arrière, extr. graves Sélection de source Unité principale originale / AUX Mise en circuit à distance Capteur de signal d'entrée automatique Délai de mise hors circuit 5 minutes 46 - Alpine PXE-H650 | User Guide - Page 45
SPÉCIFICATIONS UNITÉ PRINCIPALE Entrée principale Entrée AUX Sortie SPECIFICATION VALUE Maximum niveau d'entr de télécommande IR x 1 Piles (AAA) ...x 2 Manuel du propriétaire x 1 CD de configuration Imprint x 1 REMARQUE : Comme nous améliorons constamment nos produits, les spécifications et - Alpine PXE-H650 | User Guide - Page 46
TITLE OF PAGE 48 - Alpine PXE-H650 | User Guide - Page 47
TITLE OF PAGE Fixez à une pièce métallique du châssis avec une vis. F R 49 - Alpine PXE-H650 | User Guide - Page 48
50
-
 1
1 -
 2
2 -
 3
3 -
 4
4 -
 5
5 -
 6
6 -
 7
7 -
8
-
9
-
10
-
11
-
12
-
13
-
14
-
15
-
16
-
17
-
18
-
19
-
20
-
21
-
22
-
23
-
24
-
25
-
26
-
27
-
28
-
29
-
30
-
31
-
32
-
33
-
34
-
35
-
36
-
37
-
38
-
39
-
40
-
41
-
42
-
43
-
44
-
45
-
46
-
47
-
48
 |
 |

Temperature
Be sure the temperature inside the vehicle is between +60°C (+140°F) and –10°C (+14°F) before
turning your unit on.
Fuse Replacement
When replacing the fuse(s), the replacement must be of the same amperage as shown on the fuse
holder. If the fuse(s) blows more than once, carefully check all electrical connections for shorted
circuitry. Also have your vehicle
ʼ
s voltage regulator checked.
Maintenance
If you have problems, do not attempt to repair the unit yourself. Return it to your Alpine dealer or
the nearest Alpine Service Station for servicing.
Installation Location
Make sure the PXE-H650 will not be exposed to:
• Direct sun and heat
• High humidity
• Excessive dust
• Excessive vibrations
PRECAUTIONS
This symbol means important instructions. Failure to heed them can
result in injury or material property damage.
E
N