Alpine iLX-F309TCM Installation Manual - Page 6
Factory Unit Disassembly Process Continued, SR & SR5 Models Only
 |
View all Alpine iLX-F309TCM manuals
Add to My Manuals
Save this manual to your list of manuals |
Page 6 highlights
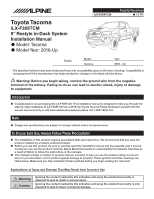
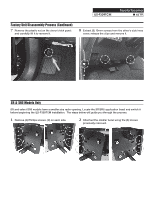
iLX-F309TCM Toyota Tacoma ˜ 6/19 Factory Unit Disassembly Process (Continued) 7 Remove the plastic nut on the driver's kick panel and carefully lift it to remove it. 8 Extract (3) 10mm screws from the driver's side knee cover, release the clips and remove it. SR & SR5 Models Only SR and select SR5 models have a smaller size radio opening. Locate the SR/SR5 application bezel and switch it before beginning the iLX-F309TCM installation. The steps below will guide you through the process. 1 Remove (4) Phillips screws. (2) on each side. 2 Attached the smaller bezel using the (4) screws previously removed.
-
 1
1 -
 2
2 -
 3
3 -
 4
4 -
 5
5 -
 6
6 -
 7
7 -
 8
8 -
 9
9 -
 10
10 -
 11
11 -
 12
12 -
13
-
14
-
15
-
16
-
17
-
18
-
19
 |
 |

Toyota Tacoma
iLX-F309TCM
±
6/19
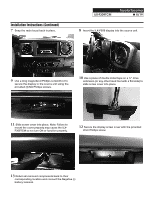
Factory Unit Disassembly Process (Continued)
7
Remove the plastic nut on the driver’s kick panel
and carefully lift it to remove it.
8
Extract (3) 10mm screws from the driver’s side knee
cover, release the clips and remove it.
SR & SR5 Models Only
1
Remove (4) Phillips screws. (2) on each side.
2
Attached the smaller bezel using the (4) screws
previously removed.
SR and select SR5 models have a smaller size radio opening. Locate the SR/SR5 application bezel and switch it
before beginning the iLX-F309TCM installation.
The steps below will guide you through the process.