Alpine iLX-F309TND Installation Manual
Alpine iLX-F309TND Manual
 |
View all Alpine iLX-F309TND manuals
Add to My Manuals
Save this manual to your list of manuals |
Alpine iLX-F309TND manual content summary:
- Alpine iLX-F309TND | Installation Manual - Page 1
equipment. Introduction ˜ Congratulations on purchasing the iLX-F309TND. This installation manual is designed to take you through the step-by-step installation of iLX-F309TND into a 2014-Up Toyota Tundra. Please familiarize yourself with the owners manual and if you still have additional questions - Alpine iLX-F309TND | Installation Manual - Page 2
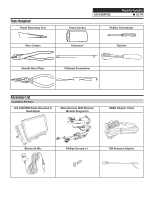
Tools Required Panel Removing Tool Wire Cutters iLX-F309TND Toyota Tundra ˜ 2/19 10mm Socket Phillips Screwdriver Extension Ratchet Needle Nose Pliers Flathead Screwdriver Accessory List Installation Kit Parts iLX-F309TND Radio Mounted In Dash Bezel Main Harness With Maestro Module Plugged - Alpine iLX-F309TND | Installation Manual - Page 3
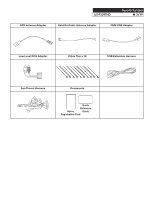
GPS Antenna Adapter iLX-F309TND Toyota Tundra ˜ 3/19 Satellite Radio Antenna Adapter OEM USB Adapter Low Level RCA Adapter Cable Ties x 10 USB Extension Harness Aux/Preout Harness Documents Quick Reference Alpine Guide Registration Card - Alpine iLX-F309TND | Installation Manual - Page 4
iLX-F309TND Toyota Tundra ˜ 4/19 Programming the iDatalink Maestro Module The Maestro module is an alphanumeric value which is found on the head units label, underneath the bar code. Review the System Requirements before installing. 2 REGISTER A WEBLINK ACCOUNT Go to: idatalinkmaestro.com/ - Alpine iLX-F309TND | Installation Manual - Page 5
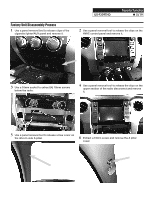
Factory Unit Disassembly Process 1 Use a panel removal tool to release clips of the cigarette lighter/AUX panel and remove it. iLX-F309TND Toyota Tundra ˜ 5/19 2 Use a panel removal tool to release the clips on the HVAC control panel and remove it. 3 Use a 10mm socket to extract (4) 10mm screws - Alpine iLX-F309TND | Installation Manual - Page 6
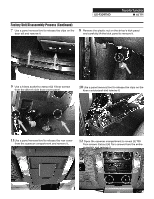
iLX-F309TND Toyota Tundra ˜ 6/19 Factory Unit Disassembly Process (Continued) 7 Use a panel removal tool to release the clips on the door sill and remove it. 8 Remove the plastic nut - Alpine iLX-F309TND | Installation Manual - Page 7
iLX-F309TND Toyota Tundra ˜ 7/19 Installation Instructions 1 Use the included 3mm Phillips screw to mount the microphone next to the eyewear compartment. Note: Be sure to clear the motion path of the - Alpine iLX-F309TND | Installation Manual - Page 8
iLX-F309TND Toyota Tundra ˜ 8/19 Installation Instructions (Continued) 7 Mount the iLX-F309TND using (2) 10mm factory screws. Note: Place the additional (2) 10mm screws in their respective location in case they are need in future applications. 8 Replace all removed - Alpine iLX-F309TND | Installation Manual - Page 9
iLX-F309TND iLX-F309TND Wiring Diagram W/O Factory Amplifier To Vehicle Connectors To OBDII Connector 24-pin Connector 28-pin Power/Speaker Rear Speaker Connector 10-pin Connector 6-pin Connector Toyota Tundra ˜ 9/19 Rear Front Rear Front Black Not Not Used Used 10-Pin Chime Red Not - Alpine iLX-F309TND | Installation Manual - Page 10
iLX-F309TND iLX-F309TND Wiring Diagram With Factory Amplifier To Vehicle Connectors To OBDII Connector 24-pin Connector 28-pin Power/Speaker Rear Speaker Connector 10-pin Connector 6-pin Connector Toyota Tundra ˜ 10/19 Rear Front Rear Front Black Not Not Used Used 10-Pin Chime Red Not - Alpine iLX-F309TND | Installation Manual - Page 11
iLX-F309TND Toyota Tundra ˜ 11/19 Connection Of An External Amplifier ANTENNA CAN I/F GPS SXM/DAB USB HDMI IN PRE OUT W.REMOTE POWER SUBW (Blue/White) REMOTE (Red) (White) - Alpine iLX-F309TND | Installation Manual - Page 12
iLX-F309TND HDMI Input iLX-F309TND Toyota Tundra ˜ 12/19 Do not use the head unit's USB to power be a 2A source. This will require a separate USB power source to be installed in the vehicle. iLX-F309 Source Unit CAN I/F GPS SXM/DAB USB HDMI IN ANTENNA PRE OUT EXT. KEY W.REMOTE POWER iPhone - Alpine iLX-F309TND | Installation Manual - Page 13
cable (Green) (Green/Black) (White) (White/Black) (Gray/Black) (Gray) (Violet/Black) (Violet) STEERING REMOTE MIC IN SUBW FRONT OUT REAR OUT iLX-F309TND Toyota Tundra ˜ 13/19 To SiriusXM Tuner Vehicle Antenna GPS Antenna (Included) To the vehicle speed pulse line To Front, Rear or Side camera - Alpine iLX-F309TND | Installation Manual - Page 14
iLX-F309TND Toyota Tundra ˜ 14/19 Wire Harness Pin Outs Radio Main 8 16 7 15 6 14 5 13 4 12 3 11 2 10 19 Blue 22AWG Red 20AWG Blue/White 22AWG Orange/White - Alpine iLX-F309TND | Installation Manual - Page 15
"Other" input on the KCX-C2600B. iLX-F309TND Toyota Tundra ˜ 15/19 Main Harness KCX-C2600B (Sold Separately) RCA Camera Input iLX-F309 Source Unit CAN I/F GPS USB RCA adapter for it.For the front camera an Alpine camera with the direct connection is recommended. Using a 3rd party camera with - Alpine iLX-F309TND | Installation Manual - Page 16
iLX-F309TND Connection Of KAC-001 (Sold Separately) KAC-001 Side View POWER RESET HEADUNIT CAN OUTPUT UPDATE Toyota Tundra ˜ 16/19 Reset Button USB port (Firmware updates only) Power Harness (3-pin White) Interface Harness (4-pin White) Interface Cable (4-pin) (included with ADS module) 8ch - Alpine iLX-F309TND | Installation Manual - Page 17
Steering Wheel Configuration iLX-F309TND Toyota Tundra ˜ 17/19 Right Up Left Enter Down Back Mode/Hold MODE HOLD Volume Up Volume Down Off Hook On Hook Voice Button Right Up Left - Alpine iLX-F309TND | Installation Manual - Page 18
Set Up Guide iLX-F309TND Toyota Tundra ˜ 18/19 1 Turn the vehicle's Ignition switch to ACC. 2 Turn ON the iLX-F309TND by pressing any key. 3 please download the full owners manual in the support section of the website at www.alpine-usa.com. Troubleshooting Guide Symptom 1 iPhone not working - Alpine iLX-F309TND | Installation Manual - Page 19
iLX-F309TND Toyota Tundra ˜ 19/19 Troubleshooting Guide Continued Symptom Possible Cause Remedy 4 Incorrect serial number was used when flashing maestro. Flash Maestro with correct serial number. Headunit will not turn on. 4 pin
-
 1
1 -
 2
2 -
 3
3 -
 4
4 -
 5
5 -
 6
6 -
 7
7 -
8
-
9
-
10
-
11
-
12
-
13
-
14
-
15
-
16
-
17
-
18
-
19
 |
 |
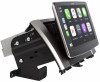
Toyota Tundra
iLX-F309TND
±
1/19
Toyota Tundra
iLX-F309TND
9” Restyle In-Dash System
Installation Manual
±
Model: Tundra
±
Model Year: 2014-Up
Note
±
Design and specifications are subject to change without notice for improvement.
To Ensure Safe Use, Always Follow These Precautions
±
The installation of this product requires specialized skills and experience. We recommend that you have the
product installed by an Alpine authorized dealer.
±
Before you use this product, be sure to carefully read this installation manual and the separate user's manual
so that you can use the product correctly. Alpine Electronics bears no responsibility for problems that arise as
a result of failure to follow the instructions in the manuals.
±
This manual includes a number of symbols that are intended to help you use the product safely, to prevent
harm to you and others, and to protect against damage to property. These symbols and their meanings are
listed below. Make sure you fully understand these symbols before you begin reading the main text.
Explanations of Injury and Damage That May Result from Incorrect Use
Warning
Ignoring the content marked by this indication and using the product incorrectly is
expected to lead to death or serious injury.
Caution
Ignoring the content marked by this indication and using the product incorrectly is only
expected to lead to injury or property damage.
Toyota
Model
Year
Tundra
2014 - Up
* The specified vehicles have been tested and have met compatibility specs at the time of testing. Compatibility is
not guaranteed if the manufacturer has made production changes to the listed vehicles above.
Warning: Before you begin wiring, remove the ground wire from the negative
terminal of the battery. Failing to do so can lead to electric shock, injury or damage
to equipment.
Introduction
±
Congratulations on purchasing the iLX-F309TND. This installation manual is designed to take you through the
step-by-step installation of iLX-F309TND into a 2014-Up Toyota Tundra. Please familiarize yourself with the
owners manual and if you still have additional questions please call 1-800-TECH-101.