Alpine iLX-F309TND Installation Manual - Page 6
Factory Unit Disassembly Process Continued
 |
View all Alpine iLX-F309TND manuals
Add to My Manuals
Save this manual to your list of manuals |
Page 6 highlights
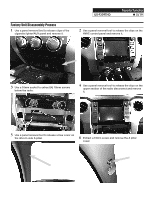
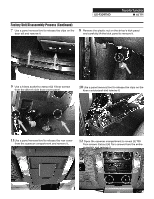
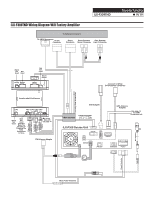
iLX-F309TND Toyota Tundra ˜ 6/19 Factory Unit Disassembly Process (Continued) 7 Use a panel removal tool to release the clips on the door sill and remove it. 8 Remove the plastic nut on the driver's kick panel and carefully lift the kick panel to remove it. 9 Use a 10mm socket to extract (2) 10mm screws from the driver's side knee cover panel. 10 Use a panel removal tool to release the clips on the knee cover panel and remove it. 11Use a panel removal tool to release the rear cover from the eyewear compartment and remove it. 12 Open the eyewear compartment to reveal (2) T20 Torx screws. Extract (4) Torx screws from the entire assembly and remove it.
-
 1
1 -
 2
2 -
 3
3 -
 4
4 -
 5
5 -
 6
6 -
 7
7 -
 8
8 -
 9
9 -
 10
10 -
 11
11 -
 12
12 -
13
-
14
-
15
-
16
-
17
-
18
-
19
 |
 |

Toyota Tundra
iLX-F309TND
±
6/19
Factory Unit Disassembly Process (Continued)
7
Use a panel removal tool to release the clips on the
door sill and remove it.
9
Use a 10mm socket to extract (2) 10mm screws
from the driver’s side knee cover panel.
11
Use a panel removal tool to release the rear cover
from the eyewear compartment and remove it.
8
Remove the plastic nut on the driver’s kick panel
and carefully lift the kick panel to remove it.
10
Use a panel removal tool to release the clips on the
knee cover panel and remove it.
12
Open the eyewear compartment to reveal (2) T20
Torx screws. Extract (4) Torx screws from the entire
assembly and remove it.