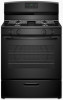
Amana AGR5330BAB Installation Guide
Amana AGR5330BAB Manual
 |
View all Amana AGR5330BAB manuals
Add to My Manuals
Save this manual to your list of manuals |
Amana AGR5330BAB manual content summary:
- Amana AGR5330BAB | Installation Guide - Page 1
of Contents RANGE SAFETY 2 INSTALLATION REQUIREMENTS 3 Tools and Parts 3 Location Requirements 4 Electrical Requirements 5 Gas Supply Requirements 6 INSTALLATION INSTRUCTIONS 7 Unpack Range 7 Install Anti-Tip Bracket 7 Make Gas Connection 8 Verify Anti-Tip Bracket Is Installed and Engaged - Amana AGR5330BAB | Installation Guide - Page 2
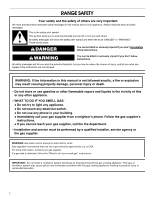
many important safety messages in this manual and on your appliance. Always read gas supplier's instructions. • If you cannot reach your gas supplier, call the fire department. - Installation and service must be performed by a qualified installer, service agency or the gas supplier. WARNING: Gas - Amana AGR5330BAB | Installation Guide - Page 3
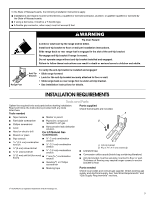
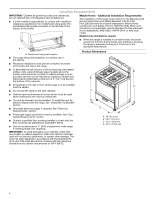
Read and follow the instructions provided with any tools listed here. Check that all parts are included. Tools needed A ■■ Tape measure ■■ Marker or pencil ■■ Flat-blade screwdriver ■■ Pipe-joint compound B ■■ Phillips screwdriver resistant to LP gas ■■ Level ■■ Noncorrosive leak - Amana AGR5330BAB | Installation Guide - Page 4
, Title 24 CFR, Part 3280 (formerly the Federal Standard for Mobile Home Construction and Safety, Title 24, HUD Part 280). When such standard Electrical B C Requirements" section. ■■ Proper gas supply connection must be available. See "Gas Supply Requirements" section. ■■ Contact a qualified - Amana AGR5330BAB | Installation Guide - Page 5
an adapter. Do not use an extension cord. Failure to follow these instructions can result in death, fire, or electrical shock. IMPORTANT: The range must the GFCI breaker is possible due to the normal operating nature of electronic gas ranges. ■■ The wiring diagram is located on the back of the range - Amana AGR5330BAB | Installation Guide - Page 6
gas company personnel, and authorized service personnel instructions. See "Complete Connection" in the "Make Gas Connection" section. Type of Gas Natural gas: ■■ This range is factory set for use with Natural gas The supply line must be equipped with a manual shut-off valve. This valve should be - Amana AGR5330BAB | Installation Guide - Page 7
gas supply piping system by closing its individual manual shut-off valve during any pressure testing of the gas supply piping system at test pressures equal to or less than ½ psi (3.5 kPa/14" WCP). INSTALLATION INSTRUCTIONS and foam support under range. 3. Remove oven racks and parts package from - Amana AGR5330BAB | Installation Guide - Page 8
Gas gas supply line. Install a shut-off valve. Securely tighten all gas connections. If connected to LP, have a qualified person make sure gas gas company personnel, and authorized service gas regulator too tight. Making the connections too tight may crack the regulator and cause a gas gas instructions - Amana AGR5330BAB | Installation Guide - Page 9
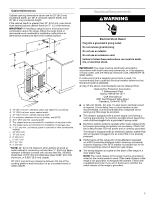
manual shut-off valve in the gas supply line. The valve is open when the handle is parallel to the gas pipe. A B Electrical Shock Hazard Plug into a grounded 3 prong outlet. Do not remove ground prong. Do not use an adapter. Do not use an extension cord. Failure to follow these instructions - Amana AGR5330BAB | Installation Guide - Page 10
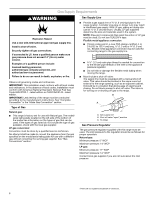
Guide or the cover or "Warranty" section of the User Instructions to contact service. Level Range 1. Place a standard flat rack in oven. 2. Place level on the rack and check levelness of the range, first side to side, then front to back. Electronic Ignition System Initial lighting and gas flame - Amana AGR5330BAB | Installation Guide - Page 11
normal. The oven valve requires a certain time before it will open and allow gas to flow. The oven burner will burn until oven temperature has reached 350°F The oven valve requires a certain time before it will open and allow gas to flow. To avoid damaging the hot surface igniter, do not insert any - Amana AGR5330BAB | Installation Guide - Page 12
Gas pressure regulator shut-off valve is in the ON position. ■■ Electrical supply is connected. ■■ See "Troubleshooting" in the Use and Care Guide or User Instructions person include: licensed heating personnel, authorized gas company personnel, and authorized service personnel. Failure to do so can - Amana AGR5330BAB | Installation Guide - Page 13
located in the back right-hand corner of the broiler compartment. A To Convert Surface Burners 1. Remove burner grate, burner caps, and burners. A. Gas pressure regulator IMPORTANT: Do not remove the gas pressure regulator. NOTE: Do not remove the spring beneath the cap. 2. Remove the cap from the - Amana AGR5330BAB | Installation Guide - Page 14
to follow these instructions can result in death or serious burns to children and adults. 1. Turn manual shut-off valve to the "closed" position. B A A. LP oven orifice spud stamped with "56" 6. Place Natural gas oven burner spud in plastic parts bag along with Natural gas cooktop burner spuds - Amana AGR5330BAB | Installation Guide - Page 15
located in the back right-hand corner of the broiler compartment. A To Convert Surface Burners 1. Remove burner grate, burner caps, and burners. A. Gas pressure regulator IMPORTANT: Do not remove the gas pressure regulator. NOTE: Do not remove the spring beneath the cap. 2. Remove the cap from the - Amana AGR5330BAB | Installation Guide - Page 16
Natural gas oven orifice spud stamped with "47" IMPORTANT: Do not overtighten. 6. Place LP gas oven burner spud in plastic parts bag along with LP gas the "Make Gas Connection" section for properly connecting the range to the gas supply. 2. Turn the manual shut-off valve in the gas supply line
-
 1
1 -
 2
2 -
 3
3 -
 4
4 -
 5
5 -
 6
6 -
 7
7 -
8
-
9
-
10
-
11
-
12
-
13
-
14
-
15
-
16
 |
 |

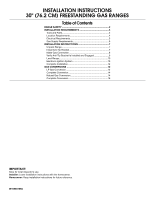
INSTALLATION INSTRUCTIONS
30" (76.2 CM) FREESTANDING GAS RANGES
W10860789A
IMPORTANT:
Save for local inspector's use.
Installer:
Leave installation instructions with the homeowner.
Homeowner:
Keep installation instructions for future reference.
Table of Contents
RANGE SAFETY
.............................................................................
2
INSTALLATION REQUIREMENTS
................................................
3
Tools and Parts
.............................................................................
3
Location Requirements
................................................................
4
Electrical Requirements
...............................................................
5
Gas Supply Requirements
...........................................................
6
INSTALLATION INSTRUCTIONS
..................................................
7
Unpack Range
..............................................................................
7
Install Anti-Tip Bracket
.................................................................
7
Make Gas Connection
.................................................................
8
Verify Anti-Tip Bracket Is Installed and Engaged
........................
9
Level Range
................................................................................
10
Electronic Ignition System
.........................................................
10
Complete Installation
.................................................................
12
GAS CONVERSIONS
...................................................................
12
LP Gas Conversion
....................................................................
12
Complete Conversion
................................................................
14
Natural Gas Conversion
.............................................................
14
Complete Conversion
................................................................
16