Asko T208VW Installation Instructions English - Page 3
Freestanding appliance
 |
View all Asko T208VW manuals
Add to My Manuals
Save this manual to your list of manuals |
Page 3 highlights
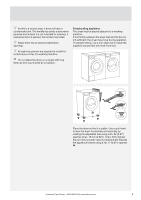
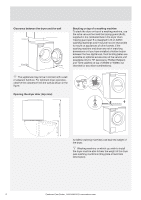
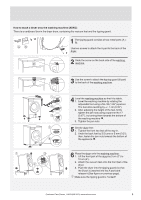
As this is a vented dryer, it does not have a condensate tank. The handle has solely a decorative purpose and is fixed; it is not intended for opening. If excessive force is applied, the handle may break. Never block the air exhaust (ventilation opening). Freestanding appliance The dryer may be placed adjacent to a washing machine. If the friction between the dryer feet and the floor is not sufficient, the dryer may move during operation. To prevent sliding, use a non-slide mat or install the supplied vacuum feet onto both front feet. At least two persons are required to install the tumble dryer on top of a washing machine. Do not place the dryer on a carpet with long fibres as this may impede air circulation. Place the dryer so that it is stable. Use a spirit level to level the dryer horizontally and vertically by rotating the adjustable feet using a No. 22 (0.87") spanner (max. 15 mm (0.59")). Then, firmly tighten the jam nuts (counter nuts) by rotating them towards the appliance bottom using a No. 17 (0.67") spanner . Customer Care Center, 1-800-898-1879, www.askona.com 3
-
 1
1 -
 2
2 -
 3
3 -
 4
4 -
 5
5 -
 6
6 -
 7
7 -
 8
8 -
 9
9 -
10
-
11
-
12
-
13
-
14
-
15
-
16
 |
 |
