Asko T700 User manual Use & Care Guide EN
Asko T700 Manual
 |
View all Asko T700 manuals
Add to My Manuals
Save this manual to your list of manuals |
Asko T700 manual content summary:
- Asko T700 | User manual Use & Care Guide EN - Page 1
SAFETY FEATURES ASKO DRYER FEATURES ENERGY SAVING TIPS INSTALLATION INSTRUCTIONS PREPARING THE LAUNDRY T711 OPERATING INSTRUCTIONS T721 OPERATING INSTRUCTIONS T731 OPERATING INSTRUCTIONS T761 AND T781 OPERATING INSTRUCTIONS CARE AND MAINTENANCE INSTRUCTIONS TROUBLESHOOTING PRODUCT WARRANTY - Asko T700 | User manual Use & Care Guide EN - Page 2
the weather. ♦ Do not tamper with controls. ♦ Do not attempt to repair or replace any part of the appliance or perform any servicing unless specifically recommended in this guide. ♦ Do not use fabric softeners or dryer sheets unless the manufacturer gives written assurance that the product will not - Asko T700 | User manual Use & Care Guide EN - Page 3
manual carefully before using your machine for the first time. For operating instructions, refer to the section in this guide for your specific model. Below is an illustration of the parts and features of your ASKO dryer dryness. Thermostat-Control Model T711 has a thermostat that controls - Asko T700 | User manual Use & Care Guide EN - Page 4
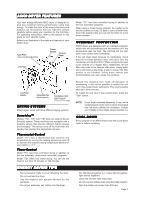
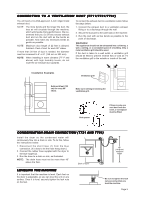
the exhaust duct can be attached to either the right or left exhaust outlet. ASKO dryers have a "T-style" exhaust vent that allows you to connect the duct on the rear or on the left or right side. Vent T-Tube Rear Exhaust Outlet Side Exhaust Outlet Stub Clamp Duct (not supplied) CONNECTING THE - Asko T700 | User manual Use & Care Guide EN - Page 5
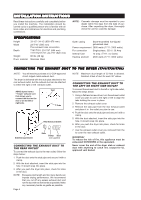
If there is only one vent duct from the room, a vent spacer must be fitted. CONDENSATION DRAIN CONNECTION (T721 AND T781) Install the dryer so the condensed water will continuously flow into a drain or sink. To do this, follow the instructions below: 2 3 1. Disconnect the short hose (1) from - Asko T700 | User manual Use & Care Guide EN - Page 6
height adjustment for the dryer is 33-1/2" to 34-1/2" (850 mm to 876 mm). Do not raise it higher than 34-1/2". Hole measurements are from center of hole. ELECTRICAL CONNECTIONS WARNING! This appliance must be properly grounded. Refer to the "Important Safety Instructions" on page 2 for grounding - Asko T700 | User manual Use & Care Guide EN - Page 7
to outer screws. 7. Tighten the strain relief screws. 8. Replace terminal box cover on back of dryer. 9. Plug dryer into wall receptacle. 10. Turn power on at breaker/fuse box. To connect a 3-wire power cord to the dryer, follow the steps below. NOTE: The numbers in the illustration below - Asko T700 | User manual Use & Care Guide EN - Page 8
STACKED INSTALLATION ASKO dryers can be mounted on top of any matching ASKO washer. Mounts are supplied with the machine. The metal brackets are attached to the lower back of the unit. The plastic cups are packed inside the dryer. Two metal brackets for securing the dryer to the washer Two plastic - Asko T700 | User manual Use & Care Guide EN - Page 9
hinges on ASKO dryers are reversible. The dryers are shipped removing the three screws holding the bracket in place. 3. Supporting the door from the bottom, pull it out and to illustrated at right (a, b, c). 16. Replace the screw you removed in step 13 (d). 17. Replace the lower panel. a d c b - Asko T700 | User manual Use & Care Guide EN - Page 10
Refer to "Important Safety Instructions" on page 2 for a list of specific materials that should never be put in a tumble dryer. FABRIC SOFTENER SHEETS We recommend Super rinse). ♦ Use fabric softener to eliminate static electricity in synthetic garments and to soften cotton. RECOMMENDED TEMPERATURE - Asko T700 | User manual Use & Care Guide EN - Page 11
Most clothes and other washable items have recommended care labels. Read these labels carefully! Care label instructions and warnings should be followed for the best cleaning results. The table below defines the symbols used on fabric care labels. (NOTE: Some manufacturers may - Asko T700 | User manual Use & Care Guide EN - Page 12
To reduce the risk of electric shock or injury to persons, read the "Important Safety Instructions" section on page 2 before , synthetics, etc. These programs work with a thermostat that measures the exhaust temperature coming out of the dryer and automatically turns the machine off when the clothes - Asko T700 | User manual Use & Care Guide EN - Page 13
To reduce the risk of electric shock or injury to persons, read the "Important Safety Instructions" section on page 2 before machine. START BUTTON Press this button to start the dryer. If you open the door during a program, the dryer will stop tumbling automatically. To continue the program, close - Asko T700 | User manual Use & Care Guide EN - Page 14
! To reduce the risk of electric shock or injury to persons, read the "Important Safety Instructions" section on page 2 before you have selected a program and the desired options, press this button to start the dryer. The red indicator light next to the Start button will come on. The indicator - Asko T700 | User manual Use & Care Guide EN - Page 15
ENGLISH PROGRAMS Your ASKO dryer has our state-of-the-art Sensidry system. This means load isn't dry, you can set the timer for a few more minutes. NOTE: Always follow the care label instruction. Program Heavy (P1) Normal (P2) Delicate (P3) Iron dry (P4) Timed Dry Air Fluff Definition For items - Asko T700 | User manual Use & Care Guide EN - Page 16
message still displays after you have checked the possible solutions, call a service technician. MESSAGE F1 F2 F3 F4 F5 ERROR Call a service technician. There may have been a power outage. Check the breaker box and fuses. The dryer is programmed to stop after a maximum of 3 hours drying time. If - Asko T700 | User manual Use & Care Guide EN - Page 17
T781 OPERATING INSTRUCTIONS WARNING! To reduce the risk of electric shock or injury to persons, read the "Important Safety Instructions" section program, press and hold the Stop button until the dryer stops (about three seconds). To restart the dryer, you will have to reselect a program and press - Asko T700 | User manual Use & Care Guide EN - Page 18
THE PRESET PROGRAMS ASKO dryers are delivered with the four most commonly used programs. The table below lists the preset programs and the settings for each. To select a program, simply press one of the program buttons and press Start. For additional programming options, - Asko T700 | User manual Use & Care Guide EN - Page 19
lists the options available with each dry program. These options can be temporary or permanent, depending on your preference. Refer to the "Programming Instructions" setting below for detailed instructions a program, press the Power button to switch the dryer off. When you switch the power back on, - Asko T700 | User manual Use & Care Guide EN - Page 20
time (5 to 90 minutes in 5-minute increments). 1. Press MENU until "Select time" displays. The Delayed Start Program This program lets you delay starting the dryer for up to 24 hours. This feature is useful in areas where utility companies offer discount rates during off-peak hours. When you select - Asko T700 | User manual Use & Care Guide EN - Page 21
message. If the message still displays after you have checked the possible solutions, call a service technician. ERROR MESSAGE Maximum program time Overflow (T781) Sensor Thermistor SOLUTION Make sure both fuses are intact. Clean the lint filter. Make sure exhaust hose is clear (T761). Clear - Asko T700 | User manual Use & Care Guide EN - Page 22
INSTRUCTIONS CLEANING THE LINT FILTER The wear on fabrics in a tumble dryer dryer exhaust outside to be sure the air flow is strong and nothing is blocking the vent. NOTE: If you use dryer penetration of water into the door lock and electrical components, never spray water or cleaning solvent of - Asko T700 | User manual Use & Care Guide EN - Page 23
the condenser into a dishwasher. Do not use any sharp metal objects or a wire brush to clean the condenser. Also, do not poke anything between the fins. 6. Make sure the side marked UPP UP OBEN "UP" does face up and carefully replace the condenser into the unit. 7. Close the condenser cover - Asko T700 | User manual Use & Care Guide EN - Page 24
TROUBLESHOOTING If you experience a problem with your dryer, you should review the following list of frequently encountered situations or go to our website at www.askousa.com. It could save you the cost and inconvenience of a service call. Even though the product is under warranty, if the problem is - Asko T700 | User manual Use & Care Guide EN - Page 25
, misuse or abuse. 3. Instruct how to use the appliance. 4. Replace house fuses or correct house wiring. 5. Correct house plumbing, including drainage problems related to improper installation. 6. Clean or service air device in drain line. B. Repair and/or replacement parts for failure of product if - Asko T700 | User manual Use & Care Guide EN - Page 26
Dryer features Drying problems Drying times Duct connection E Electrical instructions Sensidry Service Solutions to problems Sorting the laundry Specifications T Temperature control T711 T721 T731 T761 & T781 Temperature menu (T761/T781) Temperature settings Thermostat Control Troubleshooting - Asko T700 | User manual Use & Care Guide EN - Page 27
Page 27 ENGLISH - Asko T700 | User manual Use & Care Guide EN - Page 28
Page 28 Art. No. 8076530 . Rev.02.
-
 1
1 -
 2
2 -
 3
3 -
 4
4 -
 5
5 -
 6
6 -
 7
7 -
8
-
9
-
10
-
11
-
12
-
13
-
14
-
15
-
16
-
17
-
18
-
19
-
20
-
21
-
22
-
23
-
24
-
25
-
26
-
27
-
28
 |
 |

Page 1
ENGLISH
ENGLISH
ENGLISH
ENGLISH
ENGLISH
USE AND CARE GUIDE
IMPOR
IMPOR
IMPOR
IMPOR
IMPOR
T
ANT!
ANT!
ANT!
ANT!
ANT!
T
o g
o g
o g
o g
o g
et the best perf
et the best perf
et the best perf
et the best perf
et the best perf
or
or
or
or
or
mance fr
mance fr
mance fr
mance fr
mance fr
om
om
om
om
om
y
our dr
our dr
our dr
our dr
our dr
y
er
er
er
er
er
,
r
r
r
r
r
ead all oper
ead all oper
ead all oper
ead all oper
ead all oper
a
ting
ting
ting
ting
ting
instr
instr
instr
instr
instr
uctions bef
uctions bef
uctions bef
uctions bef
uctions bef
or
or
or
or
or
e using it f
e using it f
e using it f
e using it f
e using it f
or the
or the
or the
or the
or the
f
ir
ir
ir
ir
ir
st time
st time
st time
st time
st time
.
ASKO
CONTENTS
IMPORTANT SAFETY INSTRUCTIONS
2
SAFETY FEATURES
2
ASKO DRYER FEATURES
3
ENERGY SAVING TIPS
3
INSTALLATION INSTRUCTIONS
4
PREPARING THE LAUNDRY
10
T711 OPERATING INSTRUCTIONS
12
T721 OPERATING INSTRUCTIONS
13
T731 OPERATING INSTRUCTIONS
14
T761 AND T781 OPERATING INSTRUCTIONS
17
CARE AND MAINTENANCE INSTRUCTIONS
22
TROUBLESHOOTING
24
PRODUCT WARRANTY
25
INDEX
26
SAVE THESE INSTRUCTIONS FOR FUTURE REFERENCE
DRYER