Asus H61M-D H61M-D User's Manual
Asus H61M-D Manual
 |
View all Asus H61M-D manuals
Add to My Manuals
Save this manual to your list of manuals |
Asus H61M-D manual content summary:
- Asus H61M-D | H61M-D User's Manual - Page 1
H61M-D Motherboard - Asus H61M-D | H61M-D User's Manual - Page 2
ASUS"). Product warranty or service ASUS HAS BEEN ADVISED OF THE POSSIBILITY OF SUCH DAMAGES ARISING FROM ANY DEFECT OR ERROR IN THIS MANUAL OR PRODUCT. SPECIFICATIONS AND INFORMATION CONTAINED IN THIS MANUAL by downloading it from http://support.asus.com/download or encounter any problems in - Asus H61M-D | H61M-D User's Manual - Page 3
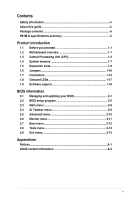
vi H61M-D specifications summary vi Product introduction 1.1 Before you proceed 1-1 1.2 Motherboard overview 1-1 1.3 Central Processing Unit (CPU 1-3 1.4 System memory 1-7 1.5 Expansion slots 1-9 1.6 Jumpers 1-10 1.7 Connectors 1-12 1.8 Onboard LEDs 1-17 1.9 Software support 1-18 BIOS - Asus H61M-D | H61M-D User's Manual - Page 4
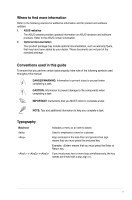
. • If you encounter technical problems with the product, contact a qualified service technician or your retailer. About this guide This user guide contains the information you need when installing and configuring the motherboard. How this guide is organized This guide contains the following parts - Asus H61M-D | H61M-D User's Manual - Page 5
to the following sources for additional information and for product and software updates. 1. ASUS websites The ASUS website provides updated information on ASUS hardware and software products. Refer to the ASUS contact information. 2. Optional documentation Your product package may include optional - Asus H61M-D | H61M-D User's Manual - Page 6
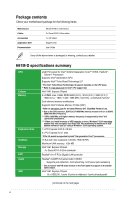
ASUS H61M-D motherboard 2 x Serial ATA 3.0 Gb/s cables 1 x I/O Shield Support DVD User Guide If any of the above items is damaged or missing, contact your retailer. H61M-D specifications summary CPU Chipset Memory Expansion slots Graphics Storage LAN Audio USB LGA1155 socket for Intel - Asus H61M-D | H61M-D User's Manual - Page 7
, ASUS EZ Flash 2, ASUS CrashFree BIOS 3 (default), MyLogo 2, SLP2.1, SLP3.0, iGPU+PEG (dual) (for Intel), GPU Boost, F3 Shortcut functions, C.P.R. WOL, PXE, PME Wake Up Drivers ASUS utilities EZ Update Anti-virus software (OEM version) uATX form factor: 8.9"x 6.9" (22.6cm x 17.5cm) Specifications - Asus H61M-D | H61M-D User's Manual - Page 8
the rear part of the chassis as indicated in the image. 1.2.2 Screw holes Place six screws into the holes indicated by circles to secure the motherboard to the chassis. Do not overtighten the screws! Doing so can damage the motherboard. ASUS H61M-D 1-1 - Asus H61M-D | H61M-D User's Manual - Page 9
64bit, 240-pin module) DDR3 DIMM_B1 (64bit, 240-pin module) LPT VGA LGA1155 1-2 22.6cm(8.9in) USB34 PS2_USBPW1-4 LAN_USB12 EATXPWR RTL 2 8111F CHA_FAN AUDIO H61M-D PCIEX16 Super I/O SB_PWR ALC 887- VD2 PCIEX1_1 PCIEX1_2 BATTERY Intel® 64Mb BIOS 6 H61 SPEAKER 7 F_PANEL AAFP - Asus H61M-D | H61M-D User's Manual - Page 10
1-3 1-7 1-14 1-17 1-15 1-10 1-16 1-12 1-15 1-17 1.3 Central Processing Unit (CPU) This motherboard comes with a surface mount LGA1155 socket designed for the Intel® 3rd/2nd generation Core™ i7 / Core™ i5 / Core™ i3, Pentium® , Celeron® processors. H61M-D H61M-D CPU socket LGA1155 ASUS H61M-D 1-3 - Asus H61M-D | H61M-D User's Manual - Page 11
install the correct CPU designed for the LGA1155 socket only. DO NOT install a CPU designed for LGA1150 and LGA1156 sockets on the LGA1155 socket. • Upon purchase of the motherboard, ensure that the PnP cap is on the socket and the socket contacts are not bent. Contact your retailer immediately if - Asus H61M-D | H61M-D User's Manual - Page 12
4 C 5 A B 1.3.2 CPU heatsink and fan assembly installation Apply the Thermal Interface Material to the CPU heatsink and CPU before you install the heatsink and fan if necessary. ASUS H61M-D 1-5 - Asus H61M-D | H61M-D User's Manual - Page 13
To install the CPU heatsink and fan assembly 1 A B 2 B A 3 4 To uninstall the CPU heatsink and fan assembly 1 2 A B B A 1-6 Chapter 1: Product introduction - Asus H61M-D | H61M-D User's Manual - Page 14
memory 1.4.1 Overview This motherboard comes with two Double Data Rate 3 (DDR3) Dual Inline Memory Module (DIMM) sockets. A DDR3 module is notched differently from a DDR or DDR2 module. DO NOT install a DDR or DDR2 memory module to the DDR3 slot. According to Intel® CPU spec, DIMM voltage below - Asus H61M-D | H61M-D User's Manual - Page 15
the vendor-marked value. • For system stability, use a more efficient memory cooling system to support a full memory load (2 DIMMs) or overclocking condition. • Visit the ASUS website at: www.asus.com for the latest QVL. 1.4.3 Installing a DIMM Unplug the power supply before adding or removing - Asus H61M-D | H61M-D User's Manual - Page 16
your motherboard drivers for the expansion card. When using PCI cards on shared slots, ensure that the drivers support "Share IRQ" or that the cards do not need IRQ assignments. Otherwise, conflicts will arise between the two PCI groups, making the system unstable and the card inoperable. ASUS H61M - Asus H61M-D | H61M-D User's Manual - Page 17
specifications. PCIe 3.0 speed is supported by Intel® 3rd generation CoreTM processors. IRQ assignments for this motherboard LAN PCIE x16_1 PCIE x1_1 PCIE x1_2 Intel system setup information such as system passwords. H61M-D CLRTC 12 23 Normal (Default) H61M-D Clear RTC RAM Clear RTC To - Asus H61M-D | H61M-D User's Manual - Page 18
down the key during the boot process and enter BIOS setup to re- enter data. Except when clearing the RTC RAM modes (no power to CPU, DRAM in slow refresh, power supply in reduced power mode). PS2_USBPW1-4 12 23 H61M-D +5V +5VSB (Default) H61M-D Keyboard Power Setting • ASUS H61M-D 1-11 - Asus H61M-D | H61M-D User's Manual - Page 19
lead, and a corresponding setting in the BIOS. H61M-D USBPW5-10 12 23 +5V +5VSB (Default) H61M-D USB Device Wake Up 1.7 Connectors 1.7.1 LAN) through a network hub. LAN port LED indications Activity Link Speed LED LED Activity/Link LED Status Description Off No link Orange Linked - Asus H61M-D | H61M-D User's Manual - Page 20
Speaker Out To configure an 8-channel audio output: Use a chassis with HD audio module in the front panel to support an 8-channel audio output. 7. USB 2.0 ports 1 and 2. These two 4-pin Universal Serial Bus (USB) 11. PS/2 keyboard port (purple). This port is for a PS/2 keyboard. ASUS H61M-D 1-13 - Asus H61M-D | H61M-D User's Manual - Page 21
fit. ATX12V EATXPWR +12V DC +12V DC H61M-D GND GND +3 Volts +12 Volts +12 Volts use a power supply unit (PSU) that complies with ATX 12V Specification 2.0 (or later version) and provides a minimum power of 350W Wattage Calculator at http://support.asus. com/PowerSupplyCalculator/PSCalculator. - Asus H61M-D | H61M-D User's Manual - Page 22
I/O module that supports either HD Audio or motherboard's high-definition audio capability. • If you want to connect a high-definition front panel audio module to this connector, set the Front Panel Type item in the BIOS H61M-D Intel® SATA 3.0Gb/s connectors • You must install Windows. XP Service - Asus H61M-D | H61M-D User's Manual - Page 23
motherboard components. These are not jumpers! Do not place jumper caps on the fan connectors! The CPU_FAN connector supports a CPU fan of maximum 1A (12 W) fan power. Only the 4-pin CPU fan supports the ASUS connectors comply with USB 2.0 specifications and supports up to 480Mbps connection speed. - Asus H61M-D | H61M-D User's Manual - Page 24
mode. This is a reminder that you should shut down the system and unplug the power cable before removing or plugging in any motherboard component. The illustration below shows the location of the onboard LED. H61M-D SB_PWR ON OFF Standby Power Powered Off H61M-D Onboard LED ASUS H61M-D 1-17 - Asus H61M-D | H61M-D User's Manual - Page 25
.com for updates. To run the Support DVD Place the Support DVD into the optical drive. If Autorun is enabled in your computer, the DVD automatically displays the Specials screen which lists the unique features of your ASUS motherboard. Click Drivers, Utilities, AHCI/RAID Drivers, Manual, Contact and - Asus H61M-D | H61M-D User's Manual - Page 26
update the motherboard BIOS in Windows® environment. • ASUS Update requires an Internet connection either through a network or an Internet Service Provider (ISP). • This utility is available in the support DVD that comes with the motherboard package. Installing ASUS Update To install ASUS Update - Asus H61M-D | H61M-D User's Manual - Page 27
from the Open window, then click Open. 3. Follow the onscreen instructions to complete the updating process. 2.1.2 ASUS EZ Flash 2 The ASUS EZ Flash 2 feature allows you to update the BIOS without using an OS‑based utility. Before you start using this utility, download the latest BIOS file from the - Asus H61M-D | H61M-D User's Manual - Page 28
screen displays may not be same as shown. Before updating BIOS 1. Prepare the motherboard support DVD and a USB flash drive in FAT32/16 format and single partition. 2. Download the latest BIOS file and BIOS Updater from the ASUS website at http://support.asus.com and save them on the USB flash drive - Asus H61M-D | H61M-D User's Manual - Page 29
D (USB flash drive). Updating the BIOS file To update the BIOS file using BIOS Updater: 1. At the FreeDOS prompt, type bupdater /pc /g and press . 2. The BIOS Updater screen appears as below. ASUSTek BIOS Updater for DOS V1.30 BOARD: H61M-D VER: 0302 DATE: 06/02/2013 H61MD.CAP 4194304 2013-06 - Asus H61M-D | H61M-D User's Manual - Page 30
drives after updating the BIOS file if you have disconnected them. 2.2 BIOS setup program Use the BIOS Setup program to update the BIOS or configure its parameters. The BIOS screens include navigation keys and brief online help to guide you in using the BIOS Setup program. Entering BIOS Setup at - Asus H61M-D | H61M-D User's Manual - Page 31
what you see on your screen. • Visit the ASUS website at www.asus.com to download the latest BIOS file for this motherboard. • Ensure that a USB mouse is connected to your motherboard if you want to use the mouse to control the BIOS setup program. • If the system becomes unstable after changing - Asus H61M-D | H61M-D User's Manual - Page 32
Selects the display language of the BIOS setup program Displays the CPU/motherboard temperature, CPU/5V/3.3V/12V voltage output, CPU/chassis fan speed Exits the BIOS setup program without saving the changes, saves is available only when the boot device is installed to the system. ASUS H61M-D 2-7 - Asus H61M-D | H61M-D User's Manual - Page 33
the BIOS settings. The figure below shows an example of the Advanced Mode. Refer to the following sections for the detailed configurations. To access the EZ Mode, click Exit, then select ASUS EZ Mode. Back button Menu items Menu bar Configuration fields General help Submenu item Pop-up window - Asus H61M-D | H61M-D User's Manual - Page 34
language, and security settings. • If you have forgotten your BIOS password, erase the CMOS Real Time Clock (RTC) RAM to clear the BIOS password. See section 1.7 Jumpers for information on how to section vary depending on the CPU and DIMM model you installed on the motherboard. ASUS H61M-D 2-9 - Asus H61M-D | H61M-D User's Manual - Page 35
2.5 Advanced menu The Advanced menu items allow you to change the settings for the CPU and other system devices. Be cautious when changing the settings of the Advanced menu items. Incorrect field values can cause the system to malfunction. 2-10 Chapter 2: Getting started - Asus H61M-D | H61M-D User's Manual - Page 36
2.6 Monitor menu The Monitor menu displays the system temperature/power status, and allows you to change the fan settings. Scroll down to display the following items: ASUS H61M-D 2-11 - Asus H61M-D | H61M-D User's Manual - Page 37
2.7 Boot menu The Boot menu items allow you to change the system boot options. Scroll down to display the following items: 2-12 Chapter 2: Getting started - Asus H61M-D | H61M-D User's Manual - Page 38
an item then press to display the submenu. 2.9 Exit menu The Exit menu items allow you to load the optimal default values for the BIOS items, and save or discard your changes to the BIOS items. You can access the EZ Mode from the Exit menu. ASUS H61M-D 2-13 - Asus H61M-D | H61M-D User's Manual - Page 39
radio frequency energy and, if not installed and used in accordance with manufacturer's instructions, may cause harmful interference to radio communications. However, there is no guarantee that y compris celles susceptibles de provoquer un fonctionnement non souhaité de l'appareil. H61M-D A-1 - Asus H61M-D | H61M-D User's Manual - Page 40
substances in our products at ASUS REACH website at http://csr.asus.com/english/REACH.htm. DO NOT throw the motherboard in municipal waste. This the battery should not be placed in municipal waste. ASUS Recycling/Takeback Services ASUS recycling and takeback programs come from our commitment to - Asus H61M-D | H61M-D User's Manual - Page 41
-4555 Web site usa.asus.com Technical Support Telephone Support fax Online support +1-812-282-2787 +1-812-284-0883 support.asus.com ASUS COMPUTER GmbH (Germany and 150, LI-TE RD., PEITOU, TAIPEI 112, TAIWAN R.O.C. ASUS Computer GmbH HARKORT STR. 21-23, 40880 RATINGEN, GERMANY H61M-D A-3 - Asus H61M-D | H61M-D User's Manual - Page 42
2. 1077(a) Responsible Party Name: Asus Computer International Address: 800 Corporate Way, Fremont, CA 94539. Phone/Fax No: (510)739-3777/(510)608-4555 hereby declares that the product Product Name : Motherboard Model Number : H61M-D Conforms to the following specifications: FCC Part 15, Subpart
-
 1
1 -
 2
2 -
 3
3 -
 4
4 -
 5
5 -
 6
6 -
 7
7 -
8
-
9
-
10
-
11
-
12
-
13
-
14
-
15
-
16
-
17
-
18
-
19
-
20
-
21
-
22
-
23
-
24
-
25
-
26
-
27
-
28
-
29
-
30
-
31
-
32
-
33
-
34
-
35
-
36
-
37
-
38
-
39
-
40
-
41
-
42
 |
 |

Motherboard
H61M-D