Asus HHHadas Install Manual - Page 14
ASUS DVD-E616P1 User Manual
 |
View all Asus HHHadas manuals
Add to My Manuals
Save this manual to your list of manuals |
Page 14 highlights
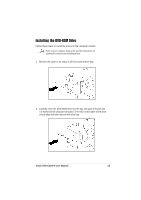
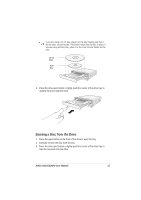
3. Secure the drive with screws that came with the drive package. Use two screws on each side of the drive. Depending on the space on your chassis, you may need to connect the drive cables before securing the drive into the chassis. For cable connections, proceed to the following section, "Connecting the Drive Cables." 14 ASUS DVD-E616P1 User Manual
-
 1
1 -
2
-
3
-
4
-
5
-
6
-
7
-
8
-
 9
9 -
 10
10 -
 11
11 -
 12
12 -
 13
13 -
 14
14 -
 15
15 -
 16
16 -
 17
17 -
 18
18 -
 19
19 -
20
-
21
-
22
-
23
-
24
-
25
-
26
-
27
-
28
-
29
-
30
-
31
-
32
-
33
-
34
-
35
-
36
 |
 |
14
ASUS DVD-E616P1 User Manual
3.
Secure the drive with screws that came with the drive package. Use two
screws on each side of the drive.
Depending on the space on your chassis, you may need to connect the
drive cables before securing the drive into the chassis. For cable
connections, proceed to the following section, “Connecting the Drive
Cables.”