Asus K551LN Users Manual - Page 91
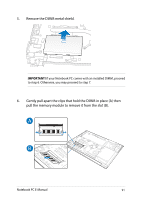
Remove the DIMM metal shield., Gently pull apart the clips that hold the DIMM in place A then
 |
View all Asus K551LN manuals
Add to My Manuals
Save this manual to your list of manuals |
Page 91 highlights
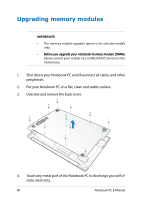
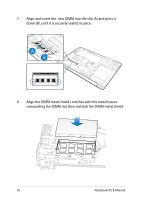
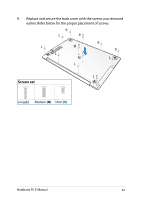
5. Remove the DIMM metal shield. IMPORTANT! If your Notebook PC comes with an installed DIMM, proceed to step 6. Otherwise, you may proceed to step 7. 6. Gently pull apart the clips that hold the DIMM in place (A) then pull the memory module to remove it from the slot (B). Notebook PC E-Manual 91
-
 1
1 -
2
-
3
-
4
-
5
-
6
-
7
-
8
-
9
-
10
-
11
-
12
-
13
-
14
-
15
-
16
-
17
-
18
-
19
-
20
-
21
-
22
-
23
-
24
-
25
-
26
-
27
-
28
-
29
-
30
-
31
-
32
-
33
-
34
-
35
-
36
-
37
-
38
-
39
-
40
-
41
-
42
-
43
-
44
-
45
-
46
-
47
-
48
-
49
-
50
-
51
-
52
-
53
-
54
-
55
-
56
-
57
-
58
-
59
-
60
-
61
-
62
-
63
-
64
-
65
-
66
-
67
-
68
-
69
-
70
-
71
-
72
-
73
-
74
-
75
-
76
-
77
-
78
-
79
-
80
-
81
-
82
-
83
-
84
-
85
-
 86
86 -
 87
87 -
 88
88 -
 89
89 -
 90
90 -
 91
91 -
 92
92 -
 93
93 -
 94
94 -
 95
95 -
 96
96 -
97
-
98
-
99
-
100
-
101
-
102
-
103
-
104
-
105
-
106
-
107
-
108
-
109
-
110
-
111
-
112
-
113
-
114
-
115
-
116
-
117
-
118
-
119
-
120
-
121
-
122
-
123
-
124
-
125
-
126
 |
 |

Notebook PC E-Manual
¶1
³.
Remove the DIMM metal shield.
´.
Gently pull apart the clips that hold the DIMM in place (A) then
pull the memory module to remove it from the slot (B).
IMPORTANT!
If your Notebook PC comes with an installed DIMM, proceed
to step ´. Otherwise, you may proceed to step µ.