Asus K8N-DRE User Guide - Page 103
Creating a RAID 0 set Stripe
 |
UPC - 610839132164
View all Asus K8N-DRE manuals
Add to My Manuals
Save this manual to your list of manuals |
Page 103 highlights
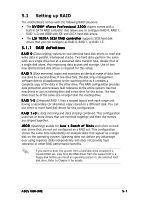
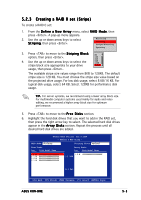
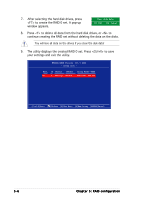
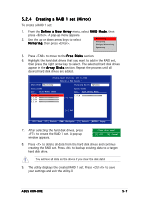
5.2.3 Creating a RAID 0 set (Stripe) To create a RAID 0 set: 1. From the D e f i n e a N e w A r r a y menu, select R A I D M o d e, then press . A pop-up menu appears. 2. Use the up or down arrow keys to select S t r i p i n g, then press . Mirroring Striping Stripe Mirroring Spanning 3. Press to move to the S t r i p i n g B l o c k option, then press . 4. Use the up or down arrow keys to select the stripe block size appropriate to your drive usage, then press . 8K ↑ 16K 32K 64K 128K Optim ↓ The available stripe size values range from 8KB to 128KB. The default stripe size is 128 KB. You must choose the stripe size value based on the projected drive usage. For low disk usage, select 8 KB/16 KB. For typical disk usage, select 64 KB. Select 128KB for performance disk usage. T I P . For server systems, we recommend using a lower array block size. For multimedia computer systems used mainly for audio and video editing, we recommend a higher array block size for optimum performance. 5. Press to move to the F r e e D i s k s section. 6. Highlight the hard disk drives that you want to add in the RAID set, then press the right arrow key to select. The selected hard disk drives appear in the A r r a y D i s k s section. Repeat the process until all desired hard disk drives are added. NVIDIA RAID Utility Oct 5 2004 - Define a New Array - RAID Mode: Striping Striping Block: Optimal Free Disks Loc Disk Model Name Array Disks Loc Disk Model Name 1.0.M XXXXXXXXXXXXXXXXXX 1.1.M XXXXXXXXXXXXXXXXXX 2.0.M XXXXXXXXXXXXXXXXXX 2.1.M XXXXXXXXXXXXXXXXXX 1.0.M XXXXXXXXXXXXXXXXXX [→] Add [←] Del [F6] Back [F7] Finish [TAB] Navigate [↑↓] Select [ENTER] Popup ASUS K8N-DRE 5-5
-
 1
1 -
2
-
3
-
4
-
5
-
6
-
7
-
8
-
9
-
10
-
11
-
12
-
13
-
14
-
15
-
16
-
17
-
18
-
19
-
20
-
21
-
22
-
23
-
24
-
25
-
26
-
27
-
28
-
29
-
30
-
31
-
32
-
33
-
34
-
35
-
36
-
37
-
38
-
39
-
40
-
41
-
42
-
43
-
44
-
45
-
46
-
47
-
48
-
49
-
50
-
51
-
52
-
53
-
54
-
55
-
56
-
57
-
58
-
59
-
60
-
61
-
62
-
63
-
64
-
65
-
66
-
67
-
68
-
69
-
70
-
71
-
72
-
73
-
74
-
75
-
76
-
77
-
78
-
79
-
80
-
81
-
82
-
83
-
84
-
85
-
86
-
87
-
88
-
89
-
90
-
91
-
92
-
93
-
94
-
95
-
96
-
97
-
 98
98 -
 99
99 -
 100
100 -
 101
101 -
 102
102 -
 103
103 -
 104
104 -
 105
105 -
 106
106 -
 107
107 -
 108
108 -
109
-
110
-
111
-
112
-
113
-
114
-
115
-
116
-
117
-
118
-
119
-
120
-
121
-
122
-
123
-
124
-
125
-
126
-
127
-
128
-
129
-
130
-
131
-
132
-
133
-
134
-
135
-
136
-
137
-
138
-
139
-
140
-
141
-
142
 |
 |