Asus M1A M1 Series Manual - Page 83
Features, Usage
 |
View all Asus M1A manuals
Add to My Manuals
Save this manual to your list of manuals |
Page 83 highlights
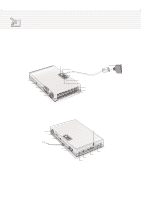
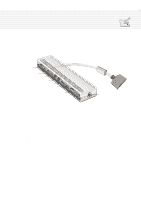
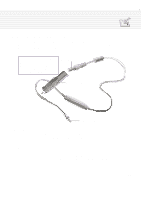
APPENDIX Notes • Except for the USB port, the ports on the Notebook PC will not function and should not have any devices (e.g. monitor, mouse, keyboard) connected when using the PortDock. • The PortDock's power requirements require that a power adapter be connected to the PortDock or to the Notebook PC. • The PortDock reset button resets the PortDock, not the Notebook PC. If the PortDock or the Notebook PC does not respond, try resetting the PortDock before resetting the Notebook PC. • Do not connect parallel devices other than a printer to the parallel port on the PortDock. Connect other parallel devices to the Notebook PC's own parallel port, but a printer cannot be connected while the Notebook PC's parallel port is in use. Features The PortDock features stereo speakers, amplifier with volume control, LCD display with four CDROM control keys, floppy drive bay, CD/DVD-ROM or second hard disk drive bay, DC-in pass-through for powering the PortDock and the Notebook PC, serial port, parallel port, two PS/2 ports, VGA port, and audio output jack. Usage If you require more than one drive access, simply insert a floppy disk drive into the upper bay of the PortDock and/or a CD/DVD-ROM or second hard disk drive into the lower bay of the PortDock and plug the docking cable to the docking port on the rear of the Notebook PC. The PortDock's Plug & Play feature allows it to be connected or disconnected while the Notebook PC is ON or OFF (hot-dockable). The modular drives cannot be inserted into or removed from the PortDock when the docking cable is connected and the Notebook PC is ON. This is also the case with the Notebook PC's own modular drive bay. Disconnect the docking cable or turn OFF the Notebook PC OFF before swapping drive modules in the PortDock. Except for the device connected to the serial port, other devices should function normally while hotswapping. CD/DVD-ROM in the PortDock should appear upon connection but a second hard disk drive may fail to appear in "My Computer." If any device does not function or cannot be seen, you can refresh devices by: (1) right clicking the "My Computer" icon on the desktop, (2) selecting "Properties" on the menu, (3) selecting the "Device Manager" tab, (4) clicking the "Refresh" button, and (5) clicking "OK" button to finish. WARNING! Do not remove or insert drives while the Notebook PC is ON. The Notebook PC may hang and cause loss of data. 83
-
 1
1 -
2
-
3
-
4
-
5
-
6
-
7
-
8
-
9
-
10
-
11
-
12
-
13
-
14
-
15
-
16
-
17
-
18
-
19
-
20
-
21
-
22
-
23
-
24
-
25
-
26
-
27
-
28
-
29
-
30
-
31
-
32
-
33
-
34
-
35
-
36
-
37
-
38
-
39
-
40
-
41
-
42
-
43
-
44
-
45
-
46
-
47
-
48
-
49
-
50
-
51
-
52
-
53
-
54
-
55
-
56
-
57
-
58
-
59
-
60
-
61
-
62
-
63
-
64
-
65
-
66
-
67
-
68
-
69
-
70
-
71
-
72
-
73
-
74
-
75
-
76
-
77
-
 78
78 -
 79
79 -
 80
80 -
 81
81 -
 82
82 -
 83
83 -
 84
84 -
 85
85 -
 86
86 -
 87
87 -
 88
88 -
89
-
90
-
91
-
92
-
93
-
94
-
95
-
96
-
97
-
98
 |
 |