Asus M2V-MX SE User Manual - Page 21
Push down the retention bracket lock on the retention mechanism to secure - no sound
 |
View all Asus M2V-MX SE manuals
Add to My Manuals
Save this manual to your list of manuals |
Page 21 highlights
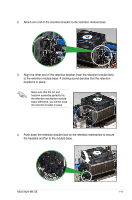
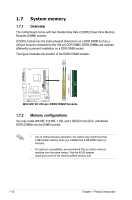
2. Attach one end of the retention bracket to the retention module base. 3. Align the other end of the retention bracket (near the retention bracket lock) to the retention module base. A clicking sound denotes that the retention bracket is in place. Make sure that the fan and heatsink assembly perfectly fits the retention mechanism module base; otherwise, you cannot snap the retention bracket in place. 4. Push down the retention bracket lock on the retention mechanism to secure the heatsink and fan to the module base. ASUS M2V-MX SE 1-11
-
 1
1 -
2
-
3
-
4
-
5
-
6
-
7
-
8
-
9
-
10
-
11
-
12
-
13
-
14
-
15
-
 16
16 -
 17
17 -
 18
18 -
 19
19 -
 20
20 -
 21
21 -
 22
22 -
 23
23 -
 24
24 -
 25
25 -
 26
26 -
27
-
28
-
29
-
30
-
31
-
32
-
33
-
34
-
35
-
36
-
37
-
38
-
39
-
40
-
41
-
42
-
43
-
44
-
45
-
46
-
47
-
48
-
49
-
50
-
51
-
52
-
53
-
54
-
55
-
56
-
57
-
58
-
59
-
60
-
61
-
62
-
63
-
64
-
65
-
66
-
67
-
68
-
69
-
70
-
71
-
72
-
73
-
74
-
75
-
76
-
77
-
78
-
79
-
80
-
81
-
82
-
83
-
84
-
85
-
86
-
87
-
88
-
89
-
90
 |
 |

ASUS M2V-MX SE
1-11
2.
Attach one end of the retention bracket to the retention module base.
3.
Align the other end of the retention bracket (near the retention bracket lock)
to the retention module base. A clicking sound denotes that the retention
bracket is in place.
4.
Push down the retention bracket lock on the retention mechanism to secure
the heatsink and fan to the module base.
Make sure that the fan and
heatsink assembly perfectly fits
the retention mechanism module
base; otherwise, you cannot snap
the retention bracket in place.