Asus P4C800-E Deluxe P4C800-E Deluxe User's manual english version E1347 - Page 144
Creating, Deleting, and Resetting RAID Sets, Installing Serial ATA hard disks
 |
View all Asus P4C800-E Deluxe manuals
Add to My Manuals
Save this manual to your list of manuals |
Page 144 highlights
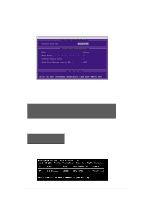
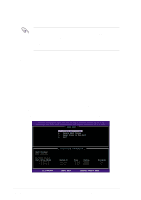
5.5.2 Installing Serial ATA hard disks 1. A Serial ATA hard disk requires SATA data (4-conductor) and power cables. Make sure that you have the appropriate SATA cables before your proceed with the installation. 2. Carefully follow other hard disk installation instructions that came with the Serial ATA hard disks. Follow these steps to install a Serial ATA hard disk. 1. Install the hard disk into the drive bay. 2. Connect one end of the SATA data cable to an SATA connector on the motherboard, then connect the other end to the hard disk. 3. Connect a 4-pin power cable to the power connector on the hard disk. 5.5.3 Creating, Deleting, and Resetting RAID Sets Use the Intel® Integrated RAID for Serial ATA - RAID Configuration Utility to configure your Serial ATA hard disks as RAID. Launch the utility by pressing when the message "Press to enter RAID Configuration Utility" appears during the Power-On Self Test (POST). Pressing displays the Main Menu of the RAID Configuration utility. Intel(R) Integrated RAID for Serial ATA - RAID Configuration Utility Copyright(C) 2003 Intel Corporation. All Rights Reserved. v3.x.x.xxxx [ MAIN MENU ] 1. Create RAID Volume 2. Delete RAID Volume 3. Reset Disks to Non-RAID 4. Exit RAID Volumes: None defined. Non-RAID Disks: Port Drive Model 0 ST320413A 1 ST320413A [ DISK/VOLUME INFORMATION ] Serial # xxxxxxxx xxxxxxxx Size 18.6GB 18.6GB Status Normal Normal Bootable Yes Yes [ ]-Select [ESC] Exit [Enter]-Select Menu 5-34 Chapter 5: Software support
-
 1
1 -
2
-
3
-
4
-
5
-
6
-
7
-
8
-
9
-
10
-
11
-
12
-
13
-
14
-
15
-
16
-
17
-
18
-
19
-
20
-
21
-
22
-
23
-
24
-
25
-
26
-
27
-
28
-
29
-
30
-
31
-
32
-
33
-
34
-
35
-
36
-
37
-
38
-
39
-
40
-
41
-
42
-
43
-
44
-
45
-
46
-
47
-
48
-
49
-
50
-
51
-
52
-
53
-
54
-
55
-
56
-
57
-
58
-
59
-
60
-
61
-
62
-
63
-
64
-
65
-
66
-
67
-
68
-
69
-
70
-
71
-
72
-
73
-
74
-
75
-
76
-
77
-
78
-
79
-
80
-
81
-
82
-
83
-
84
-
85
-
86
-
87
-
88
-
89
-
90
-
91
-
92
-
93
-
94
-
95
-
96
-
97
-
98
-
99
-
100
-
101
-
102
-
103
-
104
-
105
-
106
-
107
-
108
-
109
-
110
-
111
-
112
-
113
-
114
-
115
-
116
-
117
-
118
-
119
-
120
-
121
-
122
-
123
-
124
-
125
-
126
-
127
-
128
-
129
-
130
-
131
-
132
-
133
-
134
-
135
-
136
-
137
-
138
-
 139
139 -
 140
140 -
 141
141 -
 142
142 -
 143
143 -
 144
144 -
 145
145 -
 146
146 -
 147
147 -
 148
148 -
 149
149
 |
 |