Asus P4VP-MX Motherboard DIY Troubleshooting Guide - Page 20
Central Processing Unit CPU - windows 7
 |
View all Asus P4VP-MX manuals
Add to My Manuals
Save this manual to your list of manuals |
Page 20 highlights
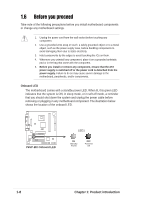
1.8 Central Processing Unit (CPU) 1.8.1 Overview The motherboard comes with a surface mount 478-pin Zero Insertion Force (ZIF) socket. The socket is designed for the Intel® Pentium® 4 and Prescott processors in the 478-pin package. This processor supports 533/400MHz front side bus (FSB), and allows data transfer rates of up to 4.3GB/s. Note in the illustration that the CPU has a gold triangular mark on one corner. This mark indicates the processor Pin 1 that should match a specific corner of the CPU socket. Gold Mark Incorrect installation of the CPU into the socket may bend the pins and severely damage the CPU! Notes on Intel® Hyper-Threading Technology 1. This motherboard supports Intel® Pentium 4 CPUs with Hyper-Threading Technology. 2. Make sure to enable the Hyper-Threading Technology item in the BIOS before installing a supported operating system. See page 2-12. 3. To verify the Hyper-Threading feature, go to the Windows OS System Properties -> Hardware -> Device Manager -> Processors. The list should display two existing processors. 4. Hyper-Threading Technology is supported under Windows® XP and later versions only. 5. It is recommended that you install Windows® XP Service Pack 1. 6. For more information on Hyper-Threading Technology, visit www.intel.com/info/hyperthreading. To use the Hyper-Threading Technology on this motherboard: 1. Buy an Intel® Pentium 4 CPU that supports Hyper-Threading Technology. Install the CPU. 2. Power up the system and enter BIOS Setup (see Chapter 2). Under the Advanced Menu, make sure that the item Hyper-Threading Technology is set to Enabled. The item appears only if you installed a CPU that supports Hyper-Threading Technology. 3. Reboot the computer. 1-10 Chapter 1: Product introduction
-
 1
1 -
2
-
3
-
4
-
5
-
6
-
7
-
8
-
9
-
10
-
11
-
12
-
13
-
14
-
 15
15 -
 16
16 -
 17
17 -
 18
18 -
 19
19 -
 20
20 -
 21
21 -
 22
22 -
 23
23 -
 24
24 -
 25
25 -
26
-
27
-
28
-
29
-
30
-
31
-
32
-
33
-
34
-
35
-
36
-
37
-
38
-
39
-
40
-
41
-
42
-
43
-
44
-
45
-
46
-
47
-
48
-
49
-
50
-
51
-
52
-
53
-
54
-
55
-
56
-
57
-
58
-
59
-
60
-
61
-
62
 |
 |
