Asus P5QL-VM DO User Guide
Asus P5QL-VM DO Manual
 |
View all Asus P5QL-VM DO manuals
Add to My Manuals
Save this manual to your list of manuals |
Asus P5QL-VM DO manual content summary:
- Asus P5QL-VM DO | User Guide - Page 1
P5QL-VM DO Motherboard - Asus P5QL-VM DO | User Guide - Page 2
Product warranty or service will not be extended if: (1) the product is repaired, modified or altered, unless such repair, modification of alteration is authorized in writing by ASUS; or (2) the serial number of the product is defaced or missing. ASUS PROVIDES THIS MANUAL "AS IS" WITHOUT WARRANTY - Asus P5QL-VM DO | User Guide - Page 3
this guide vii P5QL-VM DO specifications summary viii Chapter 1: Product introduction 1.1 Before you proceed 1-1 1.2 Motherboard overview 1-2 1.2.1 Motherboard layout 1-2 1.2.2 Layout contents 1-2 1.3 Central Processing Unit (CPU 1-3 1.4 System memory 1-3 1.4.1 Overview 1-3 1.4.2 Memory - Asus P5QL-VM DO | User Guide - Page 4
S3 Resume 2-14 2.6.3 ACPI 2.0 Support 2-14 2.6.4 ACPI APIC Support 2-14 2.6.5 APM Configuration 2-14 2.6.6 HW Monitor Configuration 2-15 2.7 Boot menu 2-16 2.7.1 Boot Device Priority 2-16 2.7.2 Boot Settings Configuration 2-16 2.7.3 Security 2-17 2.8 Tools menu 2-18 ASUS EZ Flash 2 2-18 - Asus P5QL-VM DO | User Guide - Page 5
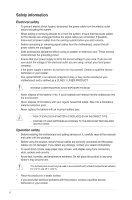
used in accordance with manufacturer's instructions, may cause harmful interference to radio Consult the dealer or an experienced radio/TV technician for help. The use of shielded cables for connection of the ASUS REACH website at http://green.asus.com/english/REACH.htm DO NOT throw the motherboard - Asus P5QL-VM DO | User Guide - Page 6
BY AN INCORRECT TYPE. • DISPOSE OF USED BATTERIES ACCORDING TO THE ABOVE BATTERY-RELATED INSTRUCTIONS. Operation safety • Before installing the motherboard and adding devices on it, carefully read all the manuals that came with the package. • Before using the product, ensure that all cables are - Asus P5QL-VM DO | User Guide - Page 7
need when installing and configuring the motherboard. How this guide is organized This guide contains the following parts: • Chapter 1: Product introduction This chapter describes the features of the motherboard and the new technology it supports. • Chapter 2: BIOS information This chapter tells how - Asus P5QL-VM DO | User Guide - Page 8
P5QL-VM DO specifications summary CPU Chipset Front Side Bus Memory LGA775 socket for Intel® Core™2 Quad / Core™2 Exreme / Core™2 Duo / Pentium® dual-core / Celeron® dual-core / Celeron® processors Support Intel® 45nm Multi-core CPU Northbridge: Intel® B43 Southbridge: Intel® ICH10D 1333/1066/800 - Asus P5QL-VM DO | User Guide - Page 9
BIOS Accessories Support DVD Form Factor 2 x USB 2.0/1.1 connectors support additional 4 USB 2.0/1.1 ports 6 x SATA connectors 1 x LPT connector 1 x COM connector 1 x Chassis fan connector 1 x CPU fan connector 1 x Power fan connector 1 x High Definition front panel audio connector 1 x System panel - Asus P5QL-VM DO | User Guide - Page 10
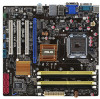
Chapter 1 Product introduction Thank you for buying an ASUS® P5QL-VM DO motherboard! Before you start installing the motherboard, and hardware devices on it, check the items in your motherboard package. Refer to page ix for the list of accessories. If any of the items is damaged or missing, contact - Asus P5QL-VM DO | User Guide - Page 11
and Power fan connectors 1-13 11. Serial port connectors (10-1 pin COM2) 1-17 (4-pin CPU_FAN, 3-pin CHA_FAN, 3-pin PWR_FAN) 3. ATX power connectors (24-pin EATXPWR, 4-pin ATX12V) 1-14 12. USB connectors (10-1 pin USB78, USB910) 1-13 4. Intel CPU socket 1-3 13. USB device wake-up (3-pin USBPW7 - Asus P5QL-VM DO | User Guide - Page 12
contacts resulting from incorrect CPU installation/removal, or misplacement/loss/incorrect removal of the PnP cap. This motherboard supports Intel® Hyper-Threading Technology and Enhanced Intel SpeedStep® Technology (EIST). 1.4 System memory 1.4.1 Overview This motherboard comes with four Double - Asus P5QL-VM DO | User Guide - Page 13
memory if you are using a 32-bit Windows® OS. - Use a 64-bit Windows® OS if you want to install 4GB or more memory on the motherboard. • This motherboard does not support to support a full memory load (4 DIMMs) or overclocking conditions. P5Q-VM DO Motherboard Qualified Vendors List (QVL - Asus P5QL-VM DO | User Guide - Page 14
(continued on the next page) Timing DIMM (BIOS) 5 5 5 4-4-4-12 4-4-4-12 4-4-4-12 5-5-5-15 DIMM Support Voltage A* B* C 4 • •• 5 8V 6 1.8V • 5-5-5-15 2.0V • 5 1.8V • 6 1.8V • 6 1.8V • 6-6-6-12 • 6-6-6-12 • 4-5-5-15 2.0V • 4-4-4-15 1.9 • - 2.1 V ASUS P5QL-VM DO 1-5 - Asus P5QL-VM DO | User Guide - Page 15
F2-5400PHU2-2GBNT G.SKILL F2-5300CL5D-4GBMQ GEIL GX21GB5300SX Size SS/ Chip DS Brand Chip No. Timing DIMM Support DIMM Voltage (BIOS) A* B* C* 2048MB DS ADATA AD20908A8A-3EG 30724 ••• 512MB SS Apacer AM4B5708JQJS7E0751C 5 ••• 512MB SS Apacer AM4B5708GQJS7E06332F 5 •• 512MB SS - Asus P5QL-VM DO | User Guide - Page 16
into either the yellow or black slots as one pair of Dual-channel memory configuration. • C*: Supports four modules inserted into both the yellow and black slots as two pairs of Dual-channel memory configuration. Visit the ASUS website at www.asus.com for the latest QVL. ASUS P5QL-VM DO 1-7 - Asus P5QL-VM DO | User Guide - Page 17
system unstable and the card inoperable. 1.5.3 PCI slots The PCI slots support cards such as LAN cards, SCSI cards, USB cards, and other cards that comply with the PCI specifications. 1.5.4 PCI Express x16 slot This motherboard supports PCI Express x16 graphics cards that comply with the PCI Express - Asus P5QL-VM DO | User Guide - Page 18
pins 2-3 (+5VSB), you can wake up the computer by pressing a key on the keyboard (the default is the Space Bar)s. This feature requires an ATX power supply that can supply at least 1A on the +5VSB lead, and a corresponding setting in the BIOS. KBPWR 12 23 +5V +5VSB (Default) P5QL-VM DO P5QL-VM - Asus P5QL-VM DO | User Guide - Page 19
mode) using the connected USB devices. Set to +5VSB to wake up from S3 and S4 sleep modes (no power to CPU, DRAM in slow refresh, power supply in reduced power mode). USBPW7-10 12 23 P5QL-VM DO +5V +5VSB (Default) P5QL-VM DO USB Device Wake Up • The USB device wake-up feature requires a power - Asus P5QL-VM DO | User Guide - Page 20
. This port is for any DVI-D compatible device. DVI-D can't be converted to output RGB Signal to CRT and isn't compatible with DVI-I. 11. COM port. This 9-pin COM1 port is for pointing devices or other serial devices. 12. PS/2 Keyboard port. This port is for a PS/2 keyboard. ASUS P5QL-VM DO 1-11 - Asus P5QL-VM DO | User Guide - Page 21
GND GND RSATA_RXN2 RSATA_RXP2 GND RSATA_TXN2 RSATA_TXP2 GND P5QL-VM DO P5QL-VM DO SATA connectors (ICH10D®) Install the Windows® XP Service Pack 2 or later version before using Serial ATA. 2. Optical drive audio in connector (4-pin CD) This connector allows you to receive stereo audio input from - Asus P5QL-VM DO | User Guide - Page 22
motherboard components. They are not jumpers! DO NOT place jumper caps on the fan connectors. CPU_FAN CPU FAN PWM CPU FAN IN CPU FAN PWR GND P5QL-VM DO CHA_FAN Rotation +12V GND P5QL-VM DO fan connectors PWR_FAN GND +12V Rotation Only the CPU fan supports the ASUS Q-FAN feature. ASUS P5QL-VM - Asus P5QL-VM DO | User Guide - Page 23
completely fit. ATX12V EATXPWR +12V DC +12V DC P5QL-VM DO GND GND +3 Volts +12 Volts +12 Volts +5V Standby Power OK PIN 1 GND +5 Volts GND +5 Volts GND +3 Volts +3 Volts PIN 1 P5QL-VM DO ATX power connectors GND +5 Volts +5 Volts +5 Volts -5 Volts GND GND GND PSON# GND - Asus P5QL-VM DO | User Guide - Page 24
System panel connector (10-1 pin F_PANEL) This connector supports several chassis-mounted functions. F_PANEL PWR LED PWR BTN PLED+ PLEDPWR GND PIN 1 IDE_LED+ IDE_LED- Ground Reset P5QL-VM DO HD_LED RESET P5QL-VM DO System panel connector • System power LED (2-pin PLED) This 2-pin connector is - Asus P5QL-VM DO | User Guide - Page 25
DO HD-audio-compliant Legacy AC'97 pin definition compliant definition P5QL-VM DO Analog front panel connector If you want to connect a high-definition front panel audio module to this connector, ensure that the Front Panel Type item in the BIOS is set to [HD Audio]. If you want to connect an - Asus P5QL-VM DO | User Guide - Page 26
P5QL-VM DO P5QL-VM DO Serial port (COM2) connector 11. TPM connector (20-1 pin TPM) This connector supports a Trusted Platform Module (TPM) system, which can securely store keys, digital certificates, passwords, and data. A TPM system also helps enhance network security, protects digital identities - Asus P5QL-VM DO | User Guide - Page 27
automatically displays the Drivers menu if the Autorun function is enabled on your computer. The contents of the Support DVD are subject to change at any time without notice. Visit the ASUS website at www.asus.com for updates. Click an icon to display Support DVD/ motherboard information Click an - Asus P5QL-VM DO | User Guide - Page 28
the motherboard package. Installing ASUS Update: 1. Place the Support DVD into the optical drive. The Drivers menu appears. 2. Click the Utilities tab, then click ASUS Update. 3. Follow the onscreen instructions to complete the installation. Quit all Windows® applications before you update the BIOS - Asus P5QL-VM DO | User Guide - Page 29
the BIOS updating process and automatically reboots the system when done. • Only a USB flash disk with FAT 32/16 format and single partition supports the ASUS EZ Flash 2 utility. • DO NOT shut down or reset the system while updating the BIOS to prevent system boot failure! 2-2 ASUS P5QL-VM DO - Asus P5QL-VM DO | User Guide - Page 30
smaller than 8GB. • DO NOT shut down or reset the system while updating the BIOS! Doing so can cause system boot failure! The recovered BIOS may not be the latest BIOS version for this motherboard. Download the latest BIOS file from the ASUS website at www.asus.com. Chapter 2: BIOS information 2-3 - Asus P5QL-VM DO | User Guide - Page 31
website at www.asus.com to download the latest BIOS file for this motherboard. 2.3 Main menu When you enter the BIOS Setup program, the Main menu screen appears, giving you an overview of the basic system information. Main AI Tweaker BIOS SETUP UTILITY Advanced Power Boot Tools Exit System - Asus P5QL-VM DO | User Guide - Page 32
the SATA device information. The BIOS automatically detects the values opposite the Compatible] [Enhanced] Configure SATA as [IDE] Sets the configuration for the Serial ATA connectors supported by the Southbridge chip. Configuration options: [IDE] [AHCI] The AHCI allows the onboard storage driver - Asus P5QL-VM DO | User Guide - Page 33
to achieve desired CPU internal frequency. Select either one of the preset overclocking configuration options: Manual - Allows you to individually set overclocking parameters. Auto - Loads the optimal settings for the system. Overclock Profile - Loads the overclock profile. 2-6 ASUS P5QL-VM DO/SI - Asus P5QL-VM DO | User Guide - Page 34
item is auto-detected by the BIOS. Input the desired CPU frequency using the numeric keypad. The values range from 200 to 800. Refer to the table below for the correct Front Side Bus and CPU External Frequency settings. FSB/CPU External Frequency Synchronization Front Side Bus FSB 1600 FSB 1333 - Asus P5QL-VM DO | User Guide - Page 35
] Intel(R) Virtualization Tech [Enabled] The Intel® Virtualization Technology allows a hardware platform to run multiple operating systems separately and simultaneously, enabling one system to virtually function as several systems. Configuration options: [Disabled] [Enabled] 2-8 ASUS P5QL-VM DO - Asus P5QL-VM DO | User Guide - Page 36
CPU Ratio Setting item to [Auto]. Intel(R) SpeedStep (TM) Tech [Enabled] When set to [Disabled], the CPU runs at its default speed. When set to [Enabled], the CPU speed is controlled Path (PAVP) BIOS support. Configuration options: [Disabled] [Lite Mode] [Paranoid] DVMT Memory [256MB] Configuration - Asus P5QL-VM DO | User Guide - Page 37
This motherboard supports Intel® DVMT 5.0 Technology whose maximum graphics memory size in total varies with the system memory size in total and the operating system. Refer to the following table for details. System Memory 1GB to < 1.5GB 1GB to < 2GB 2GB to < 3GB 3GB to < 4GB 4GB and above Maximum - Asus P5QL-VM DO | User Guide - Page 38
front panel audio module supports. Configuration options: [AC97] [HD Audio] Intel Onboard LAN Controller [Enabled] Allows you to enable or disable the onboard LAN controller. Configuration options: [Enabled] [Disabled] Intel LAN Boot ROM [Disabled] Allows you to enable or disable the Intel LAN Boot - Asus P5QL-VM DO | User Guide - Page 39
set the maximum time that the BIOS waits for the USB storage device to initialize. Configuration options: [10 Sec] [20 Sec] [30 Sec] [40 Sec] Emulation Type [Auto] Allows you to set the emulation type. Configuration options: [Auto] [Floppy] [Forced FDD] [Hard Disk] [CDROM] 2-12 ASUS P5QL-VM DO/SI - Asus P5QL-VM DO | User Guide - Page 40
/PnP or legacy ISA devices, and setting the memory size block for legacy ISA devices. Take caution Plug and Play O/S [No] When set to [No], BIOS configures all the devices in the system. When set to a TPM module is installed in this motherboard. TCG/TPM Support [Yes] Allows you to enable or disable - Asus P5QL-VM DO | User Guide - Page 41
Power On RTC Alarm [Disabled] Allows you to enable or disable RTC to generate a wake event. When this item is set to Enabled, the items RTC Alarm Date, RTC Alarm Hour, RTC Alarm Minute, and RTC Alarm Second appear with set values. Configuration options: [Disabled] [Enabled] 2-14 ASUS P5QL-VM DO/SI - Asus P5QL-VM DO | User Guide - Page 42
voltage regulators. Select Ignored if you do not wish to display the detected voltage output. ASUS Advanced Q-Fan Control Fan Profile [Silent] Allows you to select the fan profile. Configuration options: [Disabled] [Performance] [Optimal] [Silent] [Ultra Silent]. The option of "Ultra Silent" is - Asus P5QL-VM DO | User Guide - Page 43
-menu. Main AI Tweaker Advanced Boot Settings BIOS SETUP UTILITY Power Boot Tools Boot Device Priority Boot Settings Configuration Security Exit Specifies the Boot Device Priority sequence. A virtual to run Setup during POST. Configuration options: [Disabled] [Enabled] 2-16 ASUS P5QL-VM DO/SI - Asus P5QL-VM DO | User Guide - Page 44
Enter> twice. The message Password uninstalled appears. If you forget your BIOS password, you can clear it by erasing the CMOS Real Time Clock to any field. [Limited] - allows changes only to selected fields, such as Date and Time. [Full Access] - allows viewing and changing all the fields in the - Asus P5QL-VM DO | User Guide - Page 45
Tools menu Main Ai Teaker Tools Settings ASUS EZ Flash 2 BIOS SETUP UTILITY Advanced Power Boot Tools Exit Press ENTER to run the utility to select and update BIOS. This utility supports 1. FAT 12/16/32 (r/w) 2. NTFS from this menu or from the legend bar to exit. 2-18 ASUS P5QL-VM DO/SI
-
 1
1 -
 2
2 -
 3
3 -
 4
4 -
 5
5 -
 6
6 -
 7
7 -
8
-
9
-
10
-
11
-
12
-
13
-
14
-
15
-
16
-
17
-
18
-
19
-
20
-
21
-
22
-
23
-
24
-
25
-
26
-
27
-
28
-
29
-
30
-
31
-
32
-
33
-
34
-
35
-
36
-
37
-
38
-
39
-
40
-
41
-
42
-
43
-
44
-
45
 |
 |

Motherboard
P5QL-VM DO