Asus P7P55D-E LX User Manual
Asus P7P55D-E LX Manual
 |
View all Asus P7P55D-E LX manuals
Add to My Manuals
Save this manual to your list of manuals |
Asus P7P55D-E LX manual content summary:
- Asus P7P55D-E LX | User Manual - Page 1
P7P55D-E LX Motherboard - Asus P7P55D-E LX | User Manual - Page 2
2011, either (1) for free by downloading it from http://support.asus.com/download; or (2) for the cost of problems in obtaining the full corresponding source code we would be much obliged if you give us a notification to the email address [email protected], stating the product and describing the problem - Asus P7P55D-E LX | User Manual - Page 3
1.5.3 Motherboard layout 1-3 1.5.4 Layout contents 1-3 1.6 Central Processing Unit (CPU 1-4 1.6.1 Installing the CPU 1-4 1.6.2 Installing the CPU heatsink and fan 1-7 1.6.3 Uninstalling the CPU heatsink and fan 1-8 1.7 System memory 1-9 1.7.1 Overview 1-9 1.7.2 Memory configurations - Asus P7P55D-E LX | User Manual - Page 4
ASUS BIOS Updater 2-4 2.2 BIOS setup program 2-7 Entering BIOS Setup at startup 2-7 Entering BIOS Setup after POST 2-7 2.3 Main menu 2-7 2.3.1 SATA 1-6 2-8 2.3.2 Storage Configuration 2-8 2.3.3 AHCI Configuration 2-9 2.3.4 System Information 2-9 2.4 Ai Tweaker menu 2-10 2.4.1 CPU - Asus P7P55D-E LX | User Manual - Page 5
16 2.5.1 CPU Configuration 2-16 2.5.2 Uncore Configuration 2-18 2.5.3 Onboard Devices Configuration 2-18 2.5.4 USB Configuration 2-19 2.5.5 PCIPnP 2-19 2.5.6 Intel VT-d Configuration 2-19 2.6 Power menu 2-20 2.6.1 Suspend Mode 2-20 2.6.2 Repost Video on S3 Resume 2-20 2.6.3 ACPI 2.0 Support - Asus P7P55D-E LX | User Manual - Page 6
different from that to which the receiver is connected. • Consult the dealer or an experienced radio/TV technician for help. The use of shielded cables for connection of the monitor to the graphics card at ASUS REACH website at http://green.asus.com/english/REACH.htm. DO NOT throw the motherboard in - Asus P7P55D-E LX | User Manual - Page 7
Contact a qualified service technician or your retailer. Operation safety • Before installing the motherboard and adding devices on it, carefully read all the manuals that came with . • If you encounter technical problems with the product, contact a qualified service technician or your retailer. vii - Asus P7P55D-E LX | User Manual - Page 8
you need when installing and configuring the motherboard. How this guide is organized This guide contains the following parts: • Chapter 1: Product introduction This chapter describes the features of the motherboard and the new technology it supports. • Chapter 2: BIOS information This chapter tells - Asus P7P55D-E LX | User Manual - Page 9
LX specifications summary CPU Chipset Memory Expansion Slots Storage LAN USB Audio LGA1156 socket for Intel® Core™ i7 / Core™ i5 / Core™ i3 processors Supports Intel® Turbo Boost Technology * Refer to www.asus.com for Intel CPU support list Intel® P55 Express Chipset 4 x DIMM, max. 16GB, DDR3 2200 - Asus P7P55D-E LX | User Manual - Page 10
P7P55D-E LX specifications summary ASUS Q-Design ASUS Unique Features ASUS Exclusive Overclocking Features ASUS Q-LED (DRAM) ASUS Q-Slot ASUS Q-DIMM ASUS IO Level UP for Ultra Performance - True USB 3.0 or True SATA 6Gb/s Support ASUS Xtreme Design ASUS Exclusive Overclocking Features - CPU Level - Asus P7P55D-E LX | User Manual - Page 11
x CPU Fan connector 2 x Chassis Fan connectors (1 x 4-pin, 1 x 3-pin) 1 x Power Fan connector 1 x COM port connector 1 x Front panel audio connector 1 x S/PDIF Out Header 1 x 24-pin ATX Power connector 1 x 8-pin ATX 12V Power connectors 1 x System Panel 1 x MemOK! button 1 x IO Level UP button BIOS - Asus P7P55D-E LX | User Manual - Page 12
xii - Asus P7P55D-E LX | User Manual - Page 13
LGA1156 package, which has memory and PCI Express controller integrated to support 2-channel (4 DIMMs) DDR3 memory and 16 PCI Express 2.0 lanes, enabling higher graphics performance. Intel® Lynnfield / Clarkdale processor is one of the most powerful and energy efficient CPU in the world. Intel® P55 - Asus P7P55D-E LX | User Manual - Page 14
USB 3.0 transfers data 10X faster and is also backward compatible with USB 2.0 components. True SATA 6Gb/s Support Supporting next-generation Serial ATA (SATA) storage interface, this motherboard you install or remove any component, ensure that the ATX power supply is switched off or the power cord - Asus P7P55D-E LX | User Manual - Page 15
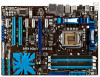
1. LGA1156 CPU Socket 2. ATX power connectors (24-pin EATXPWR, 8-pin EATX12V) 3. DDR3 DIMM slots CPU, chassis, and power fan connectors 4. (4-pin CPU_FAN, 4-pin CHA_FAN1, 3-pin CHA_FAN2, 3-pin PWR_FAN) 5. MemOK! switch 6. JMicron® JMB361 IDE Connector (40-1 pin PRI_IDE [Blue]) 7. Intel® P55 - Asus P7P55D-E LX | User Manual - Page 16
1.6 Central Processing Unit (CPU) The motherboard comes with a surface mount LGA1156 socket designed for the Intel® Core™ i7 / Core™ i5 / Core™ i3 Processors. Ensure that all power cables are unplugged before installing the CPU. • Upon purchase of the motherboard, ensure that the PnP cap is on the - Asus P7P55D-E LX | User Manual - Page 17
the socket, and then fit the socket alignment keys into the CPU notches. The CPU fits in only one correct orientation. DO NOT force the CPU into the socket to prevent bending the connectors on the socket and damaging the CPU! Gold triangle mark Alignment keys CPU notches ASUS P7P55D-E LX 1-5 - Asus P7P55D-E LX | User Manual - Page 18
6. Apply some Thermal Interface Material to the exposed area of the CPU that the heatsink will be in contact with, ensuring that it is spread in an even thin layer. Some heatsinks come with pre-applied thermal - Asus P7P55D-E LX | User Manual - Page 19
condition and performance. • When you buy a boxed Intel® processor, the package includes the CPU fan and heatsink assembly. If you buy a CPU separately, ensure that you use only Intel®‑certified multi‑directional heatsink and fan. • Your Intel® LGA1156 heatsink and fan assembly comes in a push-pin - Asus P7P55D-E LX | User Manual - Page 20
errors can occur if you fail to plug this connector. 1.6.3 Uninstalling the CPU heatsink and fan To uninstall the CPU heatsink and fan: 1. Disconnect the CPU fan cable from the connector on the motherboard. 2. Rotate each fastener counterclockwise. 3. Pull up two fasteners at a time in - Asus P7P55D-E LX | User Manual - Page 21
consumption. The figure illustrates the location of the DDR3 DIMM sockets: Recommended memory configurations One DIMM: Install only one memory module in slot A1 or B1 as a single-channel operation. Two DIMMs (dual-channel operation): Four DIMMs (dual-channel operation): ASUS P7P55D-E LX 1-9 - Asus P7P55D-E LX | User Manual - Page 22
lower-sized channel for the dual-channel configuration. Any excess memory from the higher-sized channel is then mapped for single-channel operation. • Due to Intel spec definition, X.M.P. DIMMs are supported for one DIMM per channel only. • According to Intel CPU spec, DIMM voltage below 1.65V is - Asus P7P55D-E LX | User Manual - Page 23
P7P55D-E LX Motherboard Qualified Vendors Lists (QVL) DDR3-1067MHz capability for CPU at 2.66, 2.8 and 2.93GHz Vendor Part No. Size SS/ Chip DS Brand Chip NO. Timing Lable(Bios D9KPT Timing Dimm(Bios) Voltage DIMM socket support (Optional) A* -9-9-9-24) •• •• • ASUS P7P55D-E LX 1-11 - Asus P7P55D-E LX | User Manual - Page 24
P7P55D-E LX Motherboard Qualified Vendors Lists (QVL) DDR3-1333MHz capability for CPU ASUS I0YT3E0 2048MB DS S-POWER I0YT3E0 Timing Dimm(Bios) Voltage 9(1333-9-9-9-24) 6-6-6-20(1333-9-9-9-24 24) 9(1333-9-9-9-24) 9(1333-9-9-9-24) DIMM socket support (Optional) A* B* C (1333-9-9-9-24) •• • - Asus P7P55D-E LX | User Manual - Page 25
• • 1066-8-8-8-20 •• • P7P55D-E LX Motherboard Qualified Vendors Lists (QVL) DDR3-1625MHz capability for CPU at 2.66GHz Vendor KINGSTON KINGSTON KINGSTON Package Timing Dimm(Bios) Voltage DIMM socket support (Optional) A* B* C* 1.9 • • • 1.9 • • • 1.9 • • ASUS P7P55D-E LX 1-13 - Asus P7P55D-E LX | User Manual - Page 26
Chip NO. DIMM socket Timing Lable(Bios) Voltage support (Optional) A* B* C* Heat-Sink Package 1.9 • • • Heat-Sink Package 1.9 • • • Heat-Sink Package 1.9 • • • P7P55D-E LX Motherboard Qualified Vendors Lists (QVL) DDR3-1800MHz capability for CPU at 2.66GHz Vendor Apacer CORSAIR - Asus P7P55D-E LX | User Manual - Page 27
support (Optional) A* B* C P7P55D-E LX Motherboard Qualified Vendors Lists (QVL) DDR3-1866MHz capability for CPU at 2.8 and 2.93GHz Vendor Part No. Size SS/ DS Chip Brand Chip NO. Timing Dimm(Bios 9CAASS37AZZ01D1 2GB DS N/A Heat-Sink Package 9-9-9-24 • • • ASUS P7P55D-E LX 1-15 - Asus P7P55D-E LX | User Manual - Page 28
. ASUS exclusively provides two DDR3-1600 DIMM support for each memory channel. • According to Intel CPU spec, CPUs with a core frequency of 2.66G support the maximum DIMM frequency of up to DDR3-1333. To use DIMMs of a higher frequency with a 2.66G CPU, enable the DRAM O.C. Profile feature in BIOS - Asus P7P55D-E LX | User Manual - Page 29
on BIOS setup. 2. Assign an IRQ to the card. 3. Install the software drivers for the expansion card. 1.8.3 PCI slots The PCI slots support cards such as a LAN card, SCSI card, USB card, and other cards that comply with PCI specifications. 1.8.4 PCI Express x1 slots This motherboard supports PCI - Asus P7P55D-E LX | User Manual - Page 30
RAM in CMOS. You can clear the CMOS memory of date, time, and system setup parameters by erasing the CMOS RTC RAM data. The onboard button cell battery powers the RAM the key during the boot process and enter BIOS setup to re-enter data. Except when clearing the RTC RAM, never remove the cap on - Asus P7P55D-E LX | User Manual - Page 31
load BIOS default settings. A messgae will appear during POST reminding you that the BIOS has been restored to its default settings. • We recommend that you download and update to the latest BIOS version from the ASUS website at www.asus.com after using the MemOK! function. ASUS P7P55D-E LX 1-19 - Asus P7P55D-E LX | User Manual - Page 32
boost of the USB 3.0 ports on the rear panel or the onboard SATA 6Gb/s ports. Two LEDs with different colors are provided to indicate different speed mode. 500MB/s). • You may also switch the speed of the USB 3.0 ports or the SATA 6Gb/s ports in BIOS setting. Refer to chapter 3 for details. • Press - Asus P7P55D-E LX | User Manual - Page 33
USB) ports connect to USB 3.0/2.0/1.1 devices. 5. Optical S/PDIF Out port. This port connects an external audio output device via an optical S/PDIF cable. 6. External SATA port. This port connect to an external Serial ATA hard disk drive. To configure Out Side Speaker Out ASUS P7P55D-E LX 1-21 - Asus P7P55D-E LX | User Manual - Page 34
Calculator at http://support.asus. com/PowerSupplyCalculator/PSCalculator.aspx?SLanguage=en-us for details. 2. CPU, chassis, and power fan connectors (4-pin CPU_FAN, 4-pin CHA_FAN1, 3-pin CHA_FAN2, 3-pin PWR_FAN) Connect the fan cables to the fan connectors on the motherboard, ensuring that the - Asus P7P55D-E LX | User Manual - Page 35
are for the Serial ATA signal cables for Serial ATA hard disk drives and optical disc drives. If you installed Serial ATA hard disk drives, you can create a RAID 0, 1, 5, and 10 configuration with the Intel® Matrix Storage Technology through the onboard Intel® P55 chipset. ASUS P7P55D-E LX 1-23 - Asus P7P55D-E LX | User Manual - Page 36
Configure SATA as item in the BIOS to [RAID]. • Before creating a RAID set, refer to section RAID configurations or the RAID manual bundled in the motherboard support DVD. • You must install Windows® XP Service speaker allows you to hear system beeps and warnings. • ATX power button/soft-off button - Asus P7P55D-E LX | User Manual - Page 37
separately. 7. Serial port connector (10-1 pin COM1) This connector is for a serial (COM) port. Connect the serial port module cable to this connector, then install the module to a slot opening at the back of the system chassis. The COM module is purchased separately. ASUS P7P55D-E LX 1-25 - Asus P7P55D-E LX | User Manual - Page 38
ATA boot/data hard disk drives to these connectors. • You must install Windows® XP Service Pack 2 or later versions before using Serial ATA hard disk drives. • When using hot-plug and NCQ, set the Marvell 9123 Controller item in the BIOS to [AHCI Mode]. Refer to section Onboard Devices Configuration - Asus P7P55D-E LX | User Manual - Page 39
blue, black, and gray. Connect the blue connector to the motherboard's IDE connector, then select one of the following modes to configure your device. Single device Two devices Drive jumper setting Cable-Select ", ensure that all other device jumpers have the same setting. ASUS P7P55D-E LX 1-27 - Asus P7P55D-E LX | User Manual - Page 40
. This user-friendly design provides an intuitive way to locate the root problem within seconds. You may disable the POST State LEDs in BIOS. Refer to section Boot Settings Configuration for details. 2. Standby power LED The motherboard comes with a standby power LED that lights up to indicate that - Asus P7P55D-E LX | User Manual - Page 41
Ensure that you install the Windows® XP Service Pack 2 or later versions before installing the drivers for better compatibility and system stability. 1.13 Support DVD information The support DVD that comes with the motherboard package contains the drivers, software applications, and utilities that - Asus P7P55D-E LX | User Manual - Page 42
1-30 Chapter 1: Product introduction - Asus P7P55D-E LX | User Manual - Page 43
. Updating from the Internet a. Select Update BIOS from the Internet, and then click Next. b. Select the ASUS FTP site nearest you to avoid network traffic, or click Auto elect. Click Next. c. From the FTP site, select the BIOS version that you wish to download, then click Next. ASUS P7P55D-E LX - Asus P7P55D-E LX | User Manual - Page 44
using an OS‑based utility. Before you start using this utility, download the latest BIOS file from the ASUS website at www.asus.com. To update the BIOS using EZ Flash 2: 1. Insert the USB flash disk that contains the latest BIOS file to the USB port, then launch EZ Flash 2 in any of these two ways - Asus P7P55D-E LX | User Manual - Page 45
the motherboard support DVD or a USB flash drive that contains the BIOS file. The BIOS file in the motherboard support DVD may be older than the BIOS file published on the ASUS official website. If you want to use the newer BIOS file, download the file at support.asus.com and save it to a USB flash - Asus P7P55D-E LX | User Manual - Page 46
may not be same as shown. Before updating BIOS 1. Prepare the motherboard support DVD and a USB flash drive in FAT32/16 format and single partition. 2. Download the latest BIOS file and BIOS Updater from the ASUS website at http://support.asus.com and save them on the USB flash drive. • NTFS is not - Asus P7P55D-E LX | User Manual - Page 47
prompt. ASUSTek BIOS Updater for DOS V1.00b [09/06/22] FLASH TYPE: MXIC 25L1605A Current ROM BOARD: P7P55D-E LX VER: 0019 DATE: 12/02/2009 Update ROM BOARD: Unknown VER: Unknown DATE: Unknown PATH: A:\ BIOS backup is done! Press any key to continue. Note Saving BIOS: ASUS P7P55D-E LX 2-5 - Asus P7P55D-E LX | User Manual - Page 48
down or reset the system while updating the BIOS to prevent system boot failure! • For BIOS Updater version 1.04 or later, the utility automatically exits to the DOS prompt after updating BIOS. • Ensure to load the BIOS default settings to ensure system compatibility and stability. Select the Load - Asus P7P55D-E LX | User Manual - Page 49
purposes only, and may not exactly match what you see on your screen. • Visit the ASUS website at www.asus.com to download the latest BIOS file for this motherboard. 2.3 Main menu When you enter the BIOS Setup program, the Main menu screen appears, giving you an overview of the basic system - Asus P7P55D-E LX | User Manual - Page 50
to display the submenu. SATA Configuration [Enhanced] Configuration options: [Disabled] [Compatible] [Enhanced] Configure SATA as [IDE] Sets the configuration for the Serial ATA connectors supported by the Southbridge chip. Configuration options: [IDE] [RAID] [AHCI] 2-8 Chapter 2: BIOS information - Asus P7P55D-E LX | User Manual - Page 51
Analysis and Reporting Technology. Configuration options: [Disabled] [Enabled] 2.3.4 System Information This menu gives you an overview of the general system specifications. The BIOS automatically detects the BIOS information, CPU specification, and system memory in this menu. ASUS P7P55D-E LX 2-9 - Asus P7P55D-E LX | User Manual - Page 52
vary depending on the CPU and DIMM model you installed on the motherboard. Main Ai Tweaker BIOS SETUP UTILITY Advanced Power Boot Tools Exit Configure System Performance Settings CPU Level UP [Auto Ai Overclock Tuner [Auto] CPU Ratio Setting [Auto] Intel(R) SpeedStep(TM) Tech [Enabled - Asus P7P55D-E LX | User Manual - Page 53
higher than the Intel® CPU spec, use this ASUS exclusive DRAM O.C. Profile supported by your memory module. Configuration options: [High Performance] [High Frequency] To obtain the best performance of the X.M.P. DIMM or 1600MHz DIMM, install only one DIMM on each memory channel. ASUS P7P55D-E LX - Asus P7P55D-E LX | User Manual - Page 54
options: [Auto] [DDR3-800MHz] [DDR3-1066MHz] [DDR3-1333] • The DRAM Frequency configuration options vary with the BCLK Frequency item settings. • According to Intel CPU spec, CPUs with a core frequency of 2.66G support the maximum DIMM frequency of up to DDR3 1333. To use DIMMs of a higher - Asus P7P55D-E LX | User Manual - Page 55
(SR) [Auto] Configuration options: [Auto] [4 DRAM Clock] [6 DRAM Clock] DRAM WRITE To WRITE Delay (DR) [Auto] Configuration options: [Auto] [2 DRAM Clock] - [9 DRAM Clock] DRAM WRITE To WRITE Delay (SR) [Auto] Configuration options: [Auto] [4 DRAM Clock] [6 DRAM Clock] ASUS P7P55D-E LX 2-13 - Asus P7P55D-E LX | User Manual - Page 56
Allows you to set the CPU Integrated Memory Controller voltage. The values range from 1.1V to 1.7V with a 0.02V interval. 2.4.14 DRAM Voltage [Auto] Allows you to set the DRAM voltage. The values range from 1.2V to 2.0V with a 0.02V interval. According to Intel CPU spec, DIMM voltage below 1.65V is - Asus P7P55D-E LX | User Manual - Page 57
CPU VDroop directly. CPU Spread Spectrum [Auto] Automatic configuration. Enhances the BCLK overclocking ability. Sets to [Enabled] for EMI control. PCIE Spread Spectrum [Auto] Automatic configuration. Enhances the PCIE overclocking ability. Sets to [Enabled] for EMI control. ASUS P7P55D-E LX - Asus P7P55D-E LX | User Manual - Page 58
can cause the system to malfunction. Main Ai Tweaker BIOS SETUP UTILITY Advanced Power Boot CPU Configuration Uncore Configuration Onboard Devices Configuration USB Configuration PCIPnP Intel VT-d [Disabled] Tools Exit Configure CPU. ←→ Select Screen ↑↓ Select Item Enter Go to Sub Screen - Asus P7P55D-E LX | User Manual - Page 59
package limit setting [Auto] This item appears only when you set the Intel(R) C-STATE Tech item to [Enabled]. We recommend that you set this item to [Auto] for BIOS to automatically detect the C-State mode supported by your CPU. Configuration options: [Auto] [C1] [C3] [C6] ASUS P7P55D-E LX 2-17 - Asus P7P55D-E LX | User Manual - Page 60
training. [Disabled] The cold booting with memory detection and hardware training. 2.5.3 Onboard Devices Configuration HDA Controller [Enabled] [Enabled] Enables the High Definition Audio Controller. [Disabled] Disables the controller. Front Panel Type [HD Audio] [AC97] Set the front - Asus P7P55D-E LX | User Manual - Page 61
for boot. [No] When set to [No], BIOS configures all the devices in the system. 2.5.6 [Disabled] [Enabled] Intel VT-d Configuration [Disabled] Disables the Intel Virtualization Technology for Directed I/O. Enables the Intel Virtualization Technology for Directed I/O. ASUS P7P55D-E LX 2-19 - Asus P7P55D-E LX | User Manual - Page 62
Power Management (APM). Select an item then press to display the configuration options. Main Ai Tweaker BIOS SETUP UTILITY Advanced Power Boot Suspend Mode Repost Video on S3 Resume ACPI 2.0 Support ACPI APIC Support EuP Ready [Auto] [No] [Disabled] [Enabled] [Disabled] APM - Asus P7P55D-E LX | User Manual - Page 63
[Enabled], the items RTC Alarm Date (Days) / System Time will become user-configurable with set values. Power On By External Modems [Disabled] [Disabled] Disables to by a PS/2 mouse. This feature requires an ATX power supply that provides at least 1A on the +5VSB lead. ASUS P7P55D-E LX 2-21 - Asus P7P55D-E LX | User Manual - Page 64
��n�o��t�c�o��n�n�e��c�te��d��to��t�h�e� motherboard, the field shows N/A. Select Ignored if you do not wish to display the detected speed. CPU Q-Fan Control [Disabled] [Disabled] Disables the CPU Q-Fan control feature. [Enabled] Enables the CPU Q-Fan control feature. CPU Fan Profile [Standard - Asus P7P55D-E LX | User Manual - Page 65
Tweaker BIOS SETUP UTILITY Advanced Power Boot Boot Settings Boot Device Priority Boot Settings Configuration Security Tools Exit Specifies the Boot Device Priority sequence. A virtual floppy disk drive system displays the message "Press DEL to run Setup" during POST. ASUS P7P55D-E LX 2-23 - Asus P7P55D-E LX | User Manual - Page 66
settings. Select an item then press to display the configuration options. Change Supervisor Password Select this item to set or change BIOS password, you can clear clear it by erasing the CMOS Real Time Clock (RTC) RAM. See section 1.9 Jumper for information on how to erase the RTC RAM. - Asus P7P55D-E LX | User Manual - Page 67
items allow you to configure options for special functions. Select an item then press to display the submenu. Main Ai Tweaker ASUS O.C. Profile AI NET 2 ASUS EZ Flash 2 Express Gate Enter OS Timer Reset User Data IO Levelup BIOS SETUP UTILITY Advanced Power Boot [Auto] [10 Seconds] [No - Asus P7P55D-E LX | User Manual - Page 68
can support devices such as a USB flash disk with FAT 32/16 format and single partition only. • DO NOT shut down or reset the system while updating the BIOS to prevent the system boot failure! • We recommend that you update the BIOS file only coming from the same memory/CPU configuration and BIOS - Asus P7P55D-E LX | User Manual - Page 69
the BIOS items, and save or discard your changes to the BIOS items. Main Ai Tweaker BIOS SETUP UTILITY Advanced Power Boot window appears. Select Ok to load default values. Select Exit & Save Changes or make other changes before saving the values to the non-volatile RAM. ASUS P7P55D-E LX - Asus P7P55D-E LX | User Manual - Page 70
2-28 Chapter 2: BIOS information
-
 1
1 -
 2
2 -
 3
3 -
 4
4 -
 5
5 -
 6
6 -
 7
7 -
8
-
9
-
10
-
11
-
12
-
13
-
14
-
15
-
16
-
17
-
18
-
19
-
20
-
21
-
22
-
23
-
24
-
25
-
26
-
27
-
28
-
29
-
30
-
31
-
32
-
33
-
34
-
35
-
36
-
37
-
38
-
39
-
40
-
41
-
42
-
43
-
44
-
45
-
46
-
47
-
48
-
49
-
50
-
51
-
52
-
53
-
54
-
55
-
56
-
57
-
58
-
59
-
60
-
61
-
62
-
63
-
64
-
65
-
66
-
67
-
68
-
69
-
70
 |
 |

Motherboard
P7P55D-E LX