Asus PA246Q User Manual - Page 9
Back view, Rear connectors
 |
View all Asus PA246Q manuals
Add to My Manuals
Save this manual to your list of manuals |
Page 9 highlights
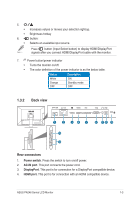
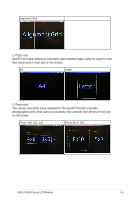
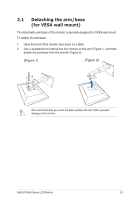
5. • • 6. • Increases values or moves your selection right/up. Brightness hotkey button: Selects an available input source. Press button (Input Select button) to display HDMI/DisplayPort signals after you connect HDMI/DisplayPort cable with the monitor. 7. Power button/power indicator • Turns the monitor on/off. • The color definition of the power indicator is as the below table. Status Description White Orange OFF ON Standby mode OFF 1.3.2 Back view 1 2 34 5 6 78 9 10 11 Rear connectors 1. Power switch. Press the switch to turn on/off power. 2. AC-IN port. This port connects the power cord. 3. DisplayPort. This port is for connection for a DisplayPort compatible device. 4. HDMI port. This port is for connection with an HDMI compatible device. ASUS PA246 Series LCD Monitor 1-3
-
 1
1 -
2
-
3
-
 4
4 -
 5
5 -
 6
6 -
 7
7 -
 8
8 -
 9
9 -
 10
10 -
 11
11 -
 12
12 -
 13
13 -
 14
14 -
15
-
16
-
17
-
18
-
19
-
20
-
21
-
22
-
23
-
24
-
25
 |
 |
