Asus PC-DL Deluxe User Guide
Asus PC-DL Deluxe Manual
 |
View all Asus PC-DL Deluxe manuals
Add to My Manuals
Save this manual to your list of manuals |
Asus PC-DL Deluxe manual content summary:
- Asus PC-DL Deluxe | User Guide - Page 1
Motherboard PC-DL Deluxe User Guide - Asus PC-DL Deluxe | User Guide - Page 2
express written permission of ASUSTeK COMPUTER INC. ("ASUS"). Product warranty or service will not be extended if: (1) the ASUS HAS BEEN ADVISED OF THE POSSIBILITY OF SUCH DAMAGES ARISING FROM ANY DEFECT OR ERROR IN THIS MANUAL OR PRODUCT. SPECIFICATIONS AND INFORMATION CONTAINED IN THIS MANUAL - Asus PC-DL Deluxe | User Guide - Page 3
vii About this guide viii ASUS contact information x PC-DL Deluxe specifications summary xi Chapter 1: Product introduction 1.1 Welcome 1-1 1.2 Package contents 1-1 1.3 Special features 1-2 1.3.1 Product highlights 1-2 1.3.2 Value-added solutions 1-5 1.4 Motherboard overview 1-6 1.4.1 Major - Asus PC-DL Deluxe | User Guide - Page 4
up for the first time 3-1 3.2 Vocal POST Messages 3-2 3.3 Powering off the computer 3-4 Chapter 4: BIOS setup 4.1 Managing and updating your BIOS 4-1 4.1.1 Creating a bootable floppy disk 4-1 4.1.2 Updating the BIOS 4-2 4.2 BIOS Setup program 4-3 4.2.1 BIOS menu screen 4-4 4.2.2 Menu bar - Asus PC-DL Deluxe | User Guide - Page 5
5-11 5.4.2 Enter the MBFastBuild™ utility 5-12 5.4.3 Creating a RAID 0 array (Performance 5-13 5.4.4 Creating a RAID 1 array (Security 5-14 5.4.5 Other FastBuild Utility Commands 5-16 5.5 Intel® RAID for Serial ATA 5-18 5.5.1 BIOS configuration 5-18 5.5.2 Installing Serial ATA hard disks 5-19 - Asus PC-DL Deluxe | User Guide - Page 6
, if not installed and used in accordance with manufacturer's instructions, may cause harmful interference to radio communications. However, there use of shielded cables for connection of the monitor to the graphics card is required to assure compliance with FCC regulations. Changes or modifications - Asus PC-DL Deluxe | User Guide - Page 7
are using, contact your local power company. • If the power supply is broken, do not try to fix it by yourself. Contact a qualified service technician or your retailer. Operation safety • Before installing the motherboard and adding devices on it, carefully read all the manuals that came with the - Asus PC-DL Deluxe | User Guide - Page 8
the motherboard. How this guide is organized This manual contains the following parts: • Chapter 1: Product introduction This chapter describes the features of the PC-DL Deluxe motherboard. It includes brief descriptions of the special attributes of the motherboard and the new technology it supports - Asus PC-DL Deluxe | User Guide - Page 9
this guide To make sure that you perform certain tasks properly, take note of the following symbols used throughout this manual. WARNING updates. 1. ASUS Websites The ASUS websites worldwide provide updated information on ASUS hardware and software products. The ASUS websites are listed in the ASUS - Asus PC-DL Deluxe | User Guide - Page 10
Fax: +49-2102-9599-31 Technical Support Support Hotlines: (Components) +49-2102-95990 (Notebook PC) +49-2102-959910 Support Fax: +49-2102-959911 Support Email: www.asuscom.de/support (for online support) Web Site: www.asuscom.de ASUS COMPUTER (Middle East and North Africa) Address - Asus PC-DL Deluxe | User Guide - Page 11
PC-DL Deluxe specifications summary CPU Chipset Front Side Bus (FSB) Memory Expansion slots Storage IEEE 1394 LAN Onboard audio Special features Rear panel I/O Support for Intel® Xeon™ processor up to 3.06+GHz On-die 512KB L2 cache Intel 82875P Memory Controller Hub (MCH) Intel 82801ER I/O - Asus PC-DL Deluxe | User Guide - Page 12
PC-DL Deluxe specifications summary Internal I/O BIOS features Industry standard Manageability Power requirement Form Factor Support CD contents 2 x USB 2.0 connectors for 4 additional USB ports CPU/Power/Chassis fan connectors 24-pin/8-pin SSI 12V power connectors IDE LED/Power LED connectors - Asus PC-DL Deluxe | User Guide - Page 13
Chapter 1 This chapter describes the features of the PC-DL Deluxe motherboard. It includes brief explanations of the special attributes of the motherboard and the new technology it supports. Product introduction - Asus PC-DL Deluxe | User Guide - Page 14
Chapter summary 1.1 Welcome 1-1 1.2 Package contents 1-1 1.3 Special features 1-2 1.4 Motherboard overview 1-6 ASUS PC-DL Deluxe motherboard - Asus PC-DL Deluxe | User Guide - Page 15
The ASUS PC-DL Deluxe motherboard delivers a host of new features and latest technologies making it another standout in the long line of ASUS quality motherboards! The motherboard incorporates the Intel® Xeon™ processor in 604-pin package coupled with the Intel® 82875P chipset to provide a powerful - Asus PC-DL Deluxe | User Guide - Page 16
highlights Latest processor technology The motherboard supports the latest Intel® Xeon™ processor via dual 604-pin surface mount ZIF sockets. The processor with 512KB L2 cache includes a 533/400 MHz system bus and features the Intel HyperThreading Technology and new power design that allow up to - Asus PC-DL Deluxe | User Guide - Page 17
provide friendly voice messages and alerts during the Power-On Self-Tests (POST) informing you of the system boot status and causes of boot errors, if any. The bundled Winbond Voice Editor software lets you to customize the voice messages in different languages. ASUS PC-DL Deluxe motherboard 1-3 - Asus PC-DL Deluxe | User Guide - Page 18
IEEE 1394 support The IEEE 1394 interfaces and the TI TSB43AB22A controller onboard provide high-speed and flexible PC connectivity See page 2-31. USB 2.0 technology The motherboard implements the Universal Serial Bus (USB) 2.0 specification, dramatically increasing the connection speed from the 12 - Asus PC-DL Deluxe | User Guide - Page 19
is retained in CMOS for more protection. ASUS Update This utility allows you to update the motherboard BIOS through a user-friendly interface. Connect to the Internet then to the ASUS FTP site nearest you to obtain the latest BIOS version for your motherboard. ASUS PC-DL Deluxe motherboard 1-5 - Asus PC-DL Deluxe | User Guide - Page 20
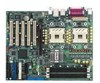
of the PC-DL Deluxe motherboard as pointed out in the picture on page 1-7. 1. SSI-type power connector (24-pin) 2. CPU sockets 3. North Bridge controller 4. SSI-type 12V power connector (8-pin) 5. DDR DIMM sockets 6. AGP Pro/8X slot 7. RAID Ultra ATA133 connector 8. SATA connectors (supported by - Asus PC-DL Deluxe | User Guide - Page 21
1 2 34 5 22 6 21 7 20 8 9 10 19 11 18 12 171615 1413 23 24 25 26 27 28 29 33 32 31 30 ASUS PC-DL Deluxe motherboard 1-7 - Asus PC-DL Deluxe | User Guide - Page 22
1.4.2 Core specifications 1 SSI-type power connector (24-pin). This 24-pin connector connects to an SSI power supply. The power supply must have at least 1A on the +5V standby lead (+5VSB). 2 CPU sockets. Two 604-pin surface mount, Zero Insertion Force (ZIF) sockets for Intel® Xeon™ processors with - Asus PC-DL Deluxe | User Guide - Page 23
. The AD1985 AC '97 2.3 stereo audio CODEC provides a 6-channel audio capability. The CODEC supports surround sound output, variable sample rate conversion, analog enumeration capability, and other major audio technologies for a complete integrated audio solution. ASUS PC-DL Deluxe motherboard 1-9 - Asus PC-DL Deluxe | User Guide - Page 24
in any 3.3V AGP card into the AGP slot. When this LED is lit, there is no way you can turn on the system power even if you press the power button 22 Gigabit LAN controller. The Intel® 82547EI Gigabit Ethernet controller allows full-duplex Gigabit performance on LAN on Motherboard (LOM) applications - Asus PC-DL Deluxe | User Guide - Page 25
Chapter 2 This chapter describes the hardware setup procedures that you have to perform when installing system components. It includes details on the switches, jumpers, and connectors on the motherboard. Hardware information - Asus PC-DL Deluxe | User Guide - Page 26
Chapter summary 2.1 Motherboard installation 2-1 2.2 Motherboard layout 2-2 2.3 Before you proceed 2-3 2.4 Central Processing Unit (CPU 2-4 2.5 System memory 2-11 2.6 Expansion slots 2-14 2.7 Jumpers 2-18 2.8 Connectors 2-21 ASUS PC-DL Deluxe motherboard - Asus PC-DL Deluxe | User Guide - Page 27
indicated in the image below. 2.1.2 Screw holes Place nine (9) screws into the holes indicated by circles to secure the motherboard to the chassis. Do not overtighten the screws! Doing so may damage the motherboard. Place this side towards the rear of the chassis ASUS PC-DL Deluxe motherboard 2-1 - Asus PC-DL Deluxe | User Guide - Page 28
Power AGP_WARN1 PCI1 PCI2 PCI3 PCI4 PROMISE PDC20378 RAID Controller Speech Controller SYS_FAN2 SATA_RAID2 SATA_RAID1 4Mbit Flash BIOS Intel I/O Controller Hub (ICH5R) SATA2 SB_PWR1 SATA1 LED1 SEC_IDE1 Super I/O GAME1 PCI5 USB2 J4 TI TSB43AB22A USB1 USBPW3 USBPW4 SYS_FAN1 PC-DL - Asus PC-DL Deluxe | User Guide - Page 29
lights up thus preventing the system to power up. This LED remains off if you plug in a 1.5V AGP card. AGP_WARN1 PC-DL PC-DL Onboard LED ASUS PC-DL Deluxe motherboard ON Incorrect AGP Card OFF Correct AGP Card LED1 ON OFF CPU Type/Voltage CPU Type/Voltage not identical identical SB_PWR1 - Asus PC-DL Deluxe | User Guide - Page 30
instructions, and data transfer rate of up to 4.27GB/s. Prestonia PC-DL PC-DL Socket 604 Gold Arrow 2.4.2 Installing the CPU Note in the above illustration that the CPU has a gold triangular mark on one corner. This mark indicates the processor Pin 1 that should match a specific corner of the CPU - Asus PC-DL Deluxe | User Guide - Page 31
Corner 4. Carefully push down the socket lever to secure the CPU. The lever clicks on the side tab to indicate that it is locked. 5. Apply the thermal interface material (thermal grease) to the top of the CPU. This thermal grease should come with the CPU package. ASUS PC-DL Deluxe motherboard 2-5 - Asus PC-DL Deluxe | User Guide - Page 32
you buy a boxed Intel CPU, the package includes the heatsink, fan, retention brackets, screws, thermal grease, installation manual, and other items that are necessary for CPU installation. 1. Perform the installation steps 1 to 3 in this section before installing you motherboard into the chassis - Asus PC-DL Deluxe | User Guide - Page 33
mechanism with the thermal plate using four screws. 4. Position the heatsink on top of the CPU, having its angled side (with cut corners) facing the memory sockets. Make sure that the heatsink base fits completely on the retention mechanism. Heatsink angled side ASUS PC-DL Deluxe motherboard 2-7 - Asus PC-DL Deluxe | User Guide - Page 34
5. Secure the heatsink with the retention clips. Retention clip a. Insert the center hole of a retention clip into the center tab on the retention mechanism. b. Slightly move the clip to the right so that the center tab is 5a positioned on the narrow side of the hole. This ensures that the 5c - Asus PC-DL Deluxe | User Guide - Page 35
. NOTE You may need to slightly press out the side of the retention mechanism to properly insert the Side rail air tunnel. Groove (inner side) ASUS PC-DL Deluxe motherboard 2-9 - Asus PC-DL Deluxe | User Guide - Page 36
tunnel should snap over the dents on the retention mechanism. Rail stopper Side rail 12. Connect the fan cable to the fan connector on the motherboard. Protruding tabs Fan connector Fan cable 2-10 Chapter 2: Hardware information - Asus PC-DL Deluxe | User Guide - Page 37
the CPU FSB (Front Side Bus). Refer to Table 2. 5. DIMMs installed into any three sockets will function in singlechannel mode. 6. When all four sockets are populated with 1GB DIMMs (total 4GB), the system may detect only 3.8GB due to ICH5R resource allocation. ASUS PC-DL Deluxe motherboard 2-11 - Asus PC-DL Deluxe | User Guide - Page 38
identical DIMM pair in DIMM_A2 and DIMM_B2 (black sockets) Table 2 Memory frequency/CPU FSB synchronization CPU FSB 533 MHz 400 MHz DDR DIMM Type PC2700/PC2100 PC2100 Memory Frequency 333/266 MHz 266 MHz Obtain DDR DIMMs only from ASUS qualified vendors for better system performance. Visit the - Asus PC-DL Deluxe | User Guide - Page 39
a DIMM. 1. Simultaneously press the retaining clips outward to unlock the DIMM. Support the DIMM lightly with your fingers when pressing the retaining clips. The DIMM might get damaged when it flips out with extra force. 2. Remove the DIMM from the socket. ASUS PC-DL Deluxe motherboard 2-13 - Asus PC-DL Deluxe | User Guide - Page 40
-sections describe the slots and the expansion cards that they support. Make sure to unplug the power cord before adding or removing expansion cards. Failure to do so may cause you physical injury and damage motherboard components. 2.6.1 Installing an expansion card Follow these steps to install an - Asus PC-DL Deluxe | User Guide - Page 41
- - - - - - When using PCI cards on shared slots, ensure that the drivers support "Share IRQ" or that the cards do not need IRQ assignments. Otherwise, conflicts will arise between the two PCI groups, making the system unstable and the card inoperable. ASUS PC-DL Deluxe motherboard 2-15 - Asus PC-DL Deluxe | User Guide - Page 42
2.6.3 PCI slots There are five 32-bit PCI slots on this motherboard. The slots support PCI cards such as a LAN card, SCSI card, USB card, and other cards that comply with PCI specifications. When installing long PCI cards, it is recommended that you install them in PCI slots 1, 4, or 5. Long PCI - Asus PC-DL Deluxe | User Guide - Page 43
This motherboard does not support 3.3V AGP cards. Keyed for 1.5V PC-DL PC-DL Accelerated Graphics Port (AGP) If installing the ATi 9500 or 9700 Pro Series VGA cards, use only the card version PN xxx-xxxxx-30 or later, for optimum performance and overclocking stability. ASUS PC-DL Deluxe motherboard - Asus PC-DL Deluxe | User Guide - Page 44
(the default is the Space Bar). This feature requires a power supply that can provide 500mA on the +5VSB lead. Otherwise the system does not power up. KBPWR1 12 23 +5V (Default) +5VSB PC-DL PC-DL Keyboard Power Setting 2. CPU external frequency selection (3-pin J1) These jumpers allow you to - Asus PC-DL Deluxe | User Guide - Page 45
requires a power supply that can provide 500mA on the +5VSB lead for each USB port. Otherwise, the system would not power up. 2. The total current consumed must NOT exceed the power supply capability (+5VSB) whether under normal condition or in sleep mode. ASUS PC-DL Deluxe motherboard 2-19 - Asus PC-DL Deluxe | User Guide - Page 46
the CMOS memory of date power cord and turn ON the computer. 4. Hold down the key during the boot process and enter BIOS setup to re-enter data. Except when clearing the RTC RAM, never remove the cap on CLRTC jumper default position. Removing the cap will cause system boot failure! PC-DL PC-DL - Asus PC-DL Deluxe | User Guide - Page 47
connector allows you to connect SMBus (System Management Bus) devices. Devices communicate with an SMBus host and/or other SMBus devices using the SMBus interface. PC-DL PC-DL SMBus Connector SMB1 1 ASUS PC-DL Deluxe motherboard FLOATING SMBCLK Ground SMBDATA +3V 2-21 - Asus PC-DL Deluxe | User Guide - Page 48
configure the second drive as a slave device by setting its jumper accordingly. Refer to the hard disk documentation for the jumper settings. BIOS supports specific device bootup. You may configure two hard disks to be both master devices with two ribbon cables - one for the primary IDE connector - Asus PC-DL Deluxe | User Guide - Page 49
chipset support to one of the IDE channels (either primary or secondary channel). 2. The Serial ATA RAID feature (RAID 0) is available only if you are using Windows XP. GND RSATA_TXP2 RSATA_TXN2 GND RSATA_RXP2 RSATA_RXN2 GND GND RSATA_TXP1 RSATA_TXN1 GND RSATA_RXP1 RSATA_RXN1 GND ASUS PC-DL Deluxe - Asus PC-DL Deluxe | User Guide - Page 50
ATA and Serial ATA device configurations supported by Intel ICH5R specifications. Native operating systems (OS) are Windows 2000/XP. ICH5R supports a maximum of six (6) devices using these OS. Legacy OS are MS-DOS, Windows 98/Me/NT4.0. ICH5R supports a maximum of four (4) devices using these - Asus PC-DL Deluxe | User Guide - Page 51
if there are no connected Serial ATA devices. 2. The Promise PDC20378 RAID controller does not support ATAPI devices such as CD-ROMs, DVD-ROMs, etc. GND RSATA_TXP2 RSATA_TXN2 GND RSATA_RXP2 RSATA_RXN2 GND GND RSATA_TXP1 RSATA_TXN1 GND RSATA_RXP1 RSATA_RXN1 GND ASUS PC-DL Deluxe motherboard 2-25 - Asus PC-DL Deluxe | User Guide - Page 52
the IDE ribbon cable to PIN 1. PC-DL PC-DL RAID Connector 1. If you wish to create a RAID set using UltraATA hard disks, make sure that you have connected the UltraATA cable and installed UltraATA 133 hard disks. 2. The Promise PDC20376 RAID controller does not support ATAPI devices such as CD-ROMs - Asus PC-DL Deluxe | User Guide - Page 53
motherboard components. These are not jumpers! DO NOT place jumper caps on the fan connectors! CHA_FAN1 GND +12V Rotation CPU_FAN1 Rotation +12V GND CPU_FAN2 Rotation +12V GND SYS_FAN2 Rotation +12V GND GND +12V Rotation PC-DL PC-DL 12-Volt Cooling Fan Power ASUS PC-DL Deluxe motherboard - Asus PC-DL Deluxe | User Guide - Page 54
-pin ATXPWR connector, this motherboard requires that you connect the 8-pin ATX +12V power plug to provide sufficient power to the CPU. 1. Do not forget to connect the 8-pin ATX +12V power plug. Otherwise, the system does not boot up. 2. Make sure that your ATX 12V power supply can provide 8A on the - Asus PC-DL Deluxe | User Guide - Page 55
end to the S/PDIF module. SPDIF_OUT1 PC-DL PC-DL Digital Audio Connector 11. GAME/MIDI connector (16-1 pin GAME1) This connector supports a GAME/MIDI module. Connect the J1CX J1B1 +5V PC-DL PC-DL Game Connector GAME1 MIDI_IN J2B2 J2CY MIDI_OUT J2CX J2B1 +5V ASUS PC-DL Deluxe motherboard 2-29 - Asus PC-DL Deluxe | User Guide - Page 56
additional USB ports. The USB header complies with USB 2.0 specification that supports up to 480 Mbps connection speed. This speed advantage over GND PC-DL PC-DL USB 2.0 Headers USB2 1 USB1 1 NEVER connect a 1394 cable to the either USB1 or USB2 connector. Doing so will damage the motherboard! - Asus PC-DL Deluxe | User Guide - Page 57
. You may also connect a 1394compliant internal hard disk to this connector. TPA0GND TPB0+12V GND TPA0+ GND TPB0+ +12V PC-DL PC-DL IEEE-1394 Connector IEEE1394_1 1 NEVER connect a USB cable to the IEEE 1394 connector. Doing so will damage the motherboard! ASUS PC-DL Deluxe motherboard 2-31 - Asus PC-DL Deluxe | User Guide - Page 58
PC-DL PC-DL Intel Panel Connector 16. System panel connector (20-pin PANEL1) This connector accommodates several system front panel functions. Power Ground PC-DL PC-DL System Panel Connector Message LED SMI Lead Reset SW ATX Power Switch* * Requires an ATX power supply. • System Power LED - Asus PC-DL Deluxe | User Guide - Page 59
settings. Pressing the power switch while in the ON mode for more than 4 seconds turns the system OFF. • Reset Switch Lead (2-pin RESET) This 2-pin connector connects to the case-mounted reset switch for rebooting the system without turning off the system power. ASUS PC-DL Deluxe motherboard 2-33 - Asus PC-DL Deluxe | User Guide - Page 60
2-34 Chapter 2: Hardware information - Asus PC-DL Deluxe | User Guide - Page 61
Chapter 3 This chapter describes the power up sequence and gives information on the BIOS beep codes. Powering up - Asus PC-DL Deluxe | User Guide - Page 62
Chapter summary 3.1 Starting up for the first time 3-1 3.2 Vocal POST Messages 3-2 3.3 Powering off the computer 3-4 ASUS PC-DL Deluxe motherboard - Asus PC-DL Deluxe | User Guide - Page 63
test error Motherboard timer not operational Keyboard controller BAT test error General exception error Display memory error CMOS shutdown register read/write error 7. At power on, hold down to enter BIOS Setup. Follow the instructions in Chapter 4. ASUS PC-DL Deluxe motherboard 3-1 - Asus PC-DL Deluxe | User Guide - Page 64
. POST Message No CPU installed System failed CPU test System failed memory test System failed VGA test System failed due to CPU over-clocking Action • Install an Intel Pentium 4 Processor into the CPU socket. • Check the CPU if properly installed. • Call ASUS technical support for assistance. See - Asus PC-DL Deluxe | User Guide - Page 65
your power supply and make sure it is not defective. • Call ASUS technical support for assistance. See the "ASUS contact information" on page x. System completed Power-On Self Test • No action required Computer now booting from operating • No action required system ASUS PC-DL Deluxe motherboard - Asus PC-DL Deluxe | User Guide - Page 66
the BIOS setting. See section "4.5 Power Menu" in Chapter 4. Using the OS shut down function If you use Windows 98SE/ME/2000/XP, click the Start button, click Shut Down, then the OK button to shut down the computer. The power supply should turn off after Windows shuts down. 3-4 Chapter 3: Powering - Asus PC-DL Deluxe | User Guide - Page 67
Chapter 4 This chapter tells how to change system settings through the BIOS Setup menus. Detailed descriptions of the BIOS parameters are also provided. BIOS setup - Asus PC-DL Deluxe | User Guide - Page 68
Chapter summary 4.1 Managing and updating your BIOS 4-1 4.2 BIOS Setup program 4-3 4.3 Main menu 4-6 4.4 Advanced menu 4-11 4.5 Power menu 4-23 4.6 Boot menu 4-27 4.7 Exit menu 4-31 ASUS PC-DL Deluxe motherboard - Asus PC-DL Deluxe | User Guide - Page 69
My Computer window, click the 3 1/2 Floppy icon. d. From the Menu bar, click File > Format. e. Select "Create an MS-DOS Startup Disk" in the Format Options field, then click Start. 2. Copy the original (or the latest) motherboard BIOS to the bootable floppy disk. ASUS PC-DL Deluxe motherboard 4-1 - Asus PC-DL Deluxe | User Guide - Page 70
The Basic Input/Output System (BIOS) can be updated using the AwardBIOS Flash Utility (AWDFLASH.EXE). Follow these instructions to update the BIOS using this utility. 1. Download the latest BIOS file from the ASUS website (see ASUS contact info on page x of this user guide). Rename the file to *.BIN - Asus PC-DL Deluxe | User Guide - Page 71
power management settings. This requires you to reconfigure your system using the BIOS BIOS software is constantly being updated, the following BIOS setup screens and descriptions are for reference purposes only, and may not exactly match what you see on your screen. ASUS PC-DL Deluxe motherboard - Asus PC-DL Deluxe | User Guide - Page 72
Support Primary Master Primary Slave Secondary Master Secondary Slave Supervisor Password User Password Security Option Halt On Base Memory Extended Memory Total Memory Wed, July 16 2003 15 : 30 : 30 [1.44M, 3.5 in.] [Disabled] [ST321122A] [ASUS For changing the power configuration settings For - Asus PC-DL Deluxe | User Guide - Page 73
do not fit on the screen. Press Up/Down arrow keys or PageUp/PageDown keys to display the other items on the screen. 4.2.7 Pop-up window Select an item in the menu, then press Enter to display a pop-up window with the configuration options for that item. ASUS PC-DL Deluxe motherboard 4-5 - Asus PC-DL Deluxe | User Guide - Page 74
BIOS menu screen" for information on the menu screen items and how to navigate through them. Date (mm:dd:yy) Time (hh:mm:ss) Legacy Diskette A Floppy 3 Mode Support Primary Master Primary Slave Secondary Master Secondary Slave Supervisor Password User Password Security Option Halt On Base Memory - Asus PC-DL Deluxe | User Guide - Page 75
. Configuration options: [All Errors] [No Errors] [All, But Keyboard] [All , But Diskette] [All, But Disk/Key] Base/Extended/Total Memory [xxxK] The base memory, extended memory, and total memory values are autodetected. These fields are not user-configurable. ASUS PC-DL Deluxe motherboard 4-7 - Asus PC-DL Deluxe | User Guide - Page 76
hard disk drive is too old or too new. If the hard disk was already formatted on a previous system, the setup BIOS may detect incorrect parameters. In these cases, select [Manual] to manually enter the IDE hard disk drive parameters. If no drive is installed or if you are removing a drive and not - Asus PC-DL Deluxe | User Guide - Page 77
make sure you have the correct configuration information supplied by the drive manufacturer. Incorrect settings may cause Master Access Mode Capacity Cylinder Head Precomp Landing Zone Sector [Press Enter] [Manual] [CHS] 40020 MB [19158] [ 16] [ 0] [19157] [ ASUS PC-DL Deluxe motherboard 4-9 - Asus PC-DL Deluxe | User Guide - Page 78
Precomp This field displays the precompressed volumes on the hard disk, if any, on the motherboard. Landing Zone This field displays the drive's maximum usable capacity as calculated by the BIOS based on the drive information you entered. Sector This item shows the number of sectors per track. After - Asus PC-DL Deluxe | User Guide - Page 79
CAS# Delay DRAM RAS# Precharge DRAM Data Integrity Mode System BIOS Cacheable Memory Hole at 15M-16M AGP Aperture Size (MB) Auto Detect PCI Clock Video BIOS Cacheable [100MHz] [16 X] [Auto] [By SPD] 2 6 3 3 [ECC] [Enabled] [Disabled] [128] [Enabled] [Disabled] ASUS PC-DL Deluxe motherboard 4-11 - Asus PC-DL Deluxe | User Guide - Page 80
Configuration options: [Min=100] [Max=165] CPU Clock Ratio This item sets the ratio between the CPU core clock and the FSB frequency. Configuration # Precharge are configurable only when the Memory Timing Selectable item is set to [Manual]. CAS Latency Time [2] This item 4-12 Chapter 4: BIOS Setup - Asus PC-DL Deluxe | User Guide - Page 81
options: [Enabled] [Disabled] Video BIOS Cacheable [Disabled] This item allows you to enable or disable the video BIOS cacheable function. Setting to [Enabled] imploves the display speed by caching the display data. Configuration options: [Disabled] [Enabled] ASUS PC-DL Deluxe motherboard 4-13 - Asus PC-DL Deluxe | User Guide - Page 82
Enabled] [Auto] [Auto] [Auto] [Auto] ***On-Chip Serial ATA Setting*** SATA Mode IDE On-Chip Serial ATA [Disabled] Serial ATA Port0 Mode [Primary Master] Serial Slave] IDE HDD Block Mode [Enabled] If your IDE hard disk supports the block mode feature, set this item to [Enabled] to allows - Asus PC-DL Deluxe | User Guide - Page 83
to automatically set or disable the secondary IDE UDMA capability, which improves transfer speeds and data integrity for compatible IDE devices. Configuration options: [Auto] [Disabled] ASUS PC-DL Deluxe motherboard 4-15 - Asus PC-DL Deluxe | User Guide - Page 84
RAID] On-chip Serial ATA [Disabled] This item allows you to configure your serial ATA devices if present. Configuration options: [Disabled] [Auto] [Combined Mode] [Enhanced Mode] [SATA Only] a. Setting to [Auto] allows BIOS to automatically configure the SATA like MS-DOS, Windows ME/98/NT4.0. - Asus PC-DL Deluxe | User Guide - Page 85
] USB Mouse Support [Enabled] Allows you to enable or disable the USB mouse support. Configuration options: [Disabled] [Enabled] Onboard AC97 Audio [Auto] Allows you to enable or disable the onboard AC97 audio controller. Configuration options: [Auto] [Disabled] ASUS PC-DL Deluxe motherboard 4-17 - Asus PC-DL Deluxe | User Guide - Page 86
Allows you enable or disable the onboard Gigabit LAN controller. Configuration options: [Disabled] [Enabled] Onboard RAID controller operating mode. This item is configurable only when the Onboard Promise Controller item is set to [Enabled]. Configuration options: [IDE] [RAID] 4-18 Chapter 4: BIOS - Asus PC-DL Deluxe | User Guide - Page 87
select the EPP mode. This item becomes configurable only if the Parallel Port Mode is set to [EPP] or [ECP+EPP]. Configuration options: [EPP 1.7] [EPP 1.9] ASUS PC-DL Deluxe motherboard 4-19 - Asus PC-DL Deluxe | User Guide - Page 88
port address. Configuration options: [Disabled] [330] [300] [290] Midi Port IRQ [10] Allows you to select the MIDI port IRQ. Configuration options: [5] [10] 4-20 Chapter 4: BIOS Setup - Asus PC-DL Deluxe | User Guide - Page 89
setting [Disabled]. Configuration options: [Disabled] [Enabled] INT Pin 1~8 Assignment [Auto] Allows you to select the appropriate interrupt to the specific devices to avoid conflict. Configuration options: [Auto] [3] [4] [5] [7] [9] [10] [11] [12] [14] [15] ASUS PC-DL Deluxe motherboard 4-21 - Asus PC-DL Deluxe | User Guide - Page 90
ISA for devices compliant with the original PC AT bus specification, PCI/ISA PnP for devices compliant Manual]. Select [PCI Device] to assign an IRQ address to a Plug and Play device. Setting to [Reserved] reserves the IRQ address.Configuration options: [PCI Device] [Reserved] 4-22 Chapter 4: BIOS - Asus PC-DL Deluxe | User Guide - Page 91
to select the ACPI state that you wish to use for system suspend. Configuration options: [S1(POS)] [S3(STR)] [S1&S3] Run VGA BIOS if S3 Resume [Auto] Allow you to determine whether to invoke VGA BIOS POST on S3/STR resume. Configuration options: [Auto] [Yes] [No] ASUS PC-DL Deluxe motherboard 4-23 - Asus PC-DL Deluxe | User Guide - Page 92
[Min. Saving] [Max. Saving] Video Off Method [DPMS] This item determines the video off features. The Display Power Management System (DPMS) feature allows the BIOS to control the video display card if it supports the DPMS feature. [Blank Screen] only blanks the screen. Use this for monitors without - Asus PC-DL Deluxe | User Guide - Page 93
Power On by Ring [Enabled] Allows you to enable or disable system wake-up on ring. Configuration options: [Disabled] [ 1 [Disabled] Allow you to set the time period before the secondary IDE 0/1 goes into suspend mode. Configuration options: [Disabled] [Enabled] ASUS PC-DL Deluxe motherboard 4-25 - Asus PC-DL Deluxe | User Guide - Page 94
12VIN (V) +3VIN (V) 5VCC (V) VBAT (V) 5VSB (V) CPU Q-Fan Temperature [Enabled] 38°C/100°F 127°C/ 4°F N/A 36°C/96°F 33°C/91°F 0 RPM 4245 RPM 0 RPM 0 RPM 0 RPM 1.44V 12.01V 3.36V 5.04V 3.10V 4.83V [50°C/122°F] The grayed items in this menu are auto-detected by BIOS, and not user- configurable. Clear - Asus PC-DL Deluxe | User Guide - Page 95
Boot Device Second Boot Device Third Boot Device Boot Other Device CPU L1 & L2 Cache Hyper-Threading Technology Quick Power On Self Test [Removable] [CDROM] [Hard Disk] [ Hard Disk Boot Priority Hard Disk Priority 1. Ch0 M. 2. Bootable Add-In Cards [ST321122A] ASUS PC-DL Deluxe motherboard 4-27 - Asus PC-DL Deluxe | User Guide - Page 96
4.6.2 Removable Device Priority Removable Device Priority 1. Floppy Disk 4.6.3 CD-ROM Boot Priority 1. Ch0 S. CD-ROM Priority [ASUS CDS520/A] 4-28 Chapter 4: BIOS Setup - Asus PC-DL Deluxe | User Guide - Page 97
the power-on state for the NumLock. Configuration options: [Disabled] [Enabled] Gate A20 Option [Fast] When set to [Fast], the chipset controls Gate A20. When set to Normal, a pin in the keyboard controller controls Gate A20. Configuration options: [Normal] [Fast] ASUS PC-DL Deluxe motherboard - Asus PC-DL Deluxe | User Guide - Page 98
when you are using an OS2 operating system with greater than 64MB RAM. Otherwise, set to [Non-OS2]. Configuration options: [Non-OS2] [OS2] 4-30 Chapter 4: BIOS Setup - Asus PC-DL Deluxe | User Guide - Page 99
for each of the parameters on the Setup menus. When you select this option or if you press , a confirmation window appears. Select [Yes] to load optimized values. Select Save & Exit or make other changes before saving the values to the non-volatile RAM. ASUS PC-DL Deluxe motherboard 4-31 - Asus PC-DL Deluxe | User Guide - Page 100
saves your selections without exiting the Setup program. You can then return to other menus and make further changes. After you select this option, a confirmation window appears. Select [Yes] to save changes to the non-volatile RAM. 4-32 Chapter - Asus PC-DL Deluxe | User Guide - Page 101
Chapter 5 This chapter tells how to install various drivers under supported operating systems. Driver installation - Asus PC-DL Deluxe | User Guide - Page 102
Chapter summary 5.1 Support CD contents 5-1 5.2 Winbond Voice Editor 5-3 5.3 SoundMAX® 4 XL software 5-7 5.4 Promise® RAID configurations 5-10 5.5 Intel® RAID for Serial ATA 5-18 ASUS PC-DL Deluxe motherboard - Asus PC-DL Deluxe | User Guide - Page 103
displays the drivers available for the onboard devices. Follow the installation wizards or find additional instructions as text files in each of the driver folders. 5.1.2 Management Sofware This screen displays the ASUS proprietary server management software. ASUS PC-DL Deluxe motherboard 5-1 - Asus PC-DL Deluxe | User Guide - Page 104
5.1.3 Utilities This screen displays the available system utilities that you can install. 5.1.4 Contact This screen displays the ASUS worldwide contact information. 5-2 Chapter 5: Driver installation - Asus PC-DL Deluxe | User Guide - Page 105
Install the software from the Utilities menu in the support CD. To avoid conflicts, do not run the Winbond Voice Editor while running the ASUS PC Probe. Follow these steps to use the Winbond Voice then click the Play button. The default language setting is English. ASUS PC-DL Deluxe motherboard 5-3 - Asus PC-DL Deluxe | User Guide - Page 106
default language 1. Click on the Load button. a window showing the available languages appears. 2. Select your desired due to file size constraints. 3. Click on the Write button to update the EEPROM. 4. Click Yes on the confirmation window that appears. The next time you boot your computer, the POST - Asus PC-DL Deluxe | User Guide - Page 107
make your messages as short as possible. 3. Use a recording software, such as Windows Recorder, to record your messages. 4. Save the messages as wave files (.WAV). File window. 6. Copy the wave files that you recorded to the database. Close the window when done. ASUS PC-DL Deluxe motherboard 5-5 - Asus PC-DL Deluxe | User Guide - Page 108
a POST event on the Voice Editor screen, then on the Edit button. The Event Sound Editor window appears. 8. Locate and select your wave file for the event then click on the arrow lower quality • Skip lesser used events like FDD Detection, IDE HDD Detection, etc. 5-6 Chapter 5: Driver installation - Asus PC-DL Deluxe | User Guide - Page 109
PC. The software implements high quality audio synthesis/rendering, 3D sound positioning, and advanced voice-input technologies. Follow the installation wizard install the AD1985 Audio Driver and Application from the support CD that came with the motherboard Panel. ASUS PC-DL Deluxe motherboard 5-7 - Asus PC-DL Deluxe | User Guide - Page 110
button when AudioESP detects and verifies a newly connected peripheral, or by clicking on the icon from the SoundMAX control panel. Speaker wizard Follow the screen instructions to configure the speakers to your desired settings. Microphone wizard Follow the screen - Asus PC-DL Deluxe | User Guide - Page 111
XL allows you to change various audio settings. Listening environment options The SoundMAX4 XL support several audio technologies including SoundMAX SPX™ Animated Audio, 3DPA™, MultiDrive™ 5.1, EnvironmentFC™, MacroFX/ZoomFX™, and Virtual Theater Surround. ASUS PC-DL Deluxe motherboard 5-9 - Asus PC-DL Deluxe | User Guide - Page 112
(like RAID 1). 1. If you use either Windows XP or Windows 2000 operating system (OS), copy first the Promise FastTrak 378 Driver from the support CD to a floppy disk before creating RAID configurations. 2. Refer to the FastTrak 378 Quick Start Guide and SATA Quick Start Guide in the support CD for - Asus PC-DL Deluxe | User Guide - Page 113
the power connector on each drive. 5. Boot the system and enter the BIOS Setup Utility. 6. Go to the Advanced menu in BIOS and set the appropriate IDE configuration settings. 7. Save your changes and Exit Setup. 8. Proceed to section 5.4.2 for the next procedure. ASUS PC-DL Deluxe motherboard 5-11 - Asus PC-DL Deluxe | User Guide - Page 114
to the ATAIDE connectors on the motherboard, the MBFastTrak378™ BIOS displays the following: MBFastTrak378 (tm) BIOS version 1.00 (c)2000-2005 Promise Technology Delete Array 4 ] Rebuild Array 5 ] [ Keys Available ] Press 1..5 to select Option [ESC] Exit 5-12 Chapter 5: Driver installation - Asus PC-DL Deluxe | User Guide - Page 115
the RAID 0 array as a single drive unit. 7. Install the RAID driver from the support CD that came with the motherboard package. Depending on the operating system you are installing, you may need to install the RAID driver during or after the OS installation. ASUS PC-DL Deluxe motherboard 5-13 - Asus PC-DL Deluxe | User Guide - Page 116
5.4.4 Creating a RAID 1 array (Security) Creating a Security Array with New Drives 1. In the FastBuild™ utility main menu, press "1" to to reboot> 6. Press any key to reboot the system. During the boot process, the MBFastTrak376 BIOS checks and displays the disk array information. 5-14 Chapter - Asus PC-DL Deluxe | User Guide - Page 117
(OS). 8. Install the RAID driver from the support CD that came with the motherboard package. Depending on the - Create Only 5. Press Y for the Create and Duplicate option. The next window prompts you to select the source drive to use. 6. Use the arrow keys Abort ASUS PC-DL Deluxe motherboard 5-15 - Asus PC-DL Deluxe | User Guide - Page 118
reboot the system. 11. Install the RAID driver from the support CD that came with the motherboard package. Depending on the operating system you for View Array to verify the ID of the defunct hard disk. 4. Power off the system and replace the hard disk with an identical model. 5. Reboot and - Asus PC-DL Deluxe | User Guide - Page 119
2.00 (c) 2002-2005 Promise Technology, Inc. [ View Array Definition Menu ] Array No RAID Mode Array 1 Mirror/Stripe Total Drv 4 Status Critical Stripe Block: Not Available Gigabyte Boundary for Controller Configuration. The default value is [Enabled]. ASUS PC-DL Deluxe motherboard 5-17 - Asus PC-DL Deluxe | User Guide - Page 120
for the Intel RAID implementation. 4. Press to save your changes, then press to exit the Setup utility. For more information on the Intel RAID for Serial ATA , refer to the Intel Application Accelerator (RAID Edition) User's Manual in the motherboard support CD. 5-18 Chapter 5: Driver - Asus PC-DL Deluxe | User Guide - Page 121
-RAID 4. Exit RAID Volumes: None defined. Non-RAID Disks: Port Drive Model 0 ST320413A 1 ST320413A [ DISK/VOLUME INFORMATION ] Serial # xxxxxxxx xxxxxxxx Size 18.6GB 18.6GB Status Normal Normal Bootable Yes Yes [ ]-Select [ESC] Exit [Enter]-Select Menu ASUS PC-DL Deluxe motherboard 5-19 - Asus PC-DL Deluxe | User Guide - Page 122
Intel(R) Integrated RAID for Serial ATA - RAID Configuration Utility Copyright(C) 2003 Intel Corporation. All Rights Reserved. v3.x.x.xxxx [ CREATE ARRAY MENU ] Name: RAID_Volume1 Stripe Size: 64KB RAID a name for your RAID volume using 1 to select the stripe size for the RAID 0 array. Press - Asus PC-DL Deluxe | User Guide - Page 123
. 2. When a confirmation message appears, press Y to permanently delete the RAID volume. [ VOLUME DELETE VERIFICATION ] Are you sure you want to delete this volume? ALL DATA IN THE VOLUME WILL BE LOST!! Are you sure you want to delete volume "RAID_Volume1"? (Y/N) ASUS PC-DL Deluxe motherboard 5-21 - Asus PC-DL Deluxe | User Guide - Page 124
5.5.6 Resetting a RAID to non-RAID Take caution when resetting a RAID to non-RAID. Resetting all RAID data will remove any internal RAID structures from all RAID disks! Intel(R) Integrated RAID for Serial ATA - RAID Configuration Utility Copyright(C) 2003 Intel Corporation. All Rights Reserved. v3
-
 1
1 -
 2
2 -
 3
3 -
 4
4 -
 5
5 -
 6
6 -
 7
7 -
8
-
9
-
10
-
11
-
12
-
13
-
14
-
15
-
16
-
17
-
18
-
19
-
20
-
21
-
22
-
23
-
24
-
25
-
26
-
27
-
28
-
29
-
30
-
31
-
32
-
33
-
34
-
35
-
36
-
37
-
38
-
39
-
40
-
41
-
42
-
43
-
44
-
45
-
46
-
47
-
48
-
49
-
50
-
51
-
52
-
53
-
54
-
55
-
56
-
57
-
58
-
59
-
60
-
61
-
62
-
63
-
64
-
65
-
66
-
67
-
68
-
69
-
70
-
71
-
72
-
73
-
74
-
75
-
76
-
77
-
78
-
79
-
80
-
81
-
82
-
83
-
84
-
85
-
86
-
87
-
88
-
89
-
90
-
91
-
92
-
93
-
94
-
95
-
96
-
97
-
98
-
99
-
100
-
101
-
102
-
103
-
104
-
105
-
106
-
107
-
108
-
109
-
110
-
111
-
112
-
113
-
114
-
115
-
116
-
117
-
118
-
119
-
120
-
121
-
122
-
123
-
124
 |
 |

Motherboard
PC-DL Deluxe
User Guide