Asus Pro WS TRX50-SAGE WIFI Quick Start Guide Multiple Languages - Page 3
Install the cooling system, Install the motherboard into the chassis
 |
View all Asus Pro WS TRX50-SAGE WIFI manuals
Add to My Manuals
Save this manual to your list of manuals |
Page 3 highlights
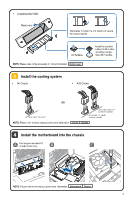
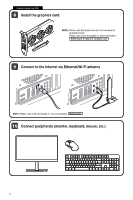
• Install the M.2 SSD Remove Remember to rotate the M.2 Q-latch or secure the screw properly. OPTIONAL NOTE: Please refer to the manual(s) for more information: Motherboard Install the bundled rubber for M.2 when installing a single sided M.2 module. Install the cooling system • Air Cooler • AIO Cooler OR CPU_FAN / CPU_OPT CPU_FAN / CPU_OPT (connect to radiator) AIO_PUMP / W_PUMP (connect to pump) NOTE: Please refer to these manual(s) for more information: Cooler Chassis Install the motherboard into the chassis For non pre-mounted I/O shield models only. NOTE: Please refer to the manual(s) for more information: Motherboard Chassis 3
-
 1
1 -
 2
2 -
 3
3 -
 4
4 -
 5
5 -
 6
6 -
 7
7 -
 8
8 -
 9
9 -
10
-
11
-
12
-
13
-
14
-
15
-
16
-
17
-
18
-
19
-
20
-
21
-
22
-
23
-
24
 |
 |

3
Install the cooling system
•
Air Cooler
•
AIO Cooler
AIO_PUMP / W_PUMP
(connect to pump)
CPU_FAN / CPU_OPT
(connect to radiator)
CPU_FAN / CPU_OPT
OR
•
Install the M.2 SSD
Remove
Remember to rotate the M.2 Q-latch or secure
the screw properly.
Install the bundled
rubber for M.2 when
installing a single
sided M.2 module.
OPTIONAL
NOTE:
Please refer to these manual(s) for more information:
NOTE:
Please refer to the manual(s) for more information:
Cooler
Chassis
Motherboard
Install the motherboard into the chassis
For non pre-mounted I/O
shield models only.
NOTE:
Please refer to the manual(s) for more information:
Motherboard
Chassis