Asus Pro WS W790-ACE Users Manual English - Page 40
M.2 installation, Completely loosen the screws on the heatsinks., Lift and remove the heatsinks.
 |
View all Asus Pro WS W790-ACE manuals
Add to My Manuals
Save this manual to your list of manuals |
Page 40 highlights
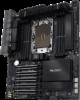
2.1.3 M.2 installation Supported M.2 type varies per motherboard. If the thermal pad on the M.2 heatsink becomes damaged, we recommend replacing it with a thermal pad with a thickness of 1.25mm. • The illustrations only show the installation steps for a single M.2 slot, the steps are the same for the other M.2 slots if you wish to install an M.2 to another M.2 slot. • Use a Phillips screwdriver when removing or installing the screws or screw stands mentioned in this section. • The M.2 is purchased separately. 1. Completely loosen the screws on the heatsinks. 2. Lift and remove the heatsinks. 1 2 1 Chapter 2 1 1 2 2-4 Chapter 2: Basic Installation
-
 1
1 -
2
-
3
-
4
-
5
-
6
-
7
-
8
-
9
-
10
-
11
-
12
-
13
-
14
-
15
-
16
-
17
-
18
-
19
-
20
-
21
-
22
-
23
-
24
-
25
-
26
-
27
-
28
-
29
-
30
-
31
-
32
-
33
-
34
-
 35
35 -
 36
36 -
 37
37 -
 38
38 -
 39
39 -
 40
40 -
 41
41 -
 42
42 -
 43
43 -
 44
44 -
 45
45 -
46
-
47
-
48
-
49
-
50
-
51
-
52
-
53
-
54
-
55
-
56
-
57
-
58
-
59
-
60
-
61
-
62
-
63
-
64
-
65
-
66
-
67
-
68
-
69
-
70
-
71
-
72
-
73
-
74
-
75
-
76
-
77
-
78
-
79
-
80
-
81
-
82
 |
 |

2-4
Chapter 2: Basic Installation
Chapter 2
2.1.3
M.2 installation
1.
Completely loosen the screws on the heatsinks.
2.
Lift and remove the heatsinks.
Supported M.2 type varies per motherboard.
If the thermal pad on the M.2 heatsink becomes damaged, we recommend replacing it
with a thermal pad with a thickness of 1.25mm.
•
The illustrations only show the installation steps for a single M.2 slot, the steps are
the same for the other M.2 slots if you wish to install an M.2 to another M.2 slot.
•
Use a Phillips screwdriver when removing or installing the screws or screw stands
mentioned in this section.
•
The M.2 is purchased separately.
2
2
1
1
1
1