Asus ROG CROSSHAIR X670E EXTREME Users Manual English - Page 60
Remove the plastic film from the thermal pads on the bottom of the heatsink., Replace the heatsink.
 |
View all Asus ROG CROSSHAIR X670E EXTREME manuals
Add to My Manuals
Save this manual to your list of manuals |
Page 60 highlights
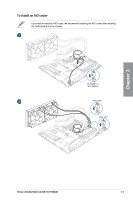
Chapter 2 E. Install your M.2 to the M.2 slot. F. Rotate the M.2 Q-Latch clockwise to secure the M.2 in place. 4. Remove the plastic film from the thermal pads on the bottom of the heatsink. If the thermal pad on the M.2 heatsink becomes damaged, we recommend replacing it with the bundled thermal pad or a thermal pad with a thickness of 1.25mm. 5. Replace the heatsink. We strongly recommend installing the motherboard into the chassis before replacing the M.2 heatsink, as two of the motherboard screw holes used to secure the motherboard to the chassis will not be reachable if the M.2 heatsink is replaced before installing the motherboard into the chassis. 6. Secure the heatsink using the screws on the heatsink. 4 6 6 5 6 6 2-10 Chapter 2: Basic Installation
-
 1
1 -
2
-
3
-
4
-
5
-
6
-
7
-
8
-
9
-
10
-
11
-
12
-
13
-
14
-
15
-
16
-
17
-
18
-
19
-
20
-
21
-
22
-
23
-
24
-
25
-
26
-
27
-
28
-
29
-
30
-
31
-
32
-
33
-
34
-
35
-
36
-
37
-
38
-
39
-
40
-
41
-
42
-
43
-
44
-
45
-
46
-
47
-
48
-
49
-
50
-
51
-
52
-
53
-
54
-
 55
55 -
 56
56 -
 57
57 -
 58
58 -
 59
59 -
 60
60 -
 61
61 -
 62
62 -
 63
63 -
 64
64 -
 65
65 -
66
-
67
-
68
-
69
-
70
-
71
-
72
-
73
-
74
-
75
-
76
-
77
-
78
-
79
-
80
-
81
-
82
-
83
-
84
-
85
-
86
-
87
-
88
-
89
-
90
-
91
-
92
-
93
-
94
-
95
-
96
-
97
-
98
-
99
-
100
-
101
-
102
-
103
-
104
-
105
-
106
 |
 |
