Asus RS120-E5 PA2 User Guide - Page 42
Optical drive
 |
View all Asus RS120-E5 PA2 manuals
Add to My Manuals
Save this manual to your list of manuals |
Page 42 highlights
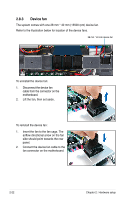
2.8.5 Optical drive To uninstall the optical drive: 1. Disconnect the power and signal cables connected to the rear of the optical drive. 2. Insert the optical drive emergency eject pin to the emergency eject pin hole until the drive tray ejects. 3. Pull out half of the drive tray to remove the tray bezel. 4. Pull the center of the bezel outward (A), then lift the sides (B) to remove. DO NOT apply too much force when removing the bezel. Too much force may break the drive tray! 5. Replace the drive tray. 2-24 Chapter 2: Hardware setup
-
 1
1 -
2
-
3
-
4
-
5
-
6
-
7
-
8
-
9
-
10
-
11
-
12
-
13
-
14
-
15
-
16
-
17
-
18
-
19
-
20
-
21
-
22
-
23
-
24
-
25
-
26
-
27
-
28
-
29
-
30
-
31
-
32
-
33
-
34
-
35
-
36
-
 37
37 -
 38
38 -
 39
39 -
 40
40 -
 41
41 -
 42
42 -
 43
43 -
 44
44 -
 45
45 -
 46
46 -
 47
47 -
48
-
49
-
50
-
51
-
52
-
53
-
54
-
55
-
56
-
57
-
58
-
59
-
60
-
61
-
62
-
63
-
64
-
65
-
66
-
67
-
68
-
69
-
70
-
71
-
72
-
73
-
74
-
75
-
76
-
77
-
78
-
79
-
80
-
81
-
82
-
83
-
84
-
85
-
86
-
87
-
88
-
89
-
90
-
91
-
92
-
93
-
94
-
95
-
96
-
97
-
98
-
99
-
100
-
101
-
102
-
103
-
104
-
105
-
106
-
107
-
108
-
109
-
110
-
111
-
112
-
113
-
114
-
115
-
116
-
117
-
118
-
119
-
120
-
121
-
122
-
123
-
124
-
125
-
126
-
127
-
128
-
129
-
130
-
131
-
132
-
133
-
134
-
135
-
136
-
137
-
138
-
139
-
140
-
141
-
142
-
143
-
144
-
145
-
146
-
147
-
148
-
149
-
150
-
151
-
152
-
153
-
154
-
155
-
156
 |
 |

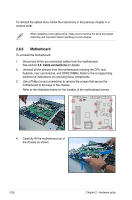
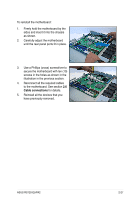
Chapter 2:
Hardware setup
2-24
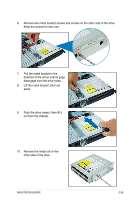
2.8.5
Optical drive
To uninstall the optical drive:
2.
Insert the optical drive emergency
eject pin to the emergency eject
pin hole until the drive tray ejects.
3.
Pull out half of the drive tray to
remove the tray bezel.
1.
Disconnect the power and signal
cables connected to the rear of
the optical drive.
4.
Pull the center of the bezel
outward (A), then lift the sides (B)
to remove.
5.
Replace the drive tray.
DO NOT apply too much force when removing the bezel. Too much force may
break the drive tray!