Asus TINKER S/BR Tinker SBR Users Manual English - Page 4
Getting Started
 |
View all Asus TINKER S/BR manuals
Add to My Manuals
Save this manual to your list of manuals |
Page 4 highlights
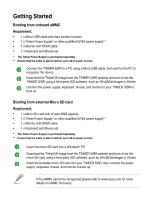
Getting Started Booting from onboard eMMC Requirement: • 1 x Micro USB cable with data transfer function • 1 x Tinker Power Supply* or other qualified 5V/3A power supply** • 1 x Monitor with HDMI cable • 1 x Keyboard and Mouse set * The Tinker Power Supply is purchased seperately. ** Ensure that the cable is able to deliver up to 3A of power current. Connect the TINKER S/BR to a PC using a Micro USB cable, then wait for the PC to recognize the device. Download the TinkerOS image from the TINKER S/BR website and burn it into the TINKER S/BR using a third-party ISO software, such as Win32DiskImager or Etcher. Connect the power supply, keyboard, mouse, and monitor to your TINKER S/BR to boot up. Booting from external Micro SD card Requirement: • 1 x Micro SD card with at least 8GB capacity • 1 x Tinker Power Supply* or other qualified 5V/3A power supply** • 1 x Monitor with HDMI cable • 1 x Keyboard and Mouse set * The Tinker Power Supply is purchased seperately. ** Ensure that the cable is able to deliver up to 3A of power current. Insert the micro SD card into a Windows® PC Download the TinkerOS image from the TINKER S/BR website and burn it into the micro SD card using a third-party ISO software, such as Win32DiskImager or Etcher. Insert the bootable micro SD card into your TINKER S/BR, then connect the power supply, keyboard, mouse, and monitor to boot up. If the eMMC cannot be recognized,please refer to www.asus.com for more details on eMMC Recovery.
-
 1
1 -
 2
2 -
 3
3 -
 4
4 -
 5
5 -
 6
6 -
 7
7 -
 8
8 -
 9
9 -
 10
10 -
11
-
12
-
13
-
14
 |
 |
