Asus Terminator C3 Terminator C3V User Manual - Page 29
Installing a hard disk drive
 |
View all Asus Terminator C3 manuals
Add to My Manuals
Save this manual to your list of manuals |
Page 29 highlights
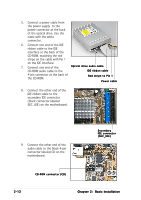
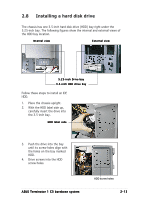
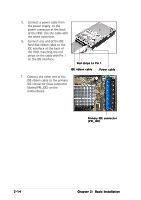
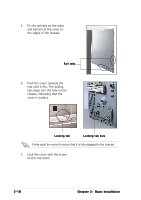
2.8 Installing a hard disk drive The chassis has one 3.5-inch hard disk drive (HDD) bay right under the 5.25-inch bay. The following figures show the internal and external views of the HDD bay location. Internal view External view 5.25-inch Drive bay 3.5-inch HDD drive bay Follow these steps to install an IDE HDD. 1. Place the chassis upright. 2. With the HDD label side up, carefully insert the drive into the 3.5-inch bay. HDD label side 3. Push the drive into the bay until its screw holes align with the holes on the bay marked HDD. 4. Drive screws into the HDD screw holes. ASUS Terminator 1 C3 barebone system HDD screw holes 2-13
-
 1
1 -
2
-
3
-
4
-
5
-
6
-
7
-
8
-
9
-
10
-
11
-
12
-
13
-
14
-
15
-
16
-
17
-
18
-
19
-
20
-
21
-
22
-
23
-
 24
24 -
 25
25 -
 26
26 -
 27
27 -
 28
28 -
 29
29 -
 30
30 -
 31
31 -
 32
32 -
 33
33 -
 34
34 -
35
-
36
-
37
-
38
-
39
-
40
-
41
-
42
-
43
-
44
-
45
-
46
-
47
-
48
-
49
-
50
-
51
-
52
-
53
-
54
-
55
-
56
-
57
-
58
-
59
-
60
-
61
-
62
-
63
-
64
-
65
-
66
-
67
-
68
-
69
-
70
-
71
-
72
-
73
-
74
-
75
-
76
-
77
-
78
-
79
-
80
-
81
-
82
-
83
-
84
-
85
-
86
-
87
-
88
-
89
-
90
-
91
-
92
-
93
-
94
 |
 |

ASUS Terminator 1 C3 barebone system
ASUS Terminator 1 C3 barebone system
ASUS Terminator 1 C3 barebone system
ASUS Terminator 1 C3 barebone system
ASUS Terminator 1 C3 barebone system
2-13
2-13
2-13
2-13
2-13
2.8
Installing a hard disk drive
The chassis has one 3.5-inch hard disk drive (HDD) bay right under the
5.25-inch bay. The following figures show the internal and external views of
the HDD bay location.
5.25-inch Drive bay
5.25-inch Drive bay
5.25-inch Drive bay
5.25-inch Drive bay
5.25-inch Drive bay
3.5-inch HDD drive bay
3.5-inch HDD drive bay
3.5-inch HDD drive bay
3.5-inch HDD drive bay
3.5-inch HDD drive bay
Internal view
Internal view
Internal view
Internal view
Internal view
External view
External view
External view
External view
External view
Follow these steps to install an IDE
HDD.
1.
Place the chassis upright.
2.
With the HDD label side up,
carefully insert the drive into
the 3.5-inch bay.
HDD label side
HDD label side
HDD label side
HDD label side
HDD label side
3.
Push the drive into the bay
until its screw holes align with
the holes on the bay marked
HDD.
4.
Drive screws into the HDD
screw holes.
HDD screw holes