Asus USB3.0_HZ-1 DOCKING-STATION Multiple languages Manual: - Page 13
Docking station's functions - usb 3 0 docking station us
 |
View all Asus USB3.0_HZ-1 DOCKING-STATION manuals
Add to My Manuals
Save this manual to your list of manuals |
Page 13 highlights
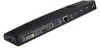
English HZ-1 USB 3.0 Docking Station User Guide Docking station's functions Menu Function DisplayLink Manager Click to open and manage your displays using the Windows utility. Check for updates Click to check and download the latest driver version from the update server. ASUSTEK USB Docking Station Click to view and use a list of submenus to enhance the settings of your docking station: • Screen Resolution: Click to select the screen resolution. You can set the screen resolution only for the main monitor. • Screen Rotation: Click to select the rotation setting for the extended monitor. • Extend to: Click to extend your Windows desktop to your extended monitors depending on their positions: Left, Right, Up, or Down. • Extend: Click to extend your Windows desktop to the extended monitor. • Set as Main Monitor: Click to set the screen as the main display • Notebook Monitor Off: Click to switch off the notebook's display and makes the extended monitor as the main display. This option only appears when one extended monitor is connected to your docking station. This option will only appear in laptop computers. • Mirror: Click to reproduce an exact replica of your main display to your extended monitor. The main display's resolution is the same as the extended monitor's resolution. • Off: Switches off the display • Optimize for Video: Select this option to enable a better movie playback performance. Only select this option when playing the video content. Texts may appear less clear when enabled. • Fit to TV: Click to adjust the size of the desktop on the connected TV screen. • This option only works in extended mode. • This option is not designed to work on multiple screens. • Fit to TV does not support rotated modes. Audio Setup Video Setup Click to open the Windows Audio Configuration window. Click to open the Windows Screen Resolution window. 13
-
 1
1 -
2
-
3
-
4
-
5
-
6
-
7
-
 8
8 -
 9
9 -
 10
10 -
 11
11 -
 12
12 -
 13
13 -
 14
14 -
 15
15 -
 16
16 -
 17
17 -
 18
18 -
19
-
20
-
21
-
22
-
23
-
24
-
25
-
26
-
27
-
28
-
29
-
30
-
31
-
32
-
33
-
34
-
35
-
36
-
37
-
38
-
39
-
40
-
41
-
42
-
43
-
44
-
45
-
46
-
47
-
48
-
49
-
50
-
51
-
52
-
53
-
54
-
55
-
56
-
57
-
58
-
59
-
60
-
61
-
62
-
63
-
64
-
65
-
66
-
67
-
68
-
69
-
70
-
71
-
72
-
73
-
74
-
75
-
76
-
77
-
78
-
79
-
80
-
81
-
82
-
83
-
84
-
85
-
86
-
87
-
88
-
89
-
90
-
91
-
92
-
93
-
94
-
95
-
96
-
97
-
98
-
99
-
100
-
101
-
102
-
103
-
104
-
105
-
106
-
107
-
108
-
109
-
110
-
111
-
112
-
113
-
114
-
115
-
116
-
117
-
118
-
119
-
120
-
121
-
122
-
123
-
124
-
125
-
126
-
127
-
128
-
129
-
130
-
131
-
132
-
133
-
134
-
135
-
136
-
137
-
138
-
139
-
140
-
141
-
142
-
143
-
144
-
145
-
146
-
147
-
148
-
149
-
150
-
151
-
152
-
153
-
154
-
155
-
156
-
157
-
158
-
159
-
160
-
161
-
162
-
163
-
164
-
165
-
166
-
167
-
168
-
169
-
170
-
171
-
172
-
173
-
174
-
175
-
176
-
177
-
178
-
179
-
180
-
181
-
182
-
183
-
184
-
185
-
186
-
187
-
188
-
189
-
190
-
191
-
192
-
193
 |
 |
