Asus V3-M2V890 V3-M2V890 Quick Start Guide for English Edtion
Asus V3-M2V890 Manual
 |
View all Asus V3-M2V890 manuals
Add to My Manuals
Save this manual to your list of manuals |
Asus V3-M2V890 manual content summary:
- Asus V3-M2V890 | V3-M2V890 Quick Start Guide for English Edtion - Page 1
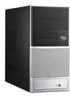
Q2748 V-Series M2V890 ASUS PC (Desktop Barebone) Quick Installation Guide - Asus V3-M2V890 | V3-M2V890 Quick Start Guide for English Edtion - Page 2
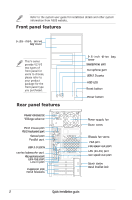
Refer to the system user guide for installation details and other system information from ASUS website. Front panel features 5.25-inch drive bay cover This V-series provide V2/V3 two types of front panel for users port rear speak out port Cover screw Metal bracket lock 2 Quick installation guide - Asus V3-M2V890 | V3-M2V890 Quick Start Guide for English Edtion - Page 3
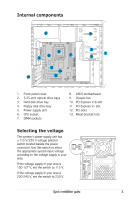
3. Hard disk drive bay 4. Floppy disk drive bay 5. Power supply unit 6. CPU socket 7. DIMM sockets 8. ASUS motherboard 9. Chassis fan 10. PCI Express x16 slot 11. PCI Express x1 slot 12. PCI slots 13. Metal bracket area is 200-240 V, set the switch to 230 V. eSATA Quick installation guide 3 - Asus V3-M2V890 | V3-M2V890 Quick Start Guide for English Edtion - Page 4
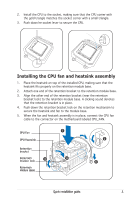
. 4 3 Air duct 1 4 2 3 1 4 2 Chassis tab holes Installing a CPU To install a CPU: 1. Locate the CPU socket,then lift the socket lever to a 90º100º angel. 3 4 4 Quick installation guide - Asus V3-M2V890 | V3-M2V890 Quick Start Guide for English Edtion - Page 5
and fan to the module base. 5. When the fan and heatsink assembly is in place, connect the CPU fan cable to the connector on the motherboard labeled CPU_FAN. CPU Fan CPU Heatsink Retention bracket Retention bracket lock 3 Retention Module Base 1 4 2 5 Quick installation - Asus V3-M2V890 | V3-M2V890 Quick Start Guide for English Edtion - Page 6
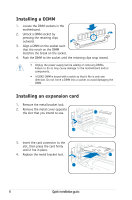
. • Unplug the power supply before adding or removing DIMMs. Failure to do so may cause damage to the motherboard and/or components. • A DDR2 DIMM is keyed with a notch so that it fits in only one direction until it fits in place. 4. Replace the metal bracket lock. 3 4 6 Quick installation guide - Asus V3-M2V890 | V3-M2V890 Quick Start Guide for English Edtion - Page 7
screw holes align with the holes on the bay. 3. Secure the hard disk drive with two screws on both sides of the bay. Quick installation guide 2 3 B A 3 2 B A 3 2 7 - Asus V3-M2V890 | V3-M2V890 Quick Start Guide for English Edtion - Page 8
release the bay cover. 3. Push the bay cover inward, then set it aside. 4. Follow the same instructions to remove the 3.5" drive bay cover. To reinstall the front panel assembly and side cover: 1. Insert earlier. 2 1 5 Air duct 4 2 1 5 3 Chassis tab holes 1 2 2 8 Quick installation guide
-
 1
1 -
 2
2 -
 3
3 -
 4
4 -
 5
5 -
 6
6 -
 7
7 -
8
 |
 |

V-Series M2V890
ASUS PC (Desktop Barebone)
Quick Installation Guide
Q
2748