Audiovox CMOLF User Guide - Page 5
View angle adjustment - camera
 |
UPC - 044476043420
View all Audiovox CMOLF manuals
Add to My Manuals
Save this manual to your list of manuals |
Page 5 highlights
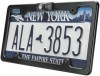
5. Connect the Camera cable to the extension cable (supplied). Route the extension cable up to the intended monitor. Connect as follows: a. Black wire- connect to chassis ground b. Red wire- connect to 12V accessory wire c. Yellow RCA- connect to Video input d. Red RCA- connect to audio input (if equipped) 6. Disregard step 5 if connecting to Audiovox 4-pin camera cable. View angle adjustment: This camera frame is designed for universal application. The angle of the image of the installed frame might have to be adjusted depending on the license plate mounting angle. There is a 10-degree angle adjustment wedge supplied to change the downward angle from 40 degrees to either 30 or 50 degrees. The angle wedge goes between the camera frame and camera body. Longer camera mounting screws are provided for use with the angle wedge 1. Turn on monitor and look at back up camera image. You should be able to see a small portion of the vehicles bumper. 2. If you see too much bumper, the downward angle must be decreased. Place the thin edge of the wedge on top between the camera and frame. 3. If you cannot see the bumper at all, the downward angle must be increased. Place the thin edge of the wedge on the bottom between the camera and frame. 5 128-8104 5 of 8
-
 1
1 -
 2
2 -
 3
3 -
 4
4 -
 5
5 -
 6
6 -
 7
7 -
 8
8
 |
 |
