Behringer EPA40 Manual - Page 4
Introduction, Control Elements and Connections - not charging
 |
View all Behringer EPA40 manuals
Add to My Manuals
Save this manual to your list of manuals |
Page 4 highlights
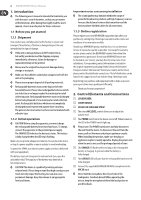
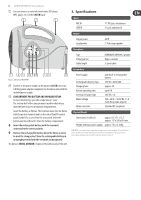
4 EUROPORT EPA40 User Manual 1. Introduction ◊ The following user's manual is intended to familiarize you with the unit's control elements, so that you can master all the functions. After having thoroughly read the user's manual, store it in a safe place for future reference. 1.1 Before you get started 1.1.1 Shipment Your product was carefully packed at the factory to ensure safe transport. Nevertheless, if the box is damaged inspect the unit immediately for signs of damage. ◊ If the unit is damaged please do NOT return it to us, but notify your dealer and the shipping company immediately; otherwise, claims for damage or replacement may not be granted. ◊ Always use the original box to prevent damage during storage or transport. ◊ Make sure that children cannot play unsupervised with the unit or its packaging. ◊ Please ensure proper disposal of all packing materials. ◊ Rechargeable batteries must not be disposed of with household waste. Please take rechargeable batteries which are defective or no longer needed to a municipal or retail collection point. Rechargeable batteries must be discharged before being disposed of at a municipal or retail collection point. Rechargeable batteries which are not completely discharged must be protected against short-circuiting. The poles or electrical contact surfaces can be insulated with adhesive tape. 1.1.2 Initial operation ◊ CAUTION! Before using the apparatus, you must charge the rechargeable battery for at least four hours. To charge, connect the apparatus to the provided power supply. The CHARGE LED indicates the battery's status. The battery is fully charged when the LED stops flashing. Make sure you provide adequate ventilation. Do not place the device on top of a power amplifier or near a radiator to avoid overheating. To power the EPA40, use only the power supply unit that is delivered with your equipment. The battery must not be exposed to extreme heat (sun, open fire and similar risks)! The capacity of the battery may diminish at low temperatures. ◊ CAUTION! The device is capable of producing extreme volume levels. Please keep in mind that high sound pressure levels not only impair the hearing, but can also cause permanent damage. Keep the volume at an appropriate level at all times. Important notes concerning installation ◊ The sound quality may diminish within the range of powerful broadcasting stations and high-frequency sources. Increase the distance between the transmitter and the device and use shielded cables for all connections. 1.1.3 Online registration Please register your new BEHRINGER equipment right after your purchase by visiting http://behringer.com and read the terms and conditions of our warranty carefully. Should your BEHRINGER product malfunction, it is our intention to have it repaired as quickly as possible. To arrange for warranty service, please contact the BEHRINGER retailer from whom the equipment was purchased. Should your BEHRINGER dealer not be located in your vicinity, you may directly contact one of our subsidiaries. Corresponding contact information is included in the original equipment packaging (Global Contact Information/ European Contact Information). Should your country not be listed, please contact the distributor nearest you. A list of distributors can be found in the support area of our website (http://behringer.com). Registering your purchase and equipment with us helps us process your repair claims more quickly and efficiently. Thank you for your cooperation! 2. Control Elements and Connections (1) LOUDSPEAKER. (2) CARRY HANDLE. (3) HOLES FOR SHOULDER STRAP. (4) The rotary MIC LEVEL control allows you to adjust the volume level. (5) The POWER switch turns the device on and off. When turned on, the LED of the POWER switch lights up. ◊ Please note: The POWER switch does not fully disconnect the unit from the mains. To disconnect the unit from the mains, pull out the main cord plug or appliance coupler. When installing the product, make sure the plug or appliance coupler is readily operable. Unplug the power cord when the unit is not used for prolonged periods of time. (6) The CHARGE LED flashes yellow as long as the rechargeable battery is charging. It goes out when the battery is fully charged. (7) The LOW BAT LED indicates that the rechargeable battery needs to be charged. (8) Connect the supplied BEHRINGER XM1800S microphone to the MIC IN input. ◊ Never hold the microphone directly in front of the loudspeaker. Feedback hazard! When operating the device, keep the microphone behind the loudspeaker to avoid feedback.
-
 1
1 -
 2
2 -
 3
3 -
 4
4 -
 5
5 -
 6
6
 |
 |
