Behringer GTX30 Manual - Page 5
Introduction, Control Elements - amp
 |
View all Behringer GTX30 manuals
Add to My Manuals
Save this manual to your list of manuals |
Page 5 highlights
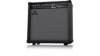
5 GUITAR AMPLIFIER GTX60/GTX30 User Manual 1. Introduction The demands placed on a guitar amp are nowadays very broad. A guitarist should offer a wide array of sounds. That's why it is very important to us to be able to offer you maximum sound diversity as well as a variety of connection possibilities with your GUITAR COMBO. Don't worry, you will quickly master the GUITAR COMBO and learn how to use all its capabilities easily and intuitively. With its up-to-date circuitry, the GUITAR COMBO features the functionality and reliability of a truly modern guitar amp. VTC Virtual Tube Circuitry The specially developed VTC Virtual Tube Circuitry gives your sound the unique vintage flavor of classic tube amps. 1.1 Before you get started Your product was carefully packed at the factory to ensure safe transport. Nevertheless, if the box is damaged inspect the unit immediately for signs of damage. ◊ If the unit is damaged, please do NOT return it to us, but notify your dealer and the shipping company immediately, otherwise claims for damage or replacement may not be granted. ◊ Always use the original box to prevent damage during storage or transport. ◊ Make sure that children cannot play unsupervised with the unit or its packaging. ◊ Please ensure proper disposal of all packaging materials. Recycle whenever possible. Ensure adequate air supply. To avoid overheating, do not place the unit near radiators, etc. ◊ Please make sure that all devices are properly grounded/earthed. For your own safety, never remove or disable the ground/earth conductors from the devices or on the power cords. The unit must always be connected to the mains outlet with a protective grounding connection. 1.1.1 Online registration Please register your new BEHRINGER equipment right after your purchase by visiting http://behringer.com and read the terms and conditions of our warranty carefully. Should your BEHRINGER product malfunction, it is our intention to have it repaired as quickly as possible. To arrange for warranty service, please contact the BEHRINGER retailer from whom the equipment was purchased. Should your BEHRINGER dealer not be located in your vicinity, you may directly contact one of our subsidiaries. Corresponding contact information is included in the original equipment packaging (Global Contact Information/European Contact Information). Should your country not be listed, please contact the distributor nearest you. A list of distributors can be found in the support area of our website (http://behringer.com). Registering your purchase and equipment with us helps us process your repair claims more quickly and efficiently. Thank you for your cooperation! ◊ The sound quality may diminish within the range of powerful broadcasting stations and high-frequency sources. Increase the distance between the transmitter and the unit, and use shielded cables for all connections. ◊ We would like to draw your attention to the fact that extremely loud sound levels may damage your hearing as well as your headphones. Turn all VOLUME controls fully to the left before you switch on the unit. Make sure you select a suitable volume at all times. 2. Control Elements (2) (7) (13) (22) (1) (3) (4) (5) (6) (8) (9) (10) (11) (12) (14) (15) (16) (17) (18) (19) (21) (20) Fig. 2.1: GUITAR COMBO control elements (front panel) 2.1 Front panel (1) The INPUT socket is the 1/4" connector for your guitar. Please use a standard 1/4" TS connector. 2.1.1 CLEAN channel (2) The CLEAN CHANNEL LED lights up when the channel is active. (3) The VOLUME control determines the volume of the CLEAN channel. (4) The BASS control in the EQ section boosts or cuts the bass frequencies on the CLEAN channel (GTX60 only). (5) The TREBLE control adjusts the treble frequencies on the CLEAN channel (GTX60 only). (6) Press the CHANNEL button to switch between the CLEAN and OVERDRIVE channels. The channel LED lights up when the channel is activated. You can also switch between channels using the footswitch sold with all models.
-
 1
1 -
 2
2 -
 3
3 -
 4
4 -
 5
5 -
 6
6 -
 7
7 -
 8
8 -
 9
9 -
 10
10
 |
 |
